setContentView流程分两种情况,一种是继承自Activity的情况,另一种是继承自AppCompatActivity的情况,下面分别介绍。
先说继承自Activity的情况,源码为android-30
public class Activity extends ContextThemeWrapper {

    public void setContentView(@LayoutRes int layoutResID) {
        getWindow().setContentView(layoutResID);
        initWindowDecorActionBar();
    }
其中getWindow()返回的是在Activity中定义的Window对象,而Window是一个抽象类,setContentView又是抽象方法,所以必须找到Window的实现类
/**
 * The only existing implementation of this abstract class is
 * android.view.PhoneWindow, which you should instantiate when needing a
 * Window.
 */
public abstract class Window {
通过Window类的介绍可以看到,Window只有一个实现类:PhoneWindow,另外通过模拟机调试android-30的源码也可以定位到Window的实现类是 PhoneWindow,看下具体实现
public class PhoneWindow extends Window implements MenuBuilder.Callback {

    @Override
    public void setContentView(int layoutResID) {
        if (mContentParent == null) {
            installDecor();
        } else if (!hasFeature(FEATURE_CONTENT_TRANSITIONS)) {
            mContentParent.removeAllViews();
        }

        if (hasFeature(FEATURE_CONTENT_TRANSITIONS)) {
           ...
        } else {
            mLayoutInflater.inflate(layoutResID, mContentParent);
        }
        ...
        mContentParentExplicitlySet = true;
}可以看到我们平时写在Activity中的布局被加载到了mContentParent中,那么mContentParent又是哪里创建的,接下来会提到,核心流程主要是看 installDecor()
private void installDecor() {
        mForceDecorInstall = false;
        if (mDecor == null) {
            mDecor = generateDecor(-1);
            mDecor.setDescendantFocusability(ViewGroup.FOCUS_AFTER_DESCENDANTS);
            ......
        } else {
            mDecor.setWindow(this);
        }
        if (mContentParent == null) {
            mContentParent = generateLayout(mDecor);
            ......
        }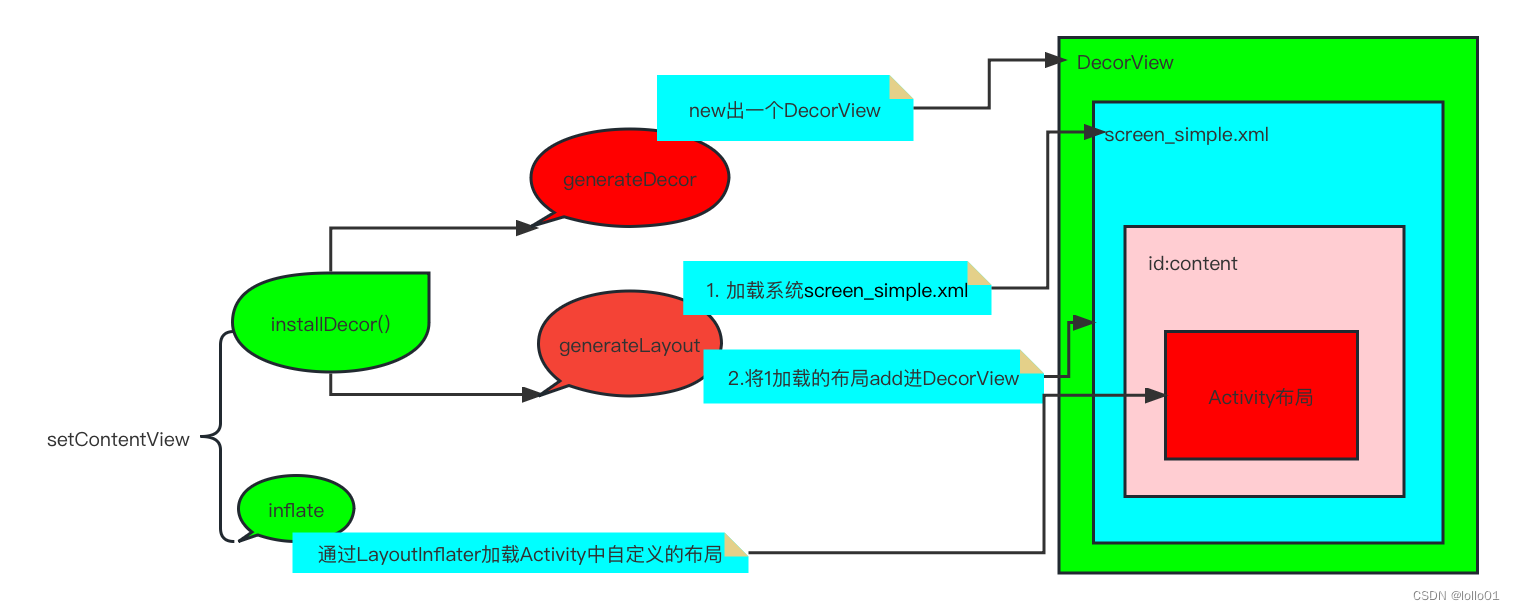
}通过上面的代码可以看到,setContentView的主要核心流程:
1. 创建生成顶层View DecorView
2. 以DecorView为父容器,解析并生成xml布局
其中 generateDecor()的流程比较简单,直接new了一个DecorView并返回,下面看geraterLayout()方法的流程,可以看到generateLayout()方法生成的布局就是mContentParent
注意其传参为上面创建的DecorView
protected ViewGroup generateLayout(DecorView decor) {

        TypedArray a = getWindowStyle();
        ......
        int layoutResource;
        int features = getLocalFeatures();
        // System.out.println("Features: 0x" + Integer.toHexString(features));
        if ((features & ((1 << FEATURE_LEFT_ICON) | (1 << FEATURE_RIGHT_ICON))) != 0) {
            ......
        } else if {
            ......
        } else if ((features & (1 << FEATURE_ACTION_MODE_OVERLAY)) != 0) {
            layoutResource = R.layout.screen_simple_overlay_action_mode;
        } else {
            // Embedded, so no decoration is needed.
            layoutResource = R.layout.screen_simple;
        }
        ......
        mDecor.onResourcesLoaded(mLayoutInflater, layoutResource);
        ViewGroup contentParent = (ViewGroup)findViewById(ID_ANDROID_CONTENT);
        ......
        return contentParent;

}
这里会根据不同的feature选择不同的系统xml布局,我们就以最简单的情况为例,也就是最后一种情况,来看下系统布局 screen_simple.xml
<LinearLayout xmlns:android="http://schemas.android.com/apk/res/android"
android:layout_width="match_parent"
android:layout_height="match_parent"
android:fitsSystemWindows="true"
android:orientation="vertical">
<ViewStub android:id="@+id/action_mode_bar_stub"
android:inflatedId="@+id/action_mode_bar"
android:layout="@layout/action_mode_bar"
android:layout_width="match_parent"
android:layout_height="wrap_content"
android:theme="?attr/actionBarTheme" />
<FrameLayout
android:id="@android:id/content"
android:layout_width="match_parent"
android:layout_height="match_parent"
android:foregroundInsidePadding="false"
android:foregroundGravity="fill_horizontal|top"
android:foreground="?android:attr/windowContentOverlay" />
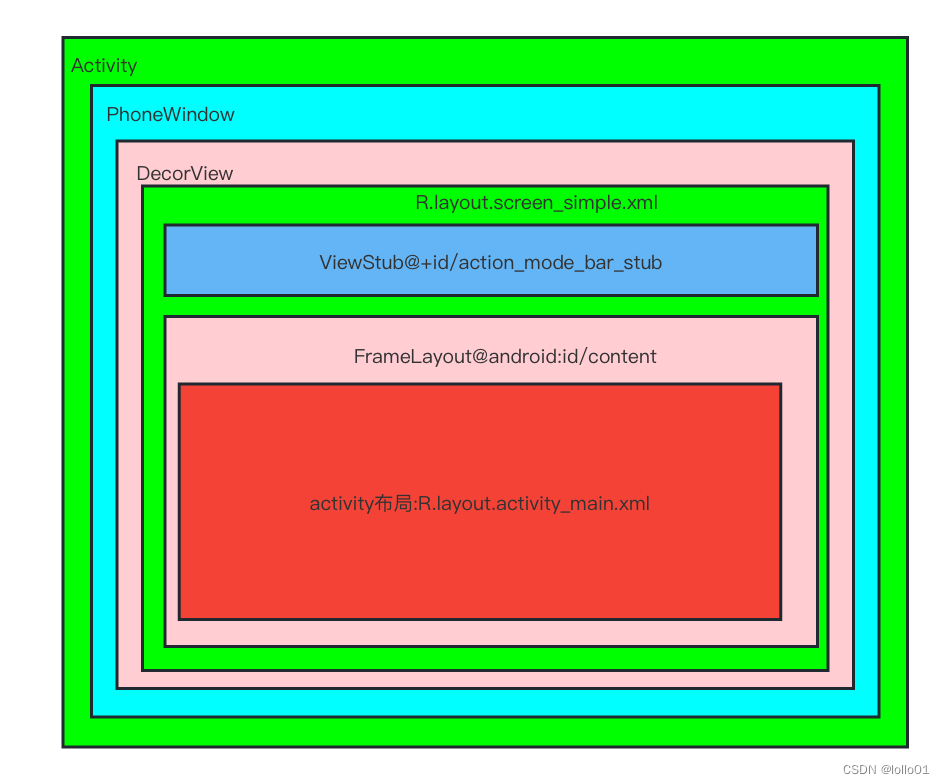
</LinearLayout>会通过DecorView的 onResourcesLoaded()方法加载上面的布局,注意:其中FrameLayout的id
void onResourcesLoaded(LayoutInflater inflater, int layoutResource) {
        ......
        mDecorCaptionView = createDecorCaptionView(inflater);
        final View root = inflater.inflate(layoutResource, null);
        if (mDecorCaptionView != null) {
            ......
        } else {
            // Put it below the color views.
            addView(root, 0, new ViewGroup.LayoutParams(MATCH_PARENT, MATCH_PARENT));
        }
        mContentRoot = (ViewGroup) root;
        initializeElevation();
    }
同样是使用LayoutInflater解析加载布局,最后通过addView()将解析后的布局添加到DecorView
下面通过一个流程图来对以上流程做一个总结
附图:继承自Activity的布局层级图