视频地址
学习文档
文章目录
- 一、示意代码
- 二、装饰器
- 三、经典案例—MyBatis二级缓存
- 1、Cache 标准定义
- 2、PerpetualCache 基础实现
- 3、增强实现
- 3-1、ScheduledCache
- 3-2、LruCache
先来说说我对装饰器理解:当你有一个基础功能的代码,但你想在不改变原来代码的基础上进行功能增强,并且可以随意组合增强的时候,就可以使用装饰器模式。
我把装饰器模式理解成是一种套娃模式,所谓套娃就是一层套一层,随意组合想怎么套就怎么套,层层嵌套的基础是有一个最初的原型。
一、示意代码
对于个人而言,首先是一个人,其次可以有不同的身份,各种身份可以随意组合。这就可以看成一个装饰器模式的案例。
// 定义接口
interface Human {
    String identity();
}

// 基础实现
class OrdinaryHuman implements Human {
    @Override
    public String identity() {
        return "我是一个人";
    }
}


// 增强实现
class Teacher implements Human {
    protected Human human;

    public teacher(Human human) {
        this.human = human;
    }

    @Override
    public String identity() {
        human.identity();
        return "我是一名老师";
    }
}

// 增强实现
class Father implements Human {
    protected Human human;

    public father(Human human) {
        this.human = human;
    }

    @Override
    public String identity() {
        human.identity();
        return "我是一名父亲";
    }
}
public static void main(String[] args) {
    OrdinaryHuman ordinaryHuman = new OrdinaryHuman();
    Teacher teacher = new Teacher(ordinaryHuman);
    Father father = new Father(teacher);

    father.identity();
}
输出
我是一个人
我是一名老师
我是一名父亲
二、装饰器
GPT的解释
装饰器模式是一种能够在不改变原对象代码的情况下,动态地为对象添加新功能的设计模式。通过将对象包装在装饰器类中,可以透明地、在运行时选择性地、以任意顺序地应用这些功能。最终效果是通过组合不同的装饰器,扩展原对象功能,使系统更灵活可扩展。
想要实现一个装饰器,如下三步:
- 要有一个标准定义(Human)
- 要有一个基础的实现(OrdinaryHuman)
- 每个增强的的实现除了实现标准定义重写对应的方法之外,还要提供一个特殊的构造方法,参数就是接口的某个实现类(基于这个特殊的构造方法,就可以随意组合了)
三、经典案例—MyBatis二级缓存
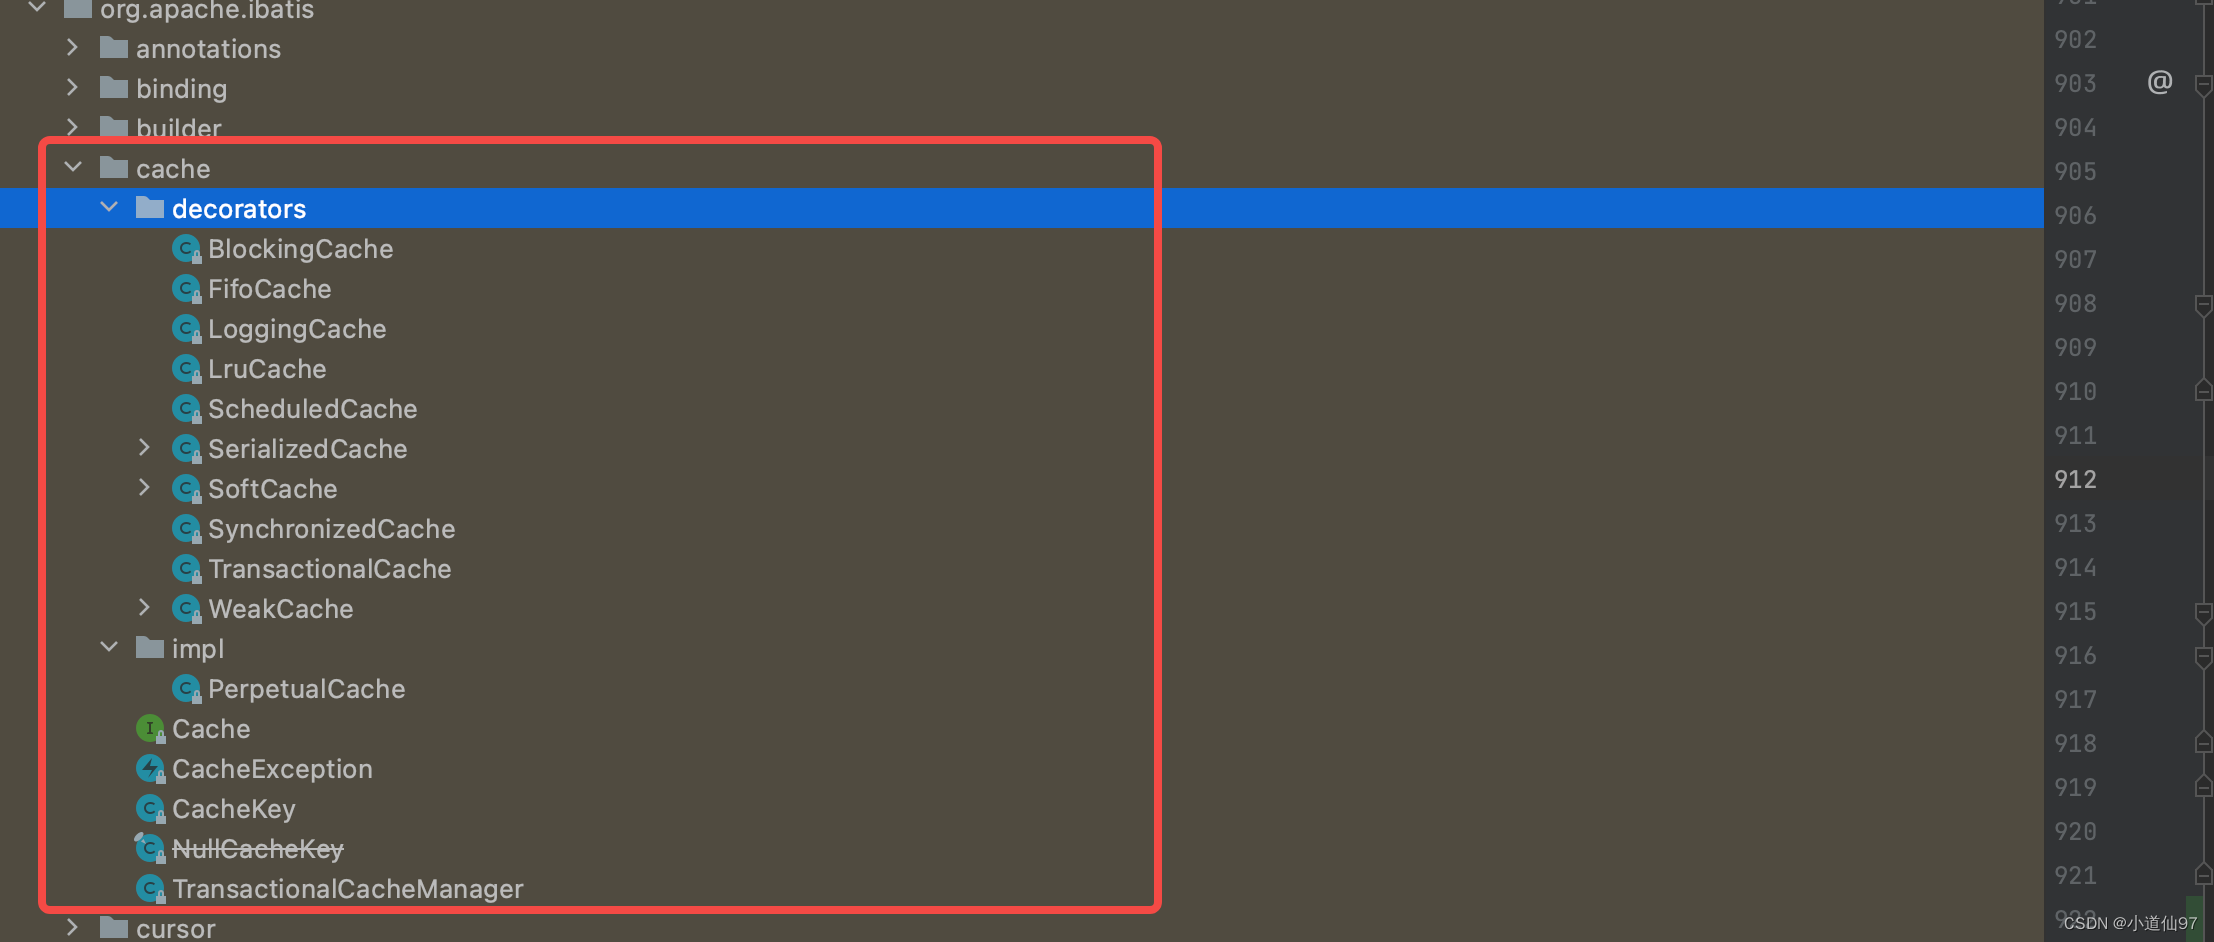
- Cache 标准定义
- PerpetualCache 基础实现
- decorators 包下面的就是各种增强实现
注:在现在分布式系统的大环境下,MyBatis的二级缓存几乎没有用武之地,但它确实理解装饰器模式的一个好案例,它的代码很简单,所以格外的好理解
1、Cache 标准定义
cache里面定义了缓存的一些操作
public interface Cache {
    String getId();

    void putObject(Object var1, Object var2);

    Object getObject(Object var1);

    Object removeObject(Object var1);

    void clear();

    int getSize();

    default ReadWriteLock getReadWriteLock() {
        return null;
    }
}
2、PerpetualCache 基础实现
PerpetualCache 的实现也很简单,就是一个 HashMap,Value就是缓存的数据,Key 是自定义的 CacheKey
public class PerpetualCache implements Cache {
    private final String id;
    private Map<Object, Object> cache = new HashMap();

    public PerpetualCache(String id) {
        this.id = id;
    }

    public String getId() {
        return this.id;
    }

    public int getSize() {
        return this.cache.size();
    }

    public void putObject(Object key, Object value) {
        this.cache.put(key, value);
    }

    public Object getObject(Object key) {
        return this.cache.get(key);
    }

    public Object removeObject(Object key) {
        return this.cache.remove(key);
    }

    public void clear() {
        this.cache.clear();
    }

    public boolean equals(Object o) {
        if (this.getId() == null) {
            throw new CacheException("Cache instances require an ID.");
        } else if (this == o) {
            return true;
        } else if (!(o instanceof Cache)) {
            return false;
        } else {
            Cache otherCache = (Cache)o;
            return this.getId().equals(otherCache.getId());
        }
    }

    public int hashCode() {
        if (this.getId() == null) {
            throw new CacheException("Cache instances require an ID.");
        } else {
            return this.getId().hashCode();
        }
    }
}
CacheKey 并不是装饰器的里面内容,但它的设计挺有意思的,简单来说就是:把当前这次操作的标识,比如 接口全限定名、请求参数、执行器信息 存入 List里面, 基于这些信息去生成唯一的 HashCode
public class CacheKey implements Cloneable, Serializable {
    private static final long serialVersionUID = 1146682552656046210L;
    public static final CacheKey NULL_CACHE_KEY = new CacheKey() {
        public void update(Object object) {
            throw new CacheException("Not allowed to update a null cache key instance.");
        }

        public void updateAll(Object[] objects) {
            throw new CacheException("Not allowed to update a null cache key instance.");
        }
    };
    private static final int DEFAULT_MULTIPLIER = 37;
    private static final int DEFAULT_HASHCODE = 17;
    private final int multiplier;
    private int hashcode;
    private long checksum;
    private int count;
    private List<Object> updateList;

    public CacheKey() {
        this.hashcode = 17;
        this.multiplier = 37;
        this.count = 0;
        this.updateList = new ArrayList();
    }

    public CacheKey(Object[] objects) {
        this();
        this.updateAll(objects);
    }

    public int getUpdateCount() {
        return this.updateList.size();
    }

    public void update(Object object) {
        int baseHashCode = object == null ? 1 : ArrayUtil.hashCode(object);
        ++this.count;
        this.checksum += (long)baseHashCode;
        baseHashCode *= this.count;
        this.hashcode = this.multiplier * this.hashcode + baseHashCode;
        this.updateList.add(object);
    }

    public void updateAll(Object[] objects) {
        Object[] var2 = objects;
        int var3 = objects.length;

        for(int var4 = 0; var4 < var3; ++var4) {
            Object o = var2[var4];
            this.update(o);
        }

    }

    public boolean equals(Object object) {
        if (this == object) {
            return true;
        } else if (!(object instanceof CacheKey)) {
            return false;
        } else {
            CacheKey cacheKey = (CacheKey)object;
            if (this.hashcode != cacheKey.hashcode) {
                return false;
            } else if (this.checksum != cacheKey.checksum) {
                return false;
            } else if (this.count != cacheKey.count) {
                return false;
            } else {
                for(int i = 0; i < this.updateList.size(); ++i) {
                    Object thisObject = this.updateList.get(i);
                    Object thatObject = cacheKey.updateList.get(i);
                    if (!ArrayUtil.equals(thisObject, thatObject)) {
                        return false;
                    }
                }

                return true;
            }
        }
    }

    public int hashCode() {
        return this.hashcode;
    }

    public String toString() {
        StringJoiner returnValue = new StringJoiner(":");
        returnValue.add(String.valueOf(this.hashcode));
        returnValue.add(String.valueOf(this.checksum));
        Stream var10000 = this.updateList.stream().map(ArrayUtil::toString);
        Objects.requireNonNull(returnValue);
        var10000.forEach(returnValue::add);
        return returnValue.toString();
    }

    public CacheKey clone() throws CloneNotSupportedException {
        CacheKey clonedCacheKey = (CacheKey)super.clone();
        clonedCacheKey.updateList = new ArrayList(this.updateList);
        return clonedCacheKey;
    }
}
3、增强实现
它这个里面的增强实现挺多的,着重看两个有意思的 ScheduledCache、LruCache
3-1、ScheduledCache
ScheduledCache 是一个支持定时清除缓存数据,可以通过 setClearInterval 方法设置清除时间缓存间隔,单位毫秒。
public void setClearInterval(long clearInterval) {
    this.clearInterval = clearInterval;
}
清除缓存的原理并没有很复杂,它的代码超级简单, this.lastClear 是上一次清除的时间,只需要在操作缓存的之前先调用下面的代码即可。
private boolean clearWhenStale() {
    if (System.currentTimeMillis() - this.lastClear > this.clearInterval) {
        this.clear();
        return true;
    } else {
        return false;
    }
}
全部代码如下:
public class ScheduledCache implements Cache {
    private final Cache delegate;
    protected long clearInterval;
    protected long lastClear;

    public ScheduledCache(Cache delegate) {
        this.delegate = delegate;
        this.clearInterval = TimeUnit.HOURS.toMillis(1L);
        this.lastClear = System.currentTimeMillis();
    }

    public void setClearInterval(long clearInterval) {
        this.clearInterval = clearInterval;
    }

    public String getId() {
        return this.delegate.getId();
    }

    public int getSize() {
        this.clearWhenStale();
        return this.delegate.getSize();
    }

    public void putObject(Object key, Object object) {
        this.clearWhenStale();
        this.delegate.putObject(key, object);
    }

    public Object getObject(Object key) {
        return this.clearWhenStale() ? null : this.delegate.getObject(key);
    }

    public Object removeObject(Object key) {
        this.clearWhenStale();
        return this.delegate.removeObject(key);
    }

    public void clear() {
        this.lastClear = System.currentTimeMillis();
        this.delegate.clear();
    }

    public int hashCode() {
        return this.delegate.hashCode();
    }

    public boolean equals(Object obj) {
        return this.delegate.equals(obj);
    }

    private boolean clearWhenStale() {
        if (System.currentTimeMillis() - this.lastClear > this.clearInterval) {
            this.clear();
            return true;
        } else {
            return false;
        }
    }
}
3-2、LruCache
GPT对LRU的解释
LRU(Least Recently Used)是一种缓存淘汰策略,用于管理缓存中的数据项。该策略的基本思想是,当缓存达到容量上限时,选择最近最少被使用的数据项进行淘汰。
LruCache 的代码很少,来一起看看它是如何实现LUR的
- eldestKey 最少被使用的一个数据,当超过容量的时候就删除它
- 每次添加元素的时候都可能超容,通过 cycleKeyList 方法判断是否需要删除数据
- LinkedHashMap 提供了一个删除最后一个元素的接口 removeEldestEntry ,通过它来删除最后一个元素
public class LruCache implements Cache {
    private final Cache delegate;
    private Map<Object, Object> keyMap;
    private Object eldestKey;

    public LruCache(Cache delegate) {
        this.delegate = delegate;
        this.setSize(1024);
    }

    public String getId() {
        return this.delegate.getId();
    }

    public int getSize() {
        return this.delegate.getSize();
    }

    public void setSize(final int size) {
        this.keyMap = new LinkedHashMap<Object, Object>(size, 0.75F, true) {
            private static final long serialVersionUID = 4267176411845948333L;

            // eldest 就是链表中最后一个元素
            // 当容量大小超过的时候就让 LruCache.this.eldestKey = eldest.getKey();
            protected boolean removeEldestEntry(Entry<Object, Object> eldest) {
                boolean tooBig = this.size() > size;
                if (tooBig) {
                    LruCache.this.eldestKey = eldest.getKey();
                }

                return tooBig;
            }
        };
    }

    public void putObject(Object key, Object value) {
        this.delegate.putObject(key, value);
        this.cycleKeyList(key);
    }

    public Object getObject(Object key) {
        this.keyMap.get(key);
        return this.delegate.getObject(key);
    }

    public Object removeObject(Object key) {
        return this.delegate.removeObject(key);
    }

    public void clear() {
        this.delegate.clear();
        this.keyMap.clear();
    }

    private void cycleKeyList(Object key) {
        this.keyMap.put(key, key);
        // 如果当前要删除的元素不为空,就删除这个元素
        if (this.eldestKey != null) {
            this.delegate.removeObject(this.eldestKey);
            this.eldestKey = null;
        }

    }
}
基于上面的分析,只需要来看看 removeEldestEntry 方法是在什么时候调用的就好了,往LinkedHashMap添加元素的时候,调用的实际上是 HashMap 的 put方法
public V put(K key, V value) {
    return putVal(hash(key), key, value, false, true);
}
省去插入元素和扩容的代码,调用了 afterNodeInsertion方法 evict = true
final V putVal(int hash, K key, V value, boolean onlyIfAbsent,
               boolean evict) {

    // ....
    afterNodeInsertion(evict);
    return null;
}
LinkedHashMap中 afterNodeInsertion 实现,把链表头也是最开始的元素传递给 removeEldestEntry
void afterNodeInsertion(boolean evict) { // possibly remove eldest
    LinkedHashMap.Entry<K,V> first;
    if (evict && (first = head) != null && removeEldestEntry(first)) {
        K key = first.key;
        removeNode(hash(key), key, null, false, true);
    }
}