JDK8知识点梳理
- 一、lambda表达式
- 1.标准格式
- 2.实现原理
- 3.省略模式
- 4.前提条件
- 二、函数式接口
- 1.函数式接口:@FunctionalInterface
- 2.接口默认方法
- 3.接口静态方法
- 4.供给型接口:Supplier
- 5.消费型接口:Consumer
- 6.消费供给型接口:Function
- 7.判断型接口:Predicate
- 三、方法引用
- 1.对象名引用成员方法
- 2.类名引用静态方法
- 3.类名引用构造方法
- 四、stream流
- 1.stream流的两种方式:惰性求值、及早求值
- 2.forEach方法:及早求值
- 3.count方法:及早求值
- 4.filter方法:惰性求值
- 5.limit方法:惰性求值
- 6.skip方法:惰性求值
- 7.map,flatMap方法:惰性求值
- 8.sorted方法:惰性求值
- 9.distinct方法:惰性求值
- 10.match方法:及早求值
- 11.find方法:及早求值
- 12.max/min方法:及早求值
- 13.reduce方法:及早求值
- 14.map和reduce的组合使用:及早求值
- 15.mapToInt(long,double)方法:惰性求值
- 16.concat方法:惰性求值
- 17.collect方法
- 18.对流数据进行聚合计算
- 19.对流数据进行分组
- 20.对流数据进行分区
- 21.对流数据进行拼接
- 22.并行流
- 23.并行流的线程安全问题
- 五、Optional
- 1.静态方法:Optional.of()
- 2.静态方法:Optional.ofNullable()
- 3.静态方法:Optional.empty()
- 4.isPresent
- 5.ifPresent(Consumer<T> consumer)
- 6.filter(Predicate<? super T> predicate)
- 7.map(Function<? super T, ? extends U> mapper)
- 8.flatMap(Function<? super T, Optional<U>> mapper)
- 9.get()
- 10.orElse(T other)
- 11.orElseGet(Supplier<? extends T> other)
- 12.orElseThrow(Supplier<? extends X> exceptionSupplier)
- 13.注意事项
- 六、新的日期时间API
- 1.LocalDate:日期
- 2.LocalTime:时间
- 3.LocalDateTime:日期时间
- 4.日期的格式化与解析:DateTimeFormatter
- 5.Instant类
- 6.计算日期差值:Duration / Period
- 6.时间矫正
- 7.日期时区
- 七、并发编程与任务编排:CompletableFuture
- 1.1.开启异步任务:runAsync() 两个方法
- 1.2.开启异步任务:supplyAsync() 两个方法
- 2.1 获取任务结果:get() 两个方法
- 2.2 获取任务结果:getNow()
- 2.3 获取任务结果:join()
- 3.1 设置任务结果:complete()
- 3.2 设置任务结果:completeExceptionally()
- 4.1 多任务依赖执行:thenApply()、thenApplyAsync()
- 4.2 多任务依赖执行:thenAccept()、thenAcceptAsync()
- 4.3 多任务依赖执行:thenRun()、thenRunAsync
- 4.4 多任务依赖执行:whenComplete、whenCompleteAsync
- 4.5 多任务依赖执行:handle()、handleAsync()
- 5.1 双任务组合处理:thenCombine() 三个方法
- 5.2 双任务组合处理:thenAcceptBoth() 三个方法
- 5.3 双任务组合处理:runAfterBoth() 三个方法
- 5.4 双任务组合处理:applyToEither() 三个方法
- 5.5 双任务组合处理:acceptEither 三个方法
- 5.6 双任务组合处理:runAfterEither 三个方法
- 6.1 多任务组合处理:allOf()
- 6.2 多任务组合处理:anyOf()
一、lambda表达式
lambda可以说是带给了java在编码上巨大的变化。
1.标准格式
(包含参数类型的参数列表) -> {
}
这里的->是固定写法,大括号内部写业务逻辑,其实可以看成是一个省去了方法名和返回类型以及访问修饰符的方法。
(String str,Object obj) -> {
// 这里处理业务逻辑
}
代码很简单,带来的却是书写上巨大的变化,下面做一个线程代码传统方式与lamdba的书写对比。
感觉java的很多设计在偷学前端的设计,比如lambda表达式,这种在前端叫箭头函数,很早就有了,而他的使用vue里也是有的,vue中有插槽的概念,插槽是子组件进行定义使用,父组件真正去实现。其实和lambda很像。lambda也是定义使用的不实现,而是有调用方进行实现具体的逻辑。
/**
 1. @author pcc
 */
public class TestLambda {
    public static void main(String[] args) {
        TestLambda.testByLambda();
        TestLambda.testByNormal();
    }

    /**
     * 这是lambda写法
     */
    public static void testByLambda(){
        Runnable r = () -> System.out.println("Hello World");
        r.run();
    }

    /**
     * 这是普通写法
     */
    public static void testByNormal(){
        Runnable r = new Runnable() {
            @Override
            public void run() {
                System.out.println("Hello World");
            }
        };
        r.run();
    }
}
可以看到lambda写法很是简洁,但是若是刚使用时肯定会感觉写法陌生,不好理解,但新事物都是这样,只要你使用习惯就会发现他的好处。
2.实现原理
那lambda的实现原理是什么呢?需要先说下匿名内部类的实现原理(lambda的作用其实就是简化匿名内部类的书写,所以可以使用lambda书写的代码,使用匿名内部类写完全没有问题)。匿名内部类在编译时会自动生成一个实现接口的类,重写接口方法,程序真正执行时调用的就是这个系统帮我们生成的类。而lambda的原理其实和匿名内部类差不多。lambda表达式会在编译阶段生成一个私有的静态方法这个方法存放lambda表达式中的业务逻辑,然后在运行阶段生成一个内部类调用在编译阶段生成的私有的静态方法。这就是他的原理
3.省略模式
其实在第一个的例子中已经使用了省略模式,下面是省略的原则:
- 参数类型可省略,程序可以自动推导出,因为传参对应的接口确定,故参数类型可知
- 若程序只有一句,则return可省略,中括号也可以省略
代码参照第一块
4.前提条件
lambda虽然书写起来比较优雅但是使用也是有条件的:接口中只有一个抽象方法,方可使用lambda。
当只有一个抽象方法时,我们可以自动为该方法映射到lambda表达式上,当有多个抽象方法时,并补能自动确定使用哪个方法来进行映射,当然也可以根据返回类型和传参等来进一步推断,但是目前的java是不支持这么做的。
二、函数式接口
上面说了lambda的使用有一个条件必须是接口中只有一个抽象方法,其实这种接口就叫做函数式接口。
1.函数式接口:@FunctionalInterface
只包含一个抽象方法的接口是函数式接口,只要这一个条件,不过我们可以发现java原生的函数式接口都有一个注解:@FunctionalInterface
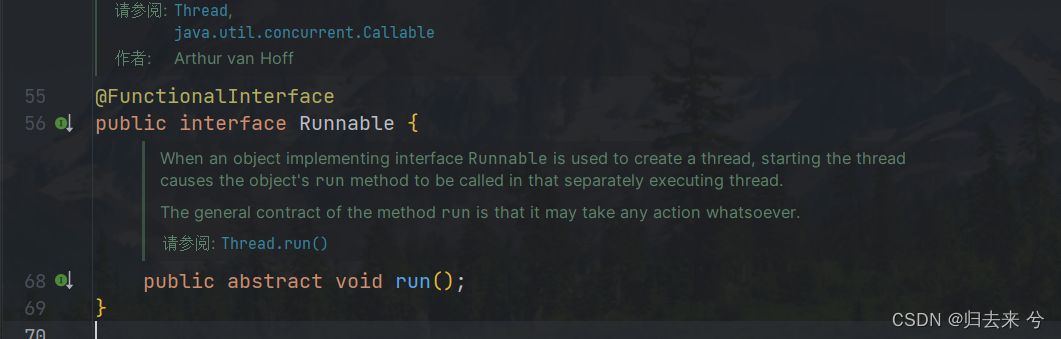
比如说上面的Runnable接口,规范中要求我们若是写函数式接口必须加上@FunctionalInterface,该注解可以帮助我们对代码进行检查,是否符合函数式接口的规范,如不符合会进行提示,如下,更有利于编码的规范和代码重构时对代码作用的推断:

2.接口默认方法
接口默认方法是JDK8新增的一个点。之前接口是只能有抽象方法的,而默认方法是可以有方法实现的,顾名思义就是为方法提供默认实现,但同时实现类也可以自定义新的实现。他的主要特点有:
- 1.使用default关键字
- 2.默认方法实现类可以有使用,而不去实现
- 3.实现类可以对默认方法进行重写,实现类若重写则调用的是重写后的方法
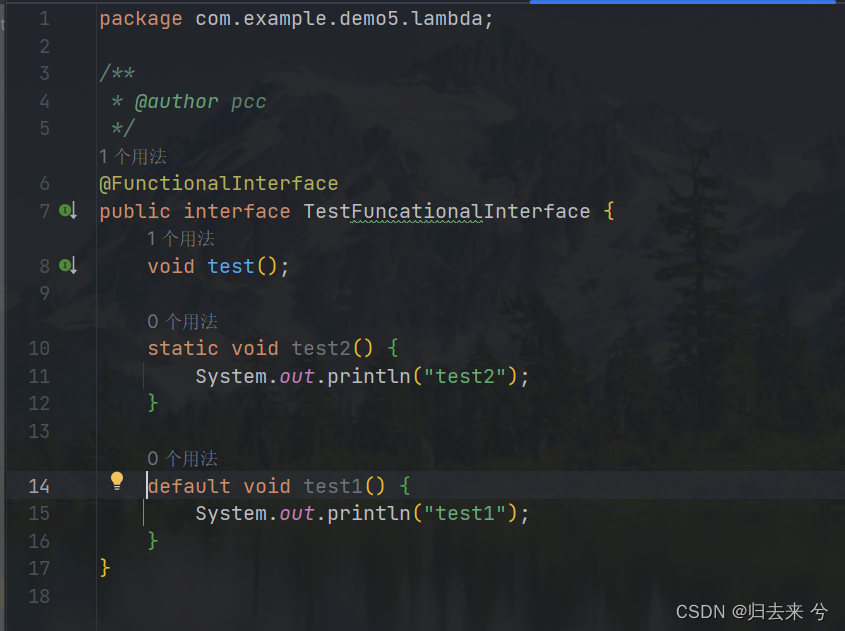
/**
 * @author pcc
 */
@FunctionalInterface
public interface TestFuncationalInterface {
    void test();

    public default void test1() {
        System.out.println("test1");
    }
}
默认方法比较突出的优点是,可以对已经使用很久的接口进行无缝改造,不会影响其他功能,实现类重不重写该方法都不会报错,需要的类再重写即可。比如Map中的forEach方法就是默认方法
3.接口静态方法
接口静态方法与普通类的静态方法基本没有区别,需要说的是新增静态方法并不影响函数式接口,且静态方法不作为函数接口中唯一抽象方法的判定。他的典型特点有:
- 1.静态方法不可继承,普通类的静态方法也是不可继承的
- 2.静态方法不可重写,普通类也是如此
- 3.可以通过接口.静态方法进行调用,这点和普通类也是一直
- 4.静态方法和默认方法,都不参与对函数式接口中唯一方法的判定:判断函数式接口时会忽略静态方法和默认方法
4.供给型接口:Supplier
Supplier供应商的意思,他只有一个抽象方法get,不接收任何参数,只做返回,这种使用场景没有消费型接口使用场景较多,不过在进行无需传参直接获取的场景上还是可以使用的。
@FunctionalInterface
public interface Supplier<T> {

    /**
     * Gets a result.
     *
     * @return a result
     */
    T get();
}
简单使用:
import java.util.function.Supplier;

/**
 * @author pcc
 */
public class TestSupplier {
    public static void main(String[] args) {
        TestSupplier.testSupplier(()->{
            return "hello";
        });
    }

    public static void testSupplier(Supplier<String> supplier){
        System.out.println(supplier.get());
    }
}
5.消费型接口:Consumer
Consumer消费者,他是一个消费型接口,接收一个参数进行处理,但没有返回。不过他有两个方法,一个是基本的accept方法,还有一个是andThen方法,这是一个默认方法,如下:
package java.util.function;

import java.util.Objects;

@FunctionalInterface
public interface Consumer<T> {

    void accept(T t);

    default Consumer<T> andThen(Consumer<? super T> after) {
        Objects.requireNonNull(after);
        return (T t) -> { accept(t); after.accept(t); };
    }
}
第一个方法很好理解,第二个看着有点绕呢,下面是参照Consumer源码模仿的写法:
@FunctionalInterface
public interface LikeConsumer<T> {
    void accept(T t);

    default LikeConsumer<? super T> andThen(LikeConsumer<? super T> t2){
        return (t)->{
            accept(t);
            t2.accept(t);
        };
    }
}
如果不理解,那就多写几遍,多模仿几遍渐渐就会理解了。
上面andThen代码意思其实是:返回一个LikeConsumer接口,因为该接口是函数接口,所以返回的相当于这个函数式接口的方法实现,也就是说andThen返回了一个新的LikeConsumer接口,他的实现就是调用了两个accept。那使用时怎么用呢?
/**
 * @author pcc
 */
public class TestLikeConsumer {
    public static void main(String[] args) {
        String str = "Hello Consumer";
        TestLikeConsumer.test(s->{
            System.out.println(s.toUpperCase());
        },s2->{
            System.out.println(s2.toLowerCase());
        },str);
    }

    static void test(LikeConsumer<String> consumer,LikeConsumer<String> consumer1,String str)
    {
        consumer.andThen(consumer1).accept(str);
    }
}
调用的时候可能会唯一感觉绕的是这里:consumer.andThen(consumer1).accept(str);,上面已经说了anThen其实是返回了一个LikeConsumer的acccpt的实现,那怎么调用这个实现呢,其实还是得通过accept来触发,所以还是需要accept的调用。
6.消费供给型接口:Function
这个函数接口是结合了上面两个接口,既接收参数,又返回参数。下面是仿写的Function接口
/**
 * @author pcc
 */
public interface LikeFunction<T,R> {

    R apply(T t);

    // 仿写compose方法,他的作用是传入一个前置执行的Function对象,将他的返回结果作为参数传递给
    // 当前的apply,所以compose传入的Function的返回参数必须是T类型,入参则无所谓,
    // 另外因为apply的返回值是R类型,所以默认方法的返回值必须是R类型
    // 返回函数的传入类型是V类型,是因为compose接收的函数的传入是V类型,这是一个泛型方法声明了泛型为V,也就是传入
    // 的function的入参类型V,而这个默认方法的返回就是一个组合函数,他是需要知道真正的入参的类型的,所以入参必须
    // 是V。
    // 这个方法总结一句话就是:传入一个Function,使用他的入参,然后将其结果作为apply的入参,最后返回R.
    default <V>  LikeFunction<V,R> compose(LikeFunction<? super V,? extends T> before){
        return (V v) ->apply(before.apply(v));
    }


    // 这里与上面逻辑差不多,接收一个后置的Function,将本身的apply的执行结果作为参数传递给after,所以
    // after他的入参必须是R,而他的返回值是自己定义的泛型方法的泛型V,所以andThen的返回函数的返回类型必须是V
    // 而原apply方法的入参是t,所以新返回的Function的入参必须是t,这个t也必须是泛型接口的泛型对象,所以
    //这里只传入一个t
    default <V> LikeFunction<T,V> andThen(LikeFunction<? super R,? extends V> after){
        return (T t)->after.apply(apply(t));
    }

}
这里需要说说的就是compose与andThen方法了,andThen方法在Consumer中也是有的(好像消费型接口都有)用法上没有区别,都是先执行当前的方法在执行andThen中的接口方法(真正是他们俩共同构成了一个新的函数式接口),调用开始执行的方法apply(T t)需要注意的是,传入的接口的入参必须是上一个接口函数的返回值,这里类型必须是一致的,其他则没有要求了。
而对于compose来说,和andThen正好是相反的,function.compose(function2)其实相等于function2.andThen(function)。所以一般使用一个即可andThen更易于记忆。
/**
 * @author pcc
 */
public class TestLikeFunction {
    public static void main(String[] args) {
        TestLikeFunction.testCompost(Integer::parseInt, String::valueOf);
    }

    public static  void testCompost(LikeFunction<String,Integer> function, LikeFunction<Integer,String> function2) {
        String apply = function.andThen(function2).apply("123");

        String apply1 = function2.compose(function).apply("123");
		// 上面两个操作是等价的
        System.out.println(apply.equals(apply1));
    }

}
上面是完全等价的,因为都是先执行function的apply,在以其结果传入function2中进行执行。
7.判断型接口:Predicate
这个函数接口也是比较常用的,他的主要用作布尔类型的判断,程序中经常需要做true或false的判断,其实是可以使用他的,这样写起来应该会更优雅,但是如果只有一行代码,还是别使用了徒增麻烦。
他比较常用的方法是test、and、or、negate、isEquals等,都比较简单。下面是源码:
@FunctionalInterface
public interface Predicate<T> {
    boolean test(T t);

    default Predicate<T> and(Predicate<? super T> other) {
        Objects.requireNonNull(other);
        return (t) -> test(t) && other.test(t);
    }

    default Predicate<T> negate() {
        return (t) -> !test(t);
    }
    default Predicate<T> or(Predicate<? super T> other) {
        Objects.requireNonNull(other);
        return (t) -> test(t) || other.test(t);
    }

    // 这里的object是test中传入的对象,真正使用时这么写Predicate.isEquals("张三").test("李四")
    // 这里的李四就是object,张三则是targetRef了。
    static <T> Predicate<T> isEqual(Object targetRef) {
        return (null == targetRef)
                ? Objects::isNull
                : object -> targetRef.equals(object);
    }

}
三、方法引用
lambda的出现简化了匿名内部类的实现,方法引用的出现就是为了简化lambda表达式的写法。那以什么规则进行简化lambda的书写呢?
- 1.只要是方法的入参和出参保持和函数式接口的入参和出参一致(函数接口可能是泛型,但必须有),那我们就可以使用方法引用来简化lambda。这种适合比较简单的操作,这种操作在工作中还是比较常见的。
1.对象名引用成员方法
这种是引用的普通的成员方法或者叫实例方法:
下面代码将字符转大写输出
    public static void main(String[] args) {
        List<String> strings = Arrays.asList("zhangsan","lisi","wangwu");
        strings.stream().map(String::toUpperCase)
                .forEach(System.out::println);

    }
2.类名引用静态方法
和上面使用没有区别
    public static void main(String[] args) {
        List<String> strings = Arrays.asList("zhangsan","lisi","wangwu");
        strings.stream().map(AppDataController::testStaticFun)
                .forEach(System.out::println);

    }

    static String testStaticFun(String str){
        return str.toUpperCase();
    }
3.类名引用构造方法
这个有区别,必须用new关键字,其他规则一样
    public static void main(String[] args) {
        List<String> strings = Arrays.asList("zhangsan","lisi","wangwu");
        strings.stream().map(StringBuilder::new)
                .forEach(System.out::println);

    }
四、stream流
这个小节的方法比较多,得花费点时间了。这里需要记住一个大前提:
- 1.stream流操作的数据,原始值不会变,stream流操作后会形成一个新的数据
1.stream流的两种方式:惰性求值、及早求值
stream的本质是对数据进行流式计算,我们要的最终结果肯定是一个确定的数组或者集合或者某个对象。所以根据这个规则可以将stream的烦方法分为两类,一类是返回stream的方法,支持我们进行链式调用,这类方法叫做惰性求值方法,一类是返回非stream的结果也就是我们这次流式操作已经达到目的后返回的最终结果这种叫及早求值方法。
2.forEach方法:及早求值
这是一个比较常用的方法,可以看到他不返回stream,所以他是一个及早求值方法,里面传入消费型接口,所以他的处理是接收一个参数做逻辑处理然后无返回。
void forEach(Consumer<? super T> action);
3.count方法:及早求值
及早求值方法,返回流中元素的长度。太简单,不贴了
4.filter方法:惰性求值
惰性求值,传入Predicate函数接口,保留true场景下的元素进行返回,其他过滤掉,也是比较简单
Stream<T> filter(Predicate<? super T> predicate);
下面保留长度大于2的元素的值
List<String> strings = Arrays.asList("zhangsan","lisi","wangwu");
strings.stream().filter(str->str.length()>2);
5.limit方法:惰性求值
这个是截取,和sql里的limit一个意思。不过他只能传递一个参数long类型,所以不出意外的只能从最左侧开始截取指定长度的数据
List<String> strings = Arrays.asList("zhangsan","lisi","wangwu");
// zhangsan
strings.stream().limit(1).forEach(System.out::println);
6.skip方法:惰性求值
和limit类似只能接受一个long类型参数。上面场景说了limit无法像sql里那样从指定位置开始截取,只能从下标为0的位置开始,其实搭配skip就可以实现类似于sql里的limit index count 这种操作了。skip的作用是跳过前多少个,从下一个开始截取。
List<String> strings = Arrays.asList("zhangsan","lisi","wangwu");
// lisi wangwu
strings.stream().skip(1).limit(2).forEach(System.out::println);
7.map,flatMap方法:惰性求值
映射转化的作用,接收一个Funcation作为入参。他可以将流中的A对象转化成B对象,实现流中类型的转变,这个还是很有用的,比如在参数请求中通常需要做类型间的转换,他还是很好用的。
<R> Stream<R> map(Function<? super T, ? extends R> mapper);
使用:
List<String> strings = Arrays.asList("zhangsan","lisi","wangwu");
// 8 4 6
strings.stream().map(String::length).forEach(System.out::println);
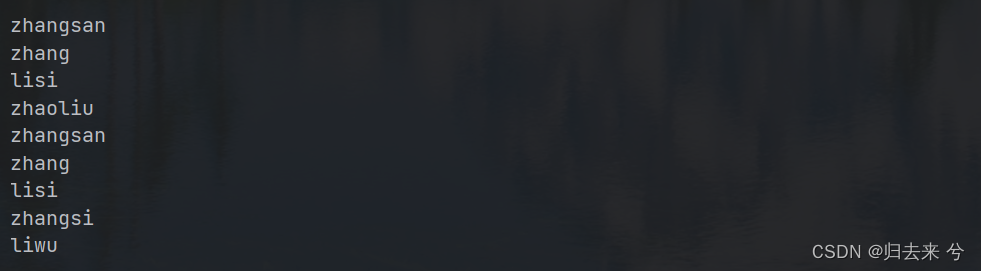
flatMap还是很好用的,他可以做多层级元素的扁平话处理,如下:
List<String> strings = Arrays.asList("zhangsan","zhang","lisi","zhangsi","liwu");
List<String> strs = Arrays.asList("zhangsan","zhang","lisi","zhaoliu");
List<List<String>> str3 = new ArrayList<>();
str3.add(strs);
str3.add(strings);


str3.stream().flatMap(x->x.stream()).forEach(System.out::println);
这里会将返回流中的元素进行扁平化处理。不过这里好像只能处理到二级流,当然如果更多级别可以使用嵌套来处理
8.sorted方法:惰性求值
惰性求值,默认调用对象的compareTo方法(对象得实现Camparable接口才可以),默认使用他的compareTo方法,官方解释叫自然排序,这里的自然讲的就是对象的默认排序规则了。string的默认排序规则是跟随每个字符的ascii码进行排序,小的靠前,大的靠后。所以顺序是升序。
List<String> strings = Arrays.asList("zhangsan","lisi","wangwu");
// lisi wangwu zhangsan
strings.stream().sorted().forEach(System.out::println);
当然也可以不使用默认的排序方法,使用自定义也是可以的,下面是仿写的String的排序不过顺序反了,如下
List<String> strings = Arrays.asList("zhangsan","lisi","wangwu");
// zhangsan wangwu lisi
strings.stream().sorted((a, b)->{
     int aLength = a.length();
     int bLength = b.length();
     int min = Math.min(aLength, bLength);
     char[] aChar = b.toCharArray();
     char[] bChar = b.toCharArray();
     int i = 0;
     while(i<min){
         if(aChar[i] != bChar[i]){
             return bChar[i] -aChar[i];
         }
         i++;
     }

     return bLength-aLength;

 }).forEach(System.out::println);
想要自己写排序规则,记住两句话即可:
- 1.传入的a,b参数中,a代表相邻元素的后位置元素,b代表相邻元素的前位置元素
- 2.相减结果为正,元素位置不变,相减结果为负,元素调换位置
9.distinct方法:惰性求值
这个方法也是比较简单,直接调用hashcode和equals方法进行比较,然后判断是否相等的
List<String> strings = Arrays.asList("zhangsan","zhang","lisi","wangwu","lisi");
// zhangsan zhang lisi wangwu
strings.stream().distinct().forEach(System.out::println);
10.match方法:及早求值
match方法有三个:allMatch、anyMatch、noneMatch
他们三个传入都是Predicate接口,Predicate接收一个参数返回一个boolean类型的对象。
anyMatch方法使用如下,这里需要特别注意anyMatch使用的是对象方法引用,当使用对象方法引用时,默认对象就是入参。,这里相当于获取两个集合的交集。
List<String> strings = Arrays.asList("zhangsan","zhang","lisi","wangwu","lisi");
// 求交集 zhangsan zhang lisi
strs.stream().filter(str -> strings.stream().anyMatch(str::equals)).forEach(System.out::println);
allMatch方法使用如下,只有Predicate全部为true才会返回true,很明显没有任何一个元素能满足这个条件,所以输出为空
List<String> strs = Arrays.asList("zhangsan","zhang","lisi","zhaoliu");
List<String> strings = Arrays.asList("zhangsan","zhang","lisi","wangwu","lisi");

// 空
strs.stream().filter(str -> strings.stream().allMatch(str::equals)).forEach(System.out::println);
noneMatch使用如下,只有所有Predicate返回全部false,才返回true。通俗点说就是不包含的元素返回true,包含的返回false
List<String> strs = Arrays.asList("zhangsan","zhang","lisi","zhaoliu");
List<String> strings = Arrays.asList("zhangsan","zhang","lisi","wangwu","lisi");
// zhaoliu ,这个可以用来求strs集合中删除的元素(strings相当于有删有增,strs是原始集合)
strs.stream().filter(str -> strings.stream().noneMatch(str::equals)).forEach(System.out::println);
11.find方法:及早求值
find有两个方法findFirst和findAny,他们都会返回一个Optional对象,他们使用上乍看没有区别,findFirst肯定是返回流中的第一个元素,而findAny则可能不返回第一个元素,返回的值是任意的(但是测试时都是返回第一个)。若是想要结果转为Optional可以考虑使用该方法。
List<String> strs = Arrays.asList("zhangsan","zhang","lisi","zhaoliu");
List<String> strings = Arrays.asList("zhangsan","zhang","lisi","wangwu","lisi");
// zhangsan zhangsan
strs.stream().findFirst().ifPresent(System.out::println);
strs.stream().findAny().ifPresent(System.out::println);
12.max/min方法:及早求值
传入一个比较器,==先对流中的元素进行排序,max取排序后最大值,min取排序后最小值。==以下的写法都是可以的
List<String> strs = Arrays.asList("zhangsan","zhang","lisi","zhaoliu");
List<Integer> ints = Arrays.asList(1,2,3,4,5);
List<String> strings = Arrays.asList("zhangsan","zhang","lisi","wangwu","lisi");

//5 zhangsan
ints.stream().max(Integer::compareTo).ifPresent(System.out::println);
strs.stream().max(Comparator.comparing(String::length)).ifPresent(System.out::println);
13.reduce方法:及早求值
reduce有三个方法:
方法一:Optional<T> reduce(BinaryOperator<T> accumulator);
方法二:T reduce(T identity, BinaryOperator<T> accumulator);
方法三:<U> U reduce(U identity,BiFunction<U, ? super T, U> accumulator, BinaryOperator<U> combiner);
方法一和二其实传入的是根本接口是BiFunction<T,T,T>,方法一的作用是将每两个相邻的匀速进行计算然后将结果在与后面的结果进行计算这样依次类推直到最后一个元素。那方法二只多了一个identity是什么用呢?方法一的起始值是下标为0的元素,那若是我们想要一个值和下标为0的元素一起计算要怎么办呢?起始identity就是这个作用,使用了itentity就相当于先将其和第一个元素计算,得到的结果再和第二个元素计算。方法一和二常用与求和等操作,注意方法一返回的是Optional对象。reduce方法可以用来做:聚合、排序、最大、最小等操作
List<Integer> ints = Arrays.asList(1,2,3,4,5);
// 15
ints.stream().reduce((x, y) -> {
    System.out.println("x:" + x);
    System.out.println("y:" + y);
    return x + y;
}).ifPresent(System.out::println);
14.map和reduce的组合使用:及早求值
map的作用是转化,reduce的作用是递归操作,其实可以使用他们的组合做很多事情,下面是简单的例子:
List<String> strings = Arrays.asList("zhangsan","zhang","lisi","wangwu","lisi");
// 27
strings.stream().map(String::length).reduce(Integer::sum).ifPresent(System.out::println);
15.mapToInt(long,double)方法:惰性求值
他们三个都差不多,作用都是将数据转化为基本数据类型,来进行处理,转为基本数据类型可以减少占用的内存,减少自动装箱和封箱的操作。
List<Integer> ints = Arrays.asList(1,2,3,4,5);
List<String> strings = Arrays.asList("zhangsan","zhang","lisi","wangwu","lisi");

// 15
ints.stream().mapToInt(Integer::intValue).reduce(Integer::sum).ifPresent(System.out::println);
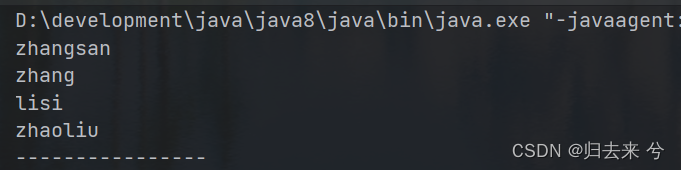
16.concat方法:惰性求值
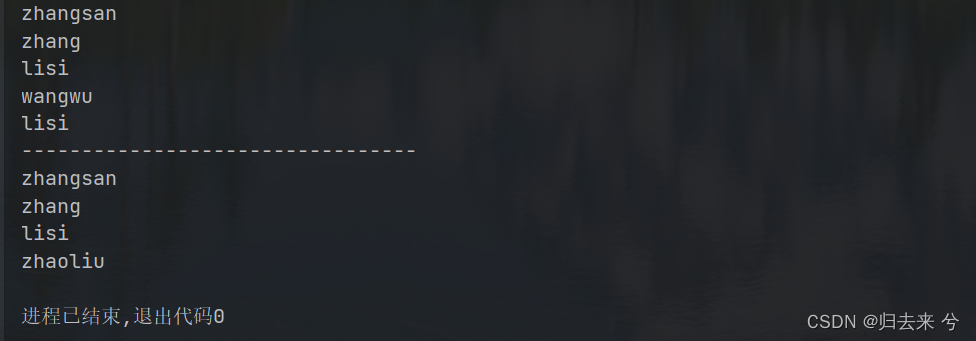
顾名思义就是合并不同的流的方法,==他是Stream的静态方法可以直接调用,不过一次只能合并两个流,合并结果就是取两个集合的所有值不去重。特别需要注意的是,使用concat合并过的流将不存在,后面是无法使用的了,这点一定切记。。。==但是不影响原集合的信息。
List<String> strs = Arrays.asList("zhangsan","zhang","lisi","zhaoliu");
List<String> strings = Arrays.asList("zhangsan","zhang","lisi","wangwu","lisi");

// "zhangsan","zhang","lisi","zhaoliu","zhangsan","zhang","lisi","wangwu","lisi"
Stream.concat(strs.stream(),strings.stream()).forEach(System.out::println);
System.out.println("---------------------------------");
strs.stream().forEach(System.out::println);
17.collect方法
将流中集合进行输出,常用方法有如下:
List<String> strings = Arrays.asList("zhangsan","zhang","lisi","wangwu","lisi");

// "zhangsan","zhang","lisi","wangwu","lisi"
strings.stream().collect(Collectors.toCollection(ArrayList::new)).forEach(System.out::println);
// "zhangsan","zhang","lisi","wangwu"
strings.stream().collect(Collectors.toSet()).forEach(System.out::println);
// "zhangsan","zhang","lisi","wangwu","lisi"
strings.stream().collect(Collectors.toList()).forEach(System.out::println);
// zhangsanzhanglisiwangwulisi
System.out.println(strings.stream().collect(Collectors.joining()));
18.对流数据进行聚合计算
这里的集合计算包括最大值、最小值、求和、平均值等操作。
最大值:
List<Integer> ints = Arrays.asList(1,2,3,4,5);

// 5
ints.stream().collect(Collectors.maxBy((x, y) -> {
    return x - y;
})).ifPresent(System.out::println);
最小值:可以直接使用上面的,将x-y改为y-x得到的就是最小值,不过这种不利于阅读,建议不用这么干
List<Integer> ints = Arrays.asList(1,2,3,4,5);

// 1
ints.stream().collect(Collectors.minBy((x, y)->{
    return x-y;
})).ifPresent(System.out::println);
平均值:
List<Integer> ints = Arrays.asList(1,2,3,4,5);

// 平均值3.0 注意这里的averagingInt 还有其他的averagingLong等方法
Double collect = ints.stream().collect(Collectors.averagingInt(Integer::intValue));
System.out.println("平均值"+collect);
总和:
List<Integer> ints = Arrays.asList(1,2,3,4,5);

// 总和15 ,这里也有long等其他类型的求和
Integer collect1 = ints.stream().collect(Collectors.summingInt(Integer::intValue));
System.out.println("总和"+collect1);
统计个数:
List<Integer> ints = Arrays.asList(1,2,3,4,5);

// 个数5
Long collect2 = ints.stream().collect(Collectors.counting());
System.out.println("个数"+collect2);
19.对流数据进行分组
-
- 单次分组
根据流中元素进行分组:
List<Integer> ints = Arrays.asList(1,2,3,4,5);

// 这里需要注意的是分组后的结果是一个Map<k,List<T>>集合
ints.stream().collect(Collectors.groupingBy(x->x)).forEach((k,v)->{
    System.out.println(k+"="+v);
});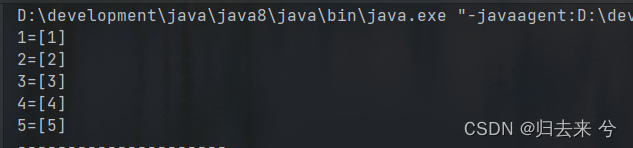
根据自定义条件进行分组:
 List<Integer> ints = Arrays.asList(1,2,3,4,5);

 // 这里返回的值就是我们Map的键,也就是分组的组名,这里的分组并不会减少数据(sql分完组每组默认取一条)
 ints.stream().collect(Collectors.groupingBy(x->{
     if(x>3){
         return "大于3";
     }else{
         return "小于3";
     }
 })).forEach((k,v)->{
     System.out.println(k+"="+v);
 });
-
2)多级分组
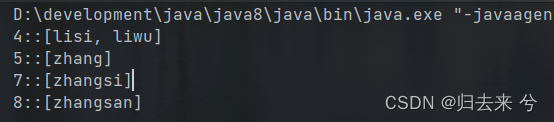
一般若是对象,会有多级分组的场景,比如先根据性别分组,再根据爱好分组等,下面使用string的流进行演示List<String> strings = Arrays.asList("zhangsan","zhang","lisi","zhangsi","liwu"); // 第一次分组根据姓不姓zhang来分,第二次根据名字的长度来分。这里都是分为两组,也可以多写几种场景分为多个组 strings.stream().collect(Collectors.groupingBy(x->{ if(x.startsWith("zhang")){ return "姓zhang"; } return "其他"; },Collectors.groupingBy(x->{ if(x.length()>5){ return "大于5"; } return "小于等于5"; }))).forEach((k,v)->{ System.out.println(k); v.forEach((k1,v1)->{ System.out.println(k1+"----"+v1); }); });需要注意groupingBy的第二个参数是Collectors.groupingBy()

20.对流数据进行分区
分区只能分为两个区,因为分区传入的是Predicate接口,他只有true和false两个场景,所以分区只能分为两个区,且分区名固定为true或者false。(感觉分区能解决的问题,分区肯定能解决)
List<String> strings = Arrays.asList("zhangsan","zhang","lisi","zhangsi","liwu");


strings.stream()
 .collect(Collectors.partitioningBy(x->x.startsWith("zhang")))
 .forEach((k,v)->{
     System.out.println(k+"::"+v);
 });

21.对流数据进行拼接
数据拼接的方法之前已经列举了,这里再说下吧
List<String> strings = Arrays.asList("zhangsan","zhang","lisi","zhangsi","liwu");

// zhangsanzhanglisizhangsiliwu
System.out.println(strings.stream().collect(Collectors.joining()));
22.并行流
并行流底层使用的是Fork join 框架的多线程,并不是java的,这种多线程支持对任务进行拆分计算,所以可以提高效率,他是将一个大任务拆分为了若干个小任务进行执行,且线程之间还可以对任务进行抢占,尽最大可能利用了线程资源。
获取并行流的两种方式
- 1.list.parallelStream() : 使用集合直接点parallelStream即可,常用
- 2.stream对象.parallel():如果已经得到了流,可以使用这种方式
并行流相较于单线程流会快很多,操作演示
List<String> strings = Arrays.asList("zhangsan","zhang","lisi","zhangsi","liwu");


strings.parallelStream().collect(Collectors.groupingBy(String::length)).forEach((k,v)->{
    System.out.println(k+"::"+v);
});
23.并行流的线程安全问题
- 1.同步代码块
在可能产生异常的地方使用同步代码块 - 2.可能产生线程安全问题的场景使用线程安全集合
比如ConcurrentHashMap等一些线程安全的集合 - 3.Collections.synchronizedList(new ArrayList<>())
这个底层其实还是使用的synchronized,他是相当于接收一个集合,把他放到自己的集合上,然后自己集合都加了synchronized
若是并行时设计到集合操作,或者时计算等,很可能会出现线程安全问题,此时是需要使用线程安全策略的。
五、Optional
Optional更像是一个容器,他是一个final类,类似String,都是不可继承的。他的作用主要用来做非空判断的,省略我们的ifnull等操作,可以让代码看起来更优雅,但里面的一些方法仍需注意,也有可能带来空指针。
1.静态方法:Optional.of()
of中支持传入任何类型进行返回一个Optional对象,其实就是将对象装入到Optional中。不过这里不允许填充null,否则报空指针
List<String> list = new ArrayList<>();
Optional.of(list);
2.静态方法:Optional.ofNullable()
ofNullable和of的区别就是允许装载null进入到Optional,所以若是返回结果可能为null最好使用这个,如下,这种场景是不会报任何错误的只是不满足存在将没有任何动作而已。同时避免了ifnull的判断,看起来更优雅。
List<String> str3= null;
Optional.ofNullable(str3).ifPresent(System.out::println);
3.静态方法:Optional.empty()
他的作用就是清空一个Optional,或者初始状态调用,返回一个空的Optional
// 什么也不会输出
List<String> strs = Arrays.asList("zhangsan","zhang","lisi","zhaoliu");
Optional.ofNullable(strs).empty().ifPresent(System.out::println);

// 返回一个空的Optional
Optional.empty();
4.isPresent
及早方法(这类类比stream里的方法,返回Optional对象的为惰性方法,否则是及早方法),返回boolean,用于判断Optional中是否存储了对象。
List<String> strs = Arrays.asList("zhangsan","zhang","lisi","zhaoliu");
boolean present = Optional.ofNullable(strs).empty().isPresent();
System.out.println(present);

5.ifPresent(Consumer consumer)
及早求值,不过没有返回值,因为传入的是Consumer这个消费型接口,参数其实就是Optional中的对象,若是有则会执行Consumer的逻辑,若是没有则不会执行。
List<String> strs = Arrays.asList("zhangsan","zhang","lisi","zhaoliu");

// Optional中有对象就会执行ifPresent中的内容
Optional.ofNullable(strs).ifPresent(System.out::println);

6.filter(Predicate<? super T> predicate)
这是惰性求值方法,返回还是一个Optional,他的作用和stream里的filter一样,都是对内部元素进行过滤使用的
List<String> strs = Arrays.asList("zhangsan","zhang","lisi","zhaoliu");
Optional.ofNullable(strs).filter(x->x.size()>0).ifPresent(System.out::println);

7.map(Function<? super T, ? extends U> mapper)
惰性求值,合理的map方法和Stream的map其实很像,都是做内部元素转换的。
List<String> strs = Arrays.asList("zhangsan","zhang","lisi","zhaoliu");

Optional.ofNullable(strs).map(x->{
    return x.stream().map(String::toUpperCase).collect(Collectors.toList());
}).ifPresent(System.out::println);

8.flatMap(Function<? super T, Optional> mapper)
与map类似,用起来差不多,应该是可以类比Stream的flatMap对于map的差异。
List<String> str3= null;
// 无输出,map也是支持这个操作的
Optional.ofNullable(str3).flatMap(x->x.stream().findFirst()).ifPresent(System.out::println);
9.get()
及早求值,若是Optional中没有值,使用get方法会报空指针,所以一般需要配合isPresent一起使用,但是这么写起来又比较麻烦,没有直接使用ifPresent好用。
10.orElse(T other)
及早求值,如果Optional有值就取出返回,如果没有值则使用orElse传入的值,相当于给了一个默认值
List<String> str3= null;
Optional.ofNullable(str3).orElse(new ArrayList<>());
11.orElseGet(Supplier<? extends T> other)
这个和上面差不多,上面是直接传入的默认值,这里的默认值是通过supplier接口生产出来的
List<String> str3= null;
// 使用Supplier生产出一个默认值
Optional.ofNullable(str3).orElseGet(()->{
                return Arrays.asList("zhangsan","zhang","lisi","zhaoliu");
            }).stream().forEach(System.out::println);
12.orElseThrow(Supplier<? extends X> exceptionSupplier)
这个也是类似上面,只不过这里是生产一个异常出来,当然也可以不生产异常,但是一般还是希望按照接口的定义来操作。
List<String> str3= null;
Optional.ofNullable(str3).orElseThrow(()-> new RuntimeException("str3 is null"));

13.注意事项
- 可能空使用ofNullable不要使用of
- 可能为空时要先判空再get,不然可能空指针异常
六、新的日期时间API
老日期API:Date,首先是基于1900开始计算,然后就是各种线程不安全问题。所以才有了新的时间API
新的日期API
1.LocalDate:日期
下面是些常用的API
System.out.println(LocalDate.now());
System.out.println(LocalDate.of(2019,10,1));
System.out.println(LocalDate.of(2019, Month.OCTOBER.getValue(), 1));
System.out.println(LocalDate.of(2019, Month.OCTOBER.getValue(), 1));
System.out.println(LocalDate.parse("2023-11-12"));
System.out.println(LocalDate.parse("2023年12月13日", DateTimeFormatter.ofPattern("yyyy年MM月dd日")));
//以上所有方法返回的都是LocalDate
System.out.println(LocalDate.now().isAfter(LocalDate.of(2019, 10, 1)));
System.out.println(LocalDate.now().isBefore(LocalDate.of(2019, 10, 1)));
System.out.println(LocalDate.now().isEqual(LocalDate.of(2019, 10, 1)));
//已上是比较
System.out.println(LocalDate.now().getDayOfMonth()); // 获取日子
System.out.println(LocalDate.now().plusDays(1)); // 增加1天
System.out.println(LocalDate.now().minusDays(1)); // 减少一天
System.out.println(LocalDate.now().plusMonths(1)); // 增加1个月
System.out.println(LocalDate.now().withMonth(12)); // 修改月份

2.LocalTime:时间
这是时间的API,大部分方法和上面是没有区别的,都是类似的,包含获取、判断、增加、截取某一段等
System.out.println(LocalTime.now());
System.out.println(LocalTime.of(12, 59, 59));
System.out.println(LocalTime.parse("12:59:59"));

System.out.println(LocalTime.now().isAfter(LocalTime.of(12, 59, 59)));
System.out.println(LocalTime.now().isBefore(LocalTime.of(12, 59, 59)));

System.out.println(LocalTime.now().plusHours(1));
System.out.println(LocalTime.now().plusSeconds(20));
System.out.println(LocalTime.now().minusMinutes(12));

System.out.println(LocalTime.now().getHour());
System.out.println(LocalTime.now().atDate(LocalDate.now()));

3.LocalDateTime:日期时间
方法其实都差不多
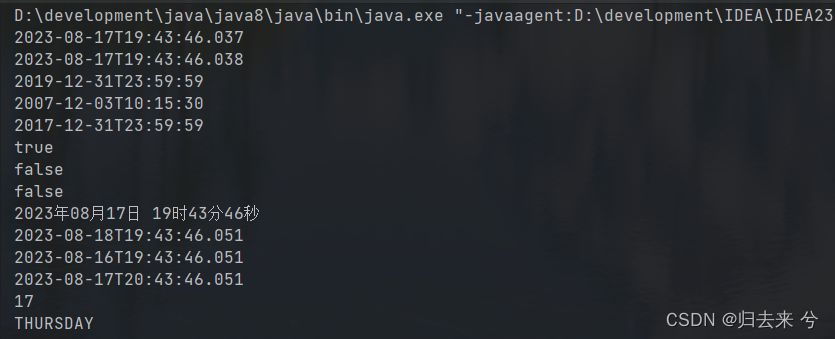
System.out.println(LocalDateTime.now());
System.out.println(LocalDateTime.of(LocalDate.now(), LocalTime.now()));
System.out.println(LocalDateTime.of(2019, 12, 31, 23, 59, 59));
System.out.println(LocalDateTime.parse("2007-12-03T10:15:30"));
System.out.println(LocalDateTime.parse("2017年12月31日 23时59分59秒", DateTimeFormatter.ofPattern("yyyy年MM月dd日 HH时mm分ss秒")));

System.out.println(LocalDateTime.now().isAfter(LocalDateTime.of(2019, 12, 31, 23, 59, 59)));
System.out.println(LocalDateTime.now().isBefore(LocalDateTime.of(2019, 12, 31, 23, 59, 59)));
System.out.println(LocalDateTime.now().isEqual(LocalDateTime.of(2019, 12, 31, 23, 59, 59)));

System.out.println(LocalDateTime.now().format(DateTimeFormatter.ofPattern("yyyy年MM月dd日 HH时mm分ss秒")));
System.out.println(LocalDateTime.now().plusDays(1));
System.out.println(LocalDateTime.now().minusDays(1));
System.out.println(LocalDateTime.now().plusHours(1));
System.out.println(LocalDateTime.now().getDayOfMonth());
System.out.println(LocalDateTime.now().getDayOfWeek());
4.日期的格式化与解析:DateTimeFormatter
可以格式化日期、时间、日期时间等所有的新时间API,其实上面已经涉及到了日期的格式化了。主要就是将日期以我们想要的格式进行展示和使用。
System.out.println(DateTimeFormatter.ofPattern("yyyy-MM-dd HH:mm:ss", Locale.CHINA).format(LocalDateTime.now()));
System.out.println(LocalDateTime.now().format(DateTimeFormatter.ofPattern("yyyy-MM-dd HH:mm:ss"))); // 和上面的操作一模一样

System.out.println(DateTimeFormatter.ofPattern("yyyy-MM-dd").format(LocalDate.now()));
System.out.println(LocalDate.now().format(DateTimeFormatter.ofPattern("yyyy-MM-dd")));

System.out.println(DateTimeFormatter.ofPattern("yyyy-MM-dd").parse("2019-12-31"));

5.Instant类
这也是一个日期类,不过主要用来处理时间戳会比较方便,不过上面有的API,他很多也都有,但我感觉用不到,可以使用他的下面这个用处,会比System.cunrrentTime()效率高些。
System.out.println(Instant.now());
System.out.println(Instant.now().toEpochMilli()==System.currentTimeMillis());

6.计算日期差值:Duration / Period
Duration用来计算时间的距离,既可以算LocalTime也可以算LocalDateTime。:/djuˈreɪʃn/
第二个参数应该是较大的时间
System.out.println(Duration.between(LocalDateTime.of(2023, 8, 17, 20, 0, 0),LocalDateTime.now()).toMinutes()+"分钟");
System.out.println(Duration.between(LocalDateTime.of(2023, 8, 17, 20, 0, 0),LocalDateTime.now()).getSeconds()+"秒");
System.out.println(Duration.between(LocalDateTime.of(2023, 8, 17, 20, 0, 0), LocalDateTime.now()).toHours()+"时");

Period用来计算日期的距离:/ˈpɪəriəd/
System.out.println(Period.between(LocalDate.of(2023, 8, 16), LocalDate.now()).getDays());
System.out.println(Period.between(LocalDate.of(2023, 8, 16), LocalDate.now()).getMonths());

6.时间矫正
TemporalAdjusters 可以将时间调整到我们想要的位置,感觉没啥用呢,他能做到的前面的也能做到,但是他的操作会简单一些是真的
System.out.println(LocalDateTime.now().with(temporal -> {
                LocalDateTime localDateTime = (LocalDateTime) temporal;
                return LocalDateTime.of(localDateTime.getYear(), 1, 1, 0, 0, 0);
            }));

// 上面代码和这里逻辑、结果一致
TemporalAdjuster temporalAdjuster = localDateTime1 ->{
    LocalDateTime localDateTime = (LocalDateTime) localDateTime1;
    return LocalDateTime.of(localDateTime.getYear(), 1, 1, 0, 0, 0);
};
System.out.println(LocalDateTime.now().with(temporalAdjuster));

7.日期时区
这里提供了时区时间、日期的API,很少可以用到,但挺有意思的
// 获取所有时区:地区/城市
ZoneId.getAvailableZoneIds().forEach(System.out::println);
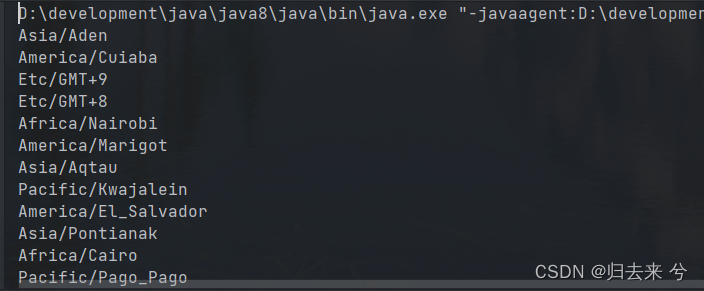
System.out.println(ZonedDateTime.now(Clock.systemUTC()));
System.out.println(ZonedDateTime.now());
这里大部分API没有列出来

七、并发编程与任务编排:CompletableFuture
CompletableFuture是JKD8新增的支持异步调用与任务编排的新的API,他对任务编排的支持比较友好,相关API也比较丰富。当然底层依然是线程池相关技术。而且在操作时是支持我们自定义线程池的,若是不定义线程池则默认使用Forkjoin.commonpool线程池,这个线程池是一个守护线程池,若是直接使用CompletableFuture会有隐患:若是使用CompletableFuture执行异步任务,且对异步任务结果不做获取(获取结果自然就会等待线程执行完毕),且子任务执行时间超过主线程,此时因为子线程是守护线程,会造成子线程意外终止。因此我们可以使用自定义的线程池,注意高并发系统绝对禁止使用默认线程池(并发不高时可以使用默认)。
1.1.开启异步任务:runAsync() 两个方法
与另个开启异步方法的区别是,没有返回值,只负责开启一个异步任务。他有两个方法,一个是直接传入Runnable对象,另一个支持多传入一个线程池,不传入线程池默认使用ForkJoin的线程池
CompletableFuture.runAsync(()->{
    System.out.println("runAsync子任务执行了: "+Thread.currentThread().getName());
});

System.out.println("主线程执行结束了: "+Thread.currentThread().getName());

传入线程池的话,自己新建即可,一般推荐使用ThreadPoolExecutor,需要对他的七个参数都有了解再去创建,这里不细说,线程基础知识可以看这里:
四万字爆肝总结多线程
并发夺命23问
1.2.开启异步任务:supplyAsync() 两个方法
他与上面的区别是他有返回值,他的返回对象是CompletableFuture<T> 这个T是有任务里写的return推导出来的,无需我们去声明,他也支持多传入一个线程池
CompletableFuture.supplyAsync(()->{
   System.out.println("supplyAsync子任务执行了: "+Thread.currentThread().getName());
    return "Hello";
});

System.out.println("主线程执行结束了: "+Thread.currentThread().getName());

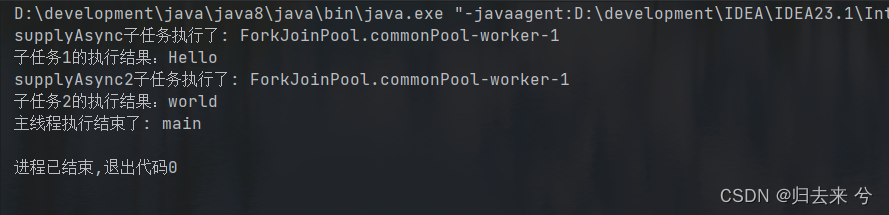
2.1 获取任务结果:get() 两个方法
针对有返回值的异步任务,我们是需要获取结果的,第2部分则来说一下这3种获取结果的区别,网上查阅说get不会阻塞主线程,join则会阻塞主线程。我们知道Thread里的join方法是会导致线程阻塞的,这里确实会导致阻塞,但是笔者亲测get也会阻塞。下面展示结果主要是看是否会阻塞:
CompletableFuture<String> stringCompletableFuture = CompletableFuture.supplyAsync(() -> {
   System.out.println("supplyAsync子任务执行了: " + Thread.currentThread().getName());
   try {
       Thread.sleep(3000L);
   } catch (InterruptedException e) {
       throw new RuntimeException(e);
   }
   return "Hello";
});

System.out.println("子任务1的执行结果:"+stringCompletableFuture.get());

CompletableFuture<String> stringCompletableFuture2 = CompletableFuture.supplyAsync(() -> {
   System.out.println("supplyAsync2子任务执行了: " + Thread.currentThread().getName());
   try {
       Thread.sleep(3000L);
   } catch (InterruptedException e) {
       throw new RuntimeException(e);
   }
   return "world";
});

System.out.println("子任务2的执行结果:"+stringCompletableFuture2.get());

System.out.println("主线程执行结束了: "+Thread.currentThread().getName());
上面代码无论执行多少遍,子任务1获取结果是子任务2都是处于等待状态,第三个join其实和这个一样,没有区别。
get还有一个方法,支持传入超时时间,也及时说等待多少时间还是获取不到值,就会抛出超时异常,这里注意get方法可能会抛出阻塞异常:InterruptedException
System.out.println(stringCompletableFuture.get(1, TimeUnit.SECONDS));

2.2 获取任务结果:getNow()
这个方法比较简单,就是取现在的子任务的执行结果,取到了就返回获取的结果,取不到就使用getNow传入的值作为默认值,下面方法有个延时,所以代码执行时肯定取不到,所以就会返回默认值。
CompletableFuture<String> stringCompletableFuture = CompletableFuture.supplyAsync(() -> {
    System.out.println("supplyAsync子任务执行了: " + Thread.currentThread().getName());
    try {
        Thread.sleep(3000L);
    } catch (InterruptedException e) {
        throw new RuntimeException(e);
    }
    return "Hello";
});
System.out.println(stringCompletableFuture.getNow("我是默认值"));
System.out.println("主线程执行结束了: "+Thread.currentThread().getName());

2.3 获取任务结果:join()
使用起来和get没发现有任何区别,不过他只有一个方法。
CompletableFuture<String> stringCompletableFuture = CompletableFuture.supplyAsync(() -> {
    System.out.println("supplyAsync子任务执行了: " + Thread.currentThread().getName());
    try {
        Thread.sleep(3000L);
    } catch (InterruptedException e) {
        throw new RuntimeException(e);
    }
    return "Hello";
});
System.out.println(stringCompletableFuture.join());

3.1 设置任务结果:complete()
可以手动设置CompletableFuture的执行结果,设置成功返回true,失败返回False。目前没感觉到特别有用的用途。设置之后后面使用get、join等获取的结果都是使用complete设置的结果了,而且设置之后CompletableFuture就会立即有结果,而不必等其执行结束,当然这个结果也不是CompletableFuture的真正执行结果
CompletableFuture<String> stringCompletableFuture = CompletableFuture.supplyAsync(() -> {
    System.out.println("supplyAsync子任务执行了: " + Thread.currentThread().getName());
    try {
        Thread.sleep(3000L);
    } catch (InterruptedException e) {
        throw new RuntimeException(e);
    }
    return "Hello";
});
stringCompletableFuture.complete("我是使用complete设置的值");
System.out.println(stringCompletableFuture.join());
System.out.println(stringCompletableFuture.get());

System.out.println("主线程执行结束了: "+Thread.currentThread().getName());
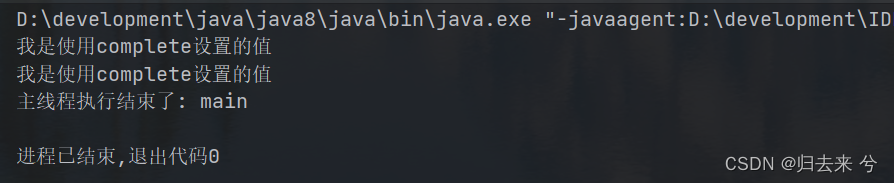
看上图可以发现设置完之后子任务的返回值就是我们使用complete设置的值了,而且这里还有一个问题,因为get、join直接获取到了结果,因此主线程在此并没有阻塞,直接执行结束了,此时子线程没有执行完毕就被杀掉了(因为子线程都是守护线程)。感觉可以用于在特定阶段对返回值的手动指定。
3.2 设置任务结果:completeExceptionally()
这个与上面类似,只是设置的是异常,设置完成程序会手动抛一个异常出来。且子线程也是无法执行完毕的
CompletableFuture<String> stringCompletableFuture = CompletableFuture.supplyAsync(() -> {
    System.out.println("supplyAsync子任务执行了: " + Thread.currentThread().getName());
    try {
        Thread.sleep(3000L);
    } catch (InterruptedException e) {
        throw new RuntimeException(e);
    }
    return "Hello";
});
stringCompletableFuture.completeExceptionally(new RuntimeException("我是异常"));
System.out.println(stringCompletableFuture.join());
System.out.println(stringCompletableFuture.get());

System.out.println("主线程执行结束了: "+Thread.currentThread().getName());
4.1 多任务依赖执行:thenApply()、thenApplyAsync()
上面说的都是单个任务的执行,CompletableFuture好用就好用在对于多任务的编排的API很丰富,支持我们各种可以想象到的操作,这一节用来总结多任务依赖执行时的API。
thenApply() 是有入参有返回,入参是上一个任务的执行结果,返回还是一个CompletableFuture。
thenApplyAsync与上面相同,只是他执行时是新起子线程,且也支持线程池的传入,同时因为返回都是CompletableFuture,所以支持一直链式调用。不过需要说的是这种链式调用效率不会太高,类似于阻塞式调用了,因为下个任务总要等待上个任务的结果。
// 使用thenApply
CompletableFuture<String> stringCompletableFuture = CompletableFuture.supplyAsync(() -> {
    System.out.println("supplyAsync子任务【1】执行了: " + Thread.currentThread().getName());
    try {
        Thread.sleep(3000L);
    } catch (InterruptedException e) {
        throw new RuntimeException(e);
    }
    return "Hello";
});

CompletableFuture<String> stringCompletableFuture2 = stringCompletableFuture.thenApply(str->{
    System.out.println("supplyAsync子任务【2】执行了: " + Thread.currentThread().getName());
    return str.toUpperCase();
});


System.out.println(stringCompletableFuture.get());
System.out.println(stringCompletableFuture2.get());

System.out.println("主线程执行结束了: "+Thread.currentThread().getName());
可以设想下执行结果,没看结果之前我认为应该是先打印“supplyAsync子任务【2】执行了 ”再打印“Hello”可是结果不是,这里我也比较疑惑,暂时没搞明白以后遇到大佬,再请教下吧:需要特别注意的是thenApply用的是上一个任务的线程,他们共用一个线程

下面是thenApplyAsync,与上面没多大区别,区别就是任务2也是异步了,但是用的还是之前的线程,除非两个任务用的线程池不是一个,是一个的话,还是会优先使用功能原线程的。这样做是合理的,因为任务2是在任务1结束之后才执行,使用原线程没有问题。
// 使用thenApplyAsync
CompletableFuture<String> stringCompletableFuture = CompletableFuture.supplyAsync(() -> {
    System.out.println("supplyAsync子任务【1】执行了: " + Thread.currentThread().getName());
    try {
        Thread.sleep(1000L);
    } catch (InterruptedException e) {
        throw new RuntimeException(e);
    }
    return "Hello";
});


CompletableFuture<String> stringCompletableFuture2 = stringCompletableFuture.thenApplyAsync(str->{
    System.out.println("supplyAsync子任务【2】执行了: " + Thread.currentThread().getName());
    try {
        Thread.sleep(3000L);
    } catch (InterruptedException e) {
        throw new RuntimeException(e);
    }
    return str.toUpperCase();
});


System.out.println(stringCompletableFuture.get());
System.out.println(stringCompletableFuture2.get());

System.out.println("主线程执行结束了: "+Thread.currentThread().getName());

4.2 多任务依赖执行:thenAccept()、thenAcceptAsync()
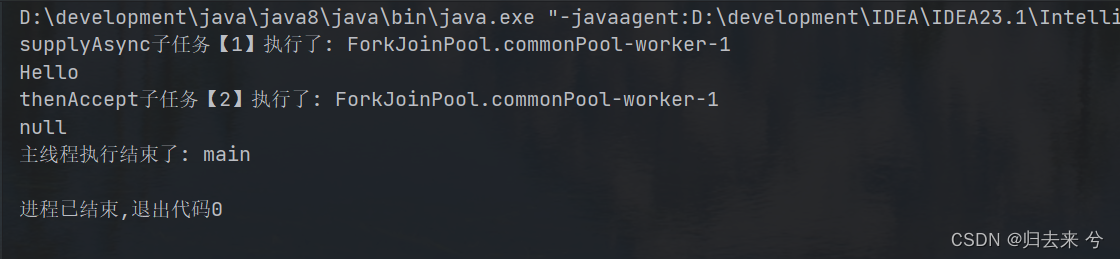
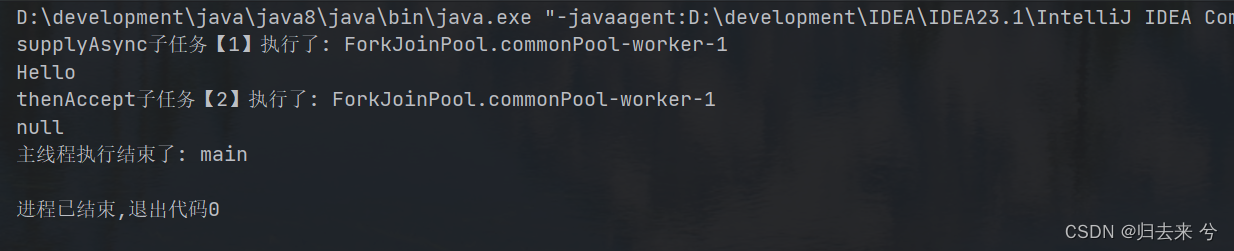
他们俩的特点是接收一个参数,不返回信息,所以里面是Consumer类型的接口,不过需要注意这里的不返回信息指的是CompletableFuture的泛型没有信息返回,处理的参数是Consumer的入参,之类不返回,但不影响整体返回CompletableFuture,但是CompletableFuture的返回类型应该是:CompletableFuture<Void>
// thenAccept
CompletableFuture<String> stringCompletableFuture = CompletableFuture.supplyAsync(() -> {
    System.out.println("supplyAsync子任务【1】执行了: " + Thread.currentThread().getName());
    try {
        Thread.sleep(1000L);
    } catch (InterruptedException e) {
        throw new RuntimeException(e);
    }
    return "Hello";
});


CompletableFuture<Void> stringCompletableFuture2 = stringCompletableFuture.thenAccept(str->{
    System.out.println("thenAccept子任务【2】执行了: " + Thread.currentThread().getName());
    try {
        Thread.sleep(3000L);
    } catch (InterruptedException e) {
        throw new RuntimeException(e);
    }
//  return str.toUpperCase();
});


System.out.println(stringCompletableFuture.get());
System.out.println(stringCompletableFuture2.get());

System.out.println("主线程执行结束了: "+Thread.currentThread().getName());
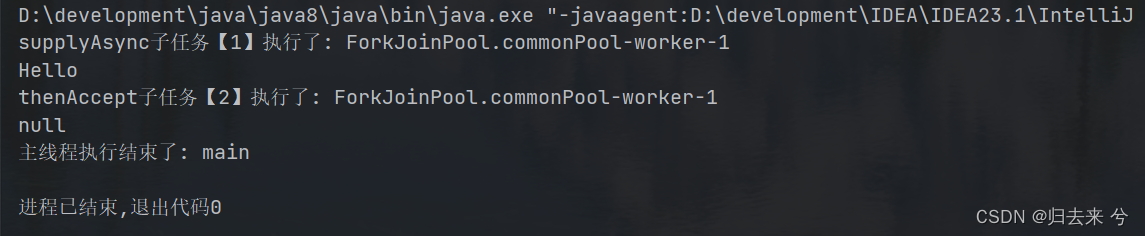
这里thenAccept不返回结果,所以获取时是null
下面是thenAcceptAsync
// thenAcceptAsync
CompletableFuture<String> stringCompletableFuture = CompletableFuture.supplyAsync(() -> {
    System.out.println("supplyAsync子任务【1】执行了: " + Thread.currentThread().getName());
    try {
        Thread.sleep(1000L);
    } catch (InterruptedException e) {
        throw new RuntimeException(e);
    }
    return "Hello";
});


CompletableFuture<Void> stringCompletableFuture2 = stringCompletableFuture.thenAcceptAsync(str->{
    System.out.println("thenAccept子任务【2】执行了: " + Thread.currentThread().getName());
    try {
        Thread.sleep(3000L);
    } catch (InterruptedException e) {
        throw new RuntimeException(e);
    }
//   return str.toUpperCase();
});


System.out.println(stringCompletableFuture.get());
System.out.println(stringCompletableFuture2.get());

System.out.println("主线程执行结束了: "+Thread.currentThread().getName());
4.3 多任务依赖执行:thenRun()、thenRunAsync
这里与上面的区别是,不接收参数,也不返回参数,其他没啥区别了,这些API都是支持自定义线程池的。
// thenRun()
CompletableFuture<String> stringCompletableFuture = CompletableFuture.supplyAsync(() -> {
   System.out.println("supplyAsync子任务【1】执行了: " + Thread.currentThread().getName());
   try {
       Thread.sleep(1000L);
   } catch (InterruptedException e) {
       throw new RuntimeException(e);
   }
   return "Hello";
});


CompletableFuture<Void> stringCompletableFuture2 = stringCompletableFuture.thenRun(()->{
   System.out.println("thenAccept子任务【2】执行了: " + Thread.currentThread().getName());
   try {
       Thread.sleep(3000L);
   } catch (InterruptedException e) {
       throw new RuntimeException(e);
   }
//                return str.toUpperCase();
});


System.out.println(stringCompletableFuture.get());
System.out.println(stringCompletableFuture2.get());

System.out.println("主线程执行结束了: "+Thread.currentThread().getName());
下面是thenRunAsync
// thenRunAsync()
CompletableFuture<String> stringCompletableFuture = CompletableFuture.supplyAsync(() -> {
    System.out.println("supplyAsync子任务【1】执行了: " + Thread.currentThread().getName());
    try {
        Thread.sleep(1000L);
    } catch (InterruptedException e) {
        throw new RuntimeException(e);
    }
    return "Hello";
});


CompletableFuture<Void> stringCompletableFuture2 = stringCompletableFuture.thenRunAsync(()->{
    System.out.println("thenAccept子任务【2】执行了: " + Thread.currentThread().getName());
    try {
        Thread.sleep(3000L);
    } catch (InterruptedException e) {
        throw new RuntimeException(e);
    }
//                return str.toUpperCase();
});


System.out.println(stringCompletableFuture.get());
System.out.println(stringCompletableFuture2.get());

System.out.println("主线程执行结束了: "+Thread.currentThread().getName());
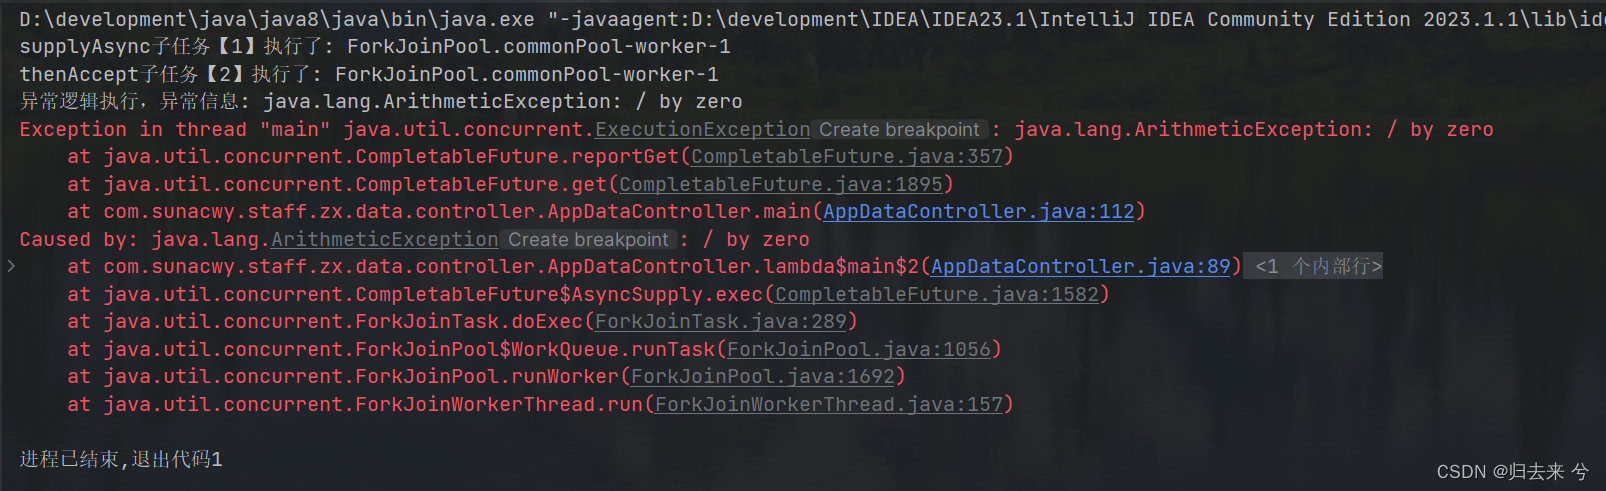
4.4 多任务依赖执行:whenComplete、whenCompleteAsync
注意这俩方法和complete,completeExceptionally没有关系,这俩方法也是处理多任务依赖执行的,第四节整个都是多任务依赖执行的方法,whenComplete、whenCompleteAsync与上面的区别在于,接收参数无返回,可以拿到子任务1中的异常。注意若是多任务依赖执行时使用whenComplete,那么前面任务若是catch住了异常,他是拿不到的,还有若是有异常且使用了whenComplete则异常信息只会在任务2中显示在我们定义的位置,不会重复出现在任务1中,下面模拟一个异常任务
// 使用whenComplete
CompletableFuture<String> stringCompletableFuture = CompletableFuture.supplyAsync(() -> {
    System.out.println("supplyAsync子任务【1】执行了: " + Thread.currentThread().getName());
    try {
        Thread.sleep(1000L);
        int i = 1/0;
    } catch (InterruptedException e) {
        throw new RuntimeException(e);
    }
    return "Hello";
});


CompletableFuture<String> stringCompletableFuture2 = stringCompletableFuture.whenComplete((str,thro)->{
    System.out.println("thenAccept子任务【2】执行了: " + Thread.currentThread().getName());

    //先判断是否有异常
    Optional.ofNullable(thro).ifPresent(e->{

        System.out.println("异常逻辑执行,异常信息: "+e.getMessage());
        // do someThing()
    });

    // 执行到这说明没有异常
    System.out.println("无异常逻辑执行,执行结果: "+str.toUpperCase());
});


System.out.println(stringCompletableFuture.get());
System.out.println(stringCompletableFuture2.get());

System.out.println("主线程执行结束了: "+Thread.currentThread().getName());
可以设想下运行结果:因为这里肯定有异常,所以任务2会进入到异常逻辑块,输出异常信息,而正确的信息应该会执行不到,因为这里会抛出异常:
至于whenCompleteAsync就是方法名不同,同时支持传入线程池,其他没区别,上面几个API也是如此,这里就不重复列举了
4.5 多任务依赖执行:handle()、handleAsync()
与上面的whenComplete区别在于,handle可以接收参数,接收的参数是上个任务的结果和异常,也支持返回参数。而whenComplete是不支持的,这是他们的区别,此外用法一致。
CompletableFuture<String> stringCompletableFuture = CompletableFuture.supplyAsync(() -> {
    System.out.println("supplyAsync子任务【1】执行了: " + Thread.currentThread().getName());
    try {
        Thread.sleep(1000L);
        int i = 1/0;
    } catch (InterruptedException e) {
        throw new RuntimeException(e);
    }
    return "Hello";
});


CompletableFuture<String> stringCompletableFuture2 = stringCompletableFuture.handle((s,thro)->{
    System.out.println("handle子任务【2】执行了: " + Thread.currentThread().getName());

    if(null ==thro){
        System.out.println("handle子任务【2】异常信息: "+thro.getMessage());
        // doSomeThing()
        return "异常了";
    }

    return s.toUpperCase();
});


System.out.println(stringCompletableFuture.get());
System.out.println(stringCompletableFuture2.get());

System.out.println("主线程执行结束了: "+Thread.currentThread().getName());
可以设想下结果,肯定是打印了异常,注意一旦异常无论是whenComplete或者是handle,获取到异常之后的代码都是无法执行的了,只会执行到异常信息的地方。

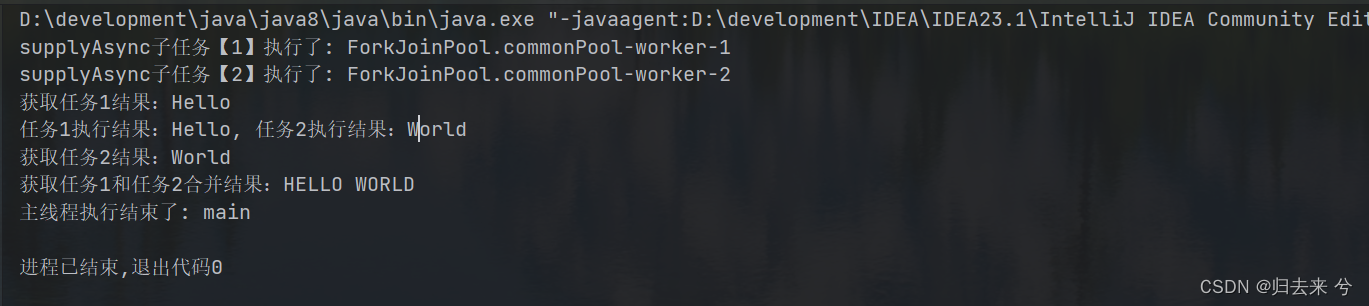
5.1 双任务组合处理:thenCombine() 三个方法
第四部分的API会有一个显著的问题:那就是任务调用链基本是阻塞式的,后面的任务必须依赖前面任务的结果,当然这也不能算是问题,若是业务如此,则我们必须这么做,倘若无需关心上一个任务的结果,也无需等待上一个任务执行结束,我们就可以不使用thenRun的API,可以考虑使用多任务组合处理的API,第一个要说的是thenComBine。第四部分的API都是传入一个函数式接口,其实底层都是转到了Runnable上,但是第五部分的API传递的都是CompletableFuture,这是与上面的区别。其实很好理解,因为他要做的是任务的并行,自然需要的是多个CompletableFuture。
thenCombine的三个方法还有一个异步的,还有一个支持传递线程池的API,下面几个也是一样。
CompletableFuture<String> stringCompletableFuture = CompletableFuture.supplyAsync(() -> {
System.out.println("supplyAsync子任务【1】执行了: " + Thread.currentThread().getName());
try {
Thread.sleep(3000L);
} catch (InterruptedException e) {
throw new RuntimeException(e);
}
return "Hello";
});
CompletableFuture<String> stringCompletableFuture2 = CompletableFuture.supplyAsync(() -> {
System.out.println("supplyAsync子任务【2】执行了: " + Thread.currentThread().getName());
try {
Thread.sleep(1000L);
} catch (InterruptedException e) {
throw new RuntimeException(e);
}
return "World";
});
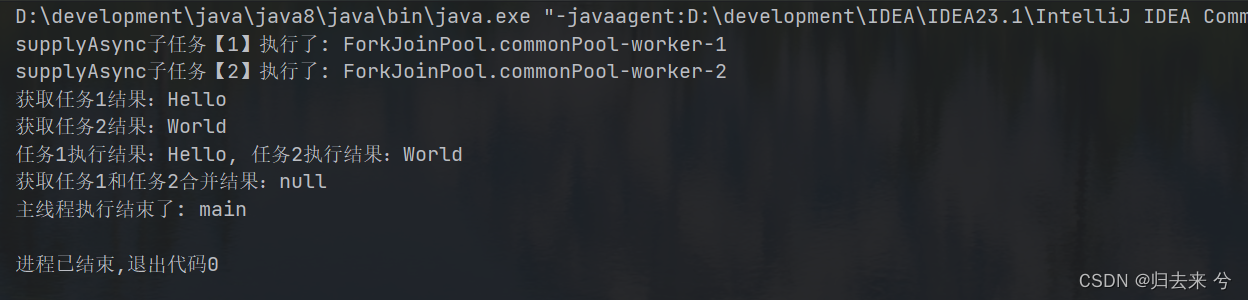
CompletableFuture<String> stringCompletableFuture3 = stringCompletableFuture.thenCombine(stringCompletableFuture2, (result1, result2) -> {
System.out.println("任务1执行结果:" + result1
+ ", 任务2执行结果:" + result2);
return (result1 +" "+ result2).toUpperCase();
});
System.out.println("获取任务1结果:"+stringCompletableFuture.get());
System.out.println("获取任务2结果:"+stringCompletableFuture2.get());
System.out.println("获取任务1和任务2合并结果:"+stringCompletableFuture3.get());
System.out.println("主线程执行结束了: "+Thread.currentThread().getName());
这里需要注意CompletableFuture有另个父级接口CompletableState、Future。这里我用任务1thenCombine时,其实是需要传入CompletableState的,所以CompletableState是可以传入的。第二个对象是一个BIFunction,所以传入两个参数返回一个,传入的两个参数就是任务1和任务2的处理结果。
5.2 双任务组合处理:thenAcceptBoth() 三个方法
这个API与之前的accept的类似,都是接收参数,不返回的,其他的和thenCombine类似,同样
CompletableFuture<String> stringCompletableFuture = CompletableFuture.supplyAsync(() -> {
    System.out.println("supplyAsync子任务【1】执行了: " + Thread.currentThread().getName());
    try {
        Thread.sleep(3000L);
    } catch (InterruptedException e) {
        throw new RuntimeException(e);
    }
    return "Hello";
});

CompletableFuture<String> stringCompletableFuture2 = CompletableFuture.supplyAsync(() -> {
    System.out.println("supplyAsync子任务【2】执行了: " + Thread.currentThread().getName());
    try {
        Thread.sleep(1000L);
    } catch (InterruptedException e) {
        throw new RuntimeException(e);
    }
    return "World";
});


CompletableFuture<Void> stringCompletableFuture3 = stringCompletableFuture.thenAcceptBoth(stringCompletableFuture2, (result1, result2) -> {
    System.out.println("任务1执行结果:" + result1 + ", 任务2执行结果:" + result2);
//                return (result1 +" "+ result2).toUpperCase();
});


System.out.println("获取任务1结果:"+stringCompletableFuture.get());
System.out.println("获取任务2结果:"+stringCompletableFuture2.get());
System.out.println("获取任务1和任务2合并结果:"+stringCompletableFuture3.get());


System.out.println("主线程执行结束了: "+Thread.currentThread().getName());
可以预想到任务1和任务2的组合结果是null,其他和上一个API没有区别
5.3 双任务组合处理:runAfterBoth() 三个方法
这个和其他run也一样,不接受返回结果,也不返回结果,只是等待前两个任务处理结束就行,这里其中任务一个都是可以任务链的,当前前面的也是一样。
CompletableFuture<String> stringCompletableFuture = CompletableFuture.supplyAsync(() -> {
System.out.println("supplyAsync子任务【1】执行了: " + Thread.currentThread().getName());
try {
Thread.sleep(3000L);
} catch (InterruptedException e) {
throw new RuntimeException(e);
}
return "Hello";
});
CompletableFuture<String> stringCompletableFuture2 = CompletableFuture.supplyAsync(() -> {
System.out.println("supplyAsync子任务【2】执行了: " + Thread.currentThread().getName());
try {
Thread.sleep(1000L);
} catch (InterruptedException e) {
throw new RuntimeException(e);
}
return "World";
});
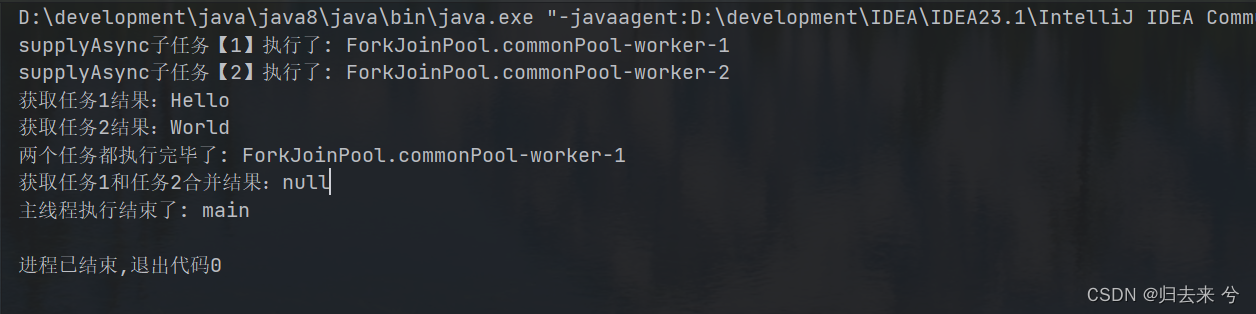
CompletableFuture<Void> stringCompletableFuture3 = stringCompletableFuture.runAfterBothAsync(stringCompletableFuture2, () -> {
System.out.println("两个任务都执行完毕了: " + Thread.currentThread().getName());
});
System.out.println("获取任务1结果:"+stringCompletableFuture.get());
System.out.println("获取任务2结果:"+stringCompletableFuture2.get());
System.out.println("获取任务1和任务2合并结果:"+stringCompletableFuture3.get());
System.out.println("主线程执行结束了: "+Thread.currentThread().getName());
5.4 双任务组合处理:applyToEither() 三个方法
这个和后面的API都是一个类型的,他们是当两个任务有任何一个执行完毕时都会触发,谁先执行结束获取到的数据就是谁的。applyToEither支持传入和返回。同时它也有三个方法,还有一个是异步的,一个是支持异步传入线程池的,x下面是一个异步的。
CompletableFuture<String> stringCompletableFuture = CompletableFuture.supplyAsync(() -> {
System.out.println("supplyAsync子任务【1】执行了: " + Thread.currentThread().getName());
try {
Thread.sleep(3000L);
} catch (InterruptedException e) {
throw new RuntimeException(e);
}
return "Hello";
});
CompletableFuture<String> stringCompletableFuture2 = CompletableFuture.supplyAsync(() -> {
System.out.println("supplyAsync子任务【2】执行了: " + Thread.currentThread().getName());
try {
Thread.sleep(1000L);
} catch (InterruptedException e) {
throw new RuntimeException(e);
}
return "World";
});
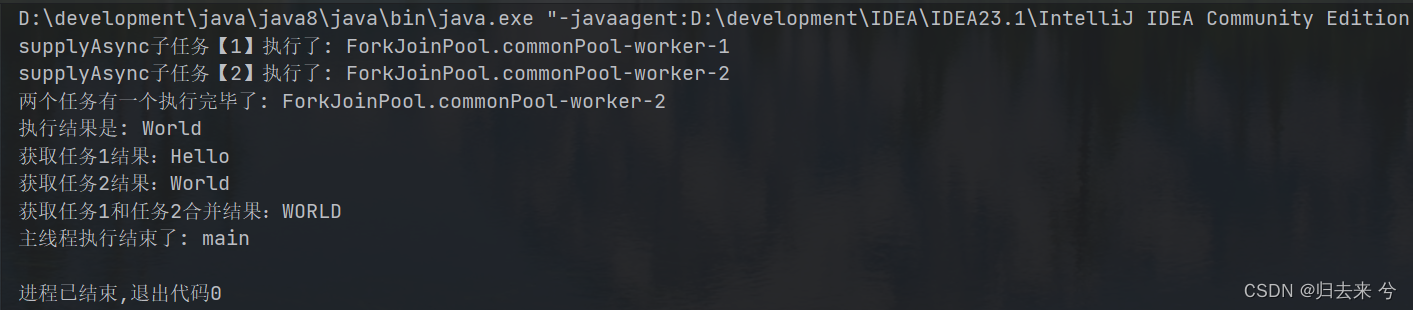
CompletableFuture<String> stringCompletableFuture3 = stringCompletableFuture.applyToEitherAsync(stringCompletableFuture2, s -> {
System.out.println("两个任务有一个执行完毕了: " + Thread.currentThread().getName());
System.out.println("执行结果是: " + s);
return s.toUpperCase();
});
System.out.println("获取任务1结果:"+stringCompletableFuture.get());
System.out.println("获取任务2结果:"+stringCompletableFuture2.get());
System.out.println("获取任务1和任务2合并结果:"+stringCompletableFuture3.get());
System.out.println("主线程执行结束了: "+Thread.currentThread().getName());
5.5 双任务组合处理:acceptEither 三个方法
这个只接受不返回,其他和同类API类似
CompletableFuture<String> stringCompletableFuture = CompletableFuture.supplyAsync(() -> {
System.out.println("supplyAsync子任务【1】执行了: " + Thread.currentThread().getName());
try {
Thread.sleep(3000L);
} catch (InterruptedException e) {
throw new RuntimeException(e);
}
return "Hello";
});
CompletableFuture<String> stringCompletableFuture2 = CompletableFuture.supplyAsync(() -> {
System.out.println("supplyAsync子任务【2】执行了: " + Thread.currentThread().getName());
try {
Thread.sleep(1000L);
} catch (InterruptedException e) {
throw new RuntimeException(e);
}
return "World";
});
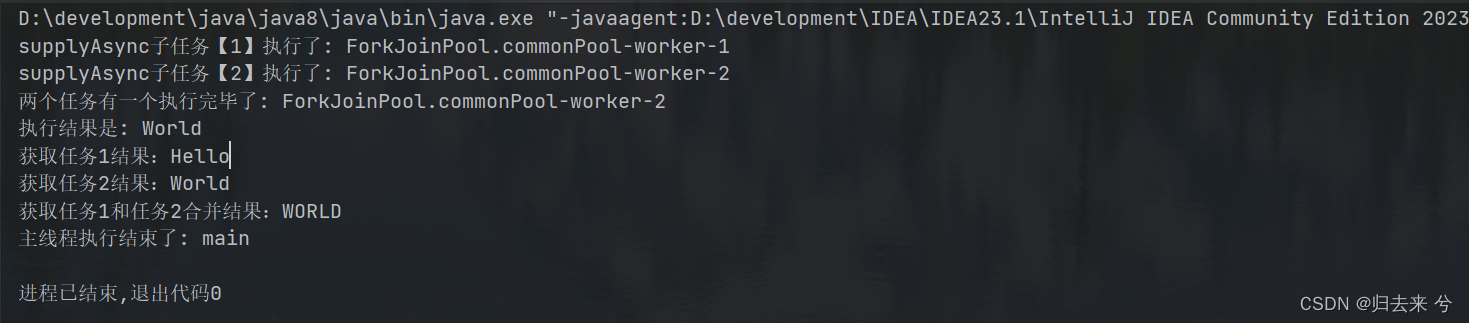
CompletableFuture<Void> stringCompletableFuture3 = stringCompletableFuture.acceptEither(stringCompletableFuture2, s -> {
System.out.println("两个任务有一个执行完毕了: " + Thread.currentThread().getName());
System.out.println("执行结果是: " + s);
// return s.toUpperCase();
});
System.out.println("获取任务1结果:"+stringCompletableFuture.get());
System.out.println("获取任务2结果:"+stringCompletableFuture2.get());
System.out.println("获取任务1和任务2合并结果:"+stringCompletableFuture3.get());
System.out.println("主线程执行结束了: "+Thread.currentThread().getName());
5.6 双任务组合处理:runAfterEither 三个方法
不接收不返回,他们都是有三个方法,如下:
CompletableFuture<String> stringCompletableFuture = CompletableFuture.supplyAsync(() -> {
    System.out.println("supplyAsync子任务【1】执行了: " + Thread.currentThread().getName());
    try {
        Thread.sleep(3000L);
    } catch (InterruptedException e) {
        throw new RuntimeException(e);
    }
    return "Hello";
});

CompletableFuture<String> stringCompletableFuture2 = CompletableFuture.supplyAsync(() -> {
    System.out.println("supplyAsync子任务【2】执行了: " + Thread.currentThread().getName());
    try {
        Thread.sleep(1000L);
    } catch (InterruptedException e) {
        throw new RuntimeException(e);
    }
    return "World";
});

CompletableFuture<Void> stringCompletableFuture3 = stringCompletableFuture.runAfterEither(stringCompletableFuture2, () -> {
    System.out.println("两个任务有一个执行完毕了: " + Thread.currentThread().getName());
//                System.out.println("执行结果是: " + s);
//                return s.toUpperCase();
});


System.out.println("获取任务1结果:"+stringCompletableFuture.get());
System.out.println("获取任务2结果:"+stringCompletableFuture2.get());
System.out.println("获取任务1和任务2合并结果:"+stringCompletableFuture3.get());


System.out.println("主线程执行结束了: "+Thread.currentThread().getName());
6.1 多任务组合处理:allOf()
上面的API可以处理双任务的组合处理,但是多余两个就没办法了,所以还有allOf这个方法,当传入的任务全部执行完毕后会进行触发该方法。如下:这里需要特别注意的是,若是最后的组合处理时间较慢,主线程已经结束,则可能会造成子任务未执行。这里无论是使用同步还是异步处理都会有这个问题,因为无论是同步还是异步都会优先使用线程池中的线程,其实都是类似于异步的。而使用了线程池中的线程又没有阻塞等待结果,主线程就会执行完毕,导致最终的任务没有被执行,这个很好复现,只需要把下面代码最后的的get方法调用去掉即可。
CompletableFuture<String> stringCompletableFuture = CompletableFuture.supplyAsync(() -> {
    System.out.println("supplyAsync子任务【1】执行了: " + Thread.currentThread().getName());
    try {
        Thread.sleep(3000L);
    } catch (InterruptedException e) {
        throw new RuntimeException(e);
    }
    return "Hello";
});

CompletableFuture<String> stringCompletableFuture2 = CompletableFuture.supplyAsync(() -> {
    System.out.println("supplyAsync子任务【2】执行了: " + Thread.currentThread().getName());
    try {
        Thread.sleep(1000L);
    } catch (InterruptedException e) {
        throw new RuntimeException(e);
    }
    return "World";
});

CompletableFuture<String> stringCompletableFuture3 = CompletableFuture.supplyAsync(() -> {
    System.out.println("supplyAsync子任务【3】执行了: " + Thread.currentThread().getName());
    try {
        Thread.sleep(2000L);
    } catch (InterruptedException e) {
        throw new RuntimeException(e);
    }
    return "CompletableFuture";
});

CompletableFuture.allOf(stringCompletableFuture, stringCompletableFuture2, stringCompletableFuture3).thenRunAsync(()->{
    System.out.println("所有任务都结束了: "+Thread.currentThread().getName());
    // 执行到这里所有任务肯定都结束了,所以我们是可以手动获取到结果的
    try {
        System.out.println("获取任务1结果:"+stringCompletableFuture.get());
        System.out.println("获取任务2结果:"+stringCompletableFuture2.get());
        System.out.println("获取任务3结果:"+stringCompletableFuture3.get());
    } catch (Exception e) {
        throw new RuntimeException(e);
    }

});

// TODO 这个很重要,若是不对最终结果进行阻塞,可能会造成最后的任务不执行
System.out.println(voidCompletableFuture.get());


System.out.println("主线程执行结束了: "+Thread.currentThread().getName());

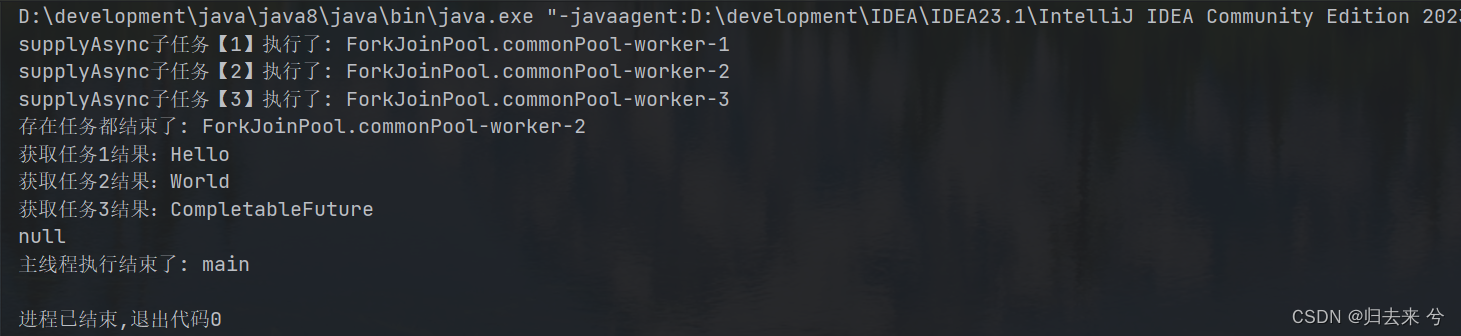
6.2 多任务组合处理:anyOf()
与上面类似,只不过是任意一个执行结束就会触发,不过极端情况下也可能会出现上面同样的问题,所以对最后一个任务的结果进行阻塞是有必要的。
CompletableFuture<String> stringCompletableFuture = CompletableFuture.supplyAsync(() -> {
    System.out.println("supplyAsync子任务【1】执行了: " + Thread.currentThread().getName());
    try {
        Thread.sleep(3000L);
    } catch (InterruptedException e) {
        throw new RuntimeException(e);
    }
    return "Hello";
});

CompletableFuture<String> stringCompletableFuture2 = CompletableFuture.supplyAsync(() -> {
    System.out.println("supplyAsync子任务【2】执行了: " + Thread.currentThread().getName());
    try {
        Thread.sleep(1000L);
    } catch (InterruptedException e) {
        throw new RuntimeException(e);
    }
    return "World";
});

CompletableFuture<String> stringCompletableFuture3 = CompletableFuture.supplyAsync(() -> {
    System.out.println("supplyAsync子任务【3】执行了: " + Thread.currentThread().getName());
    try {
        Thread.sleep(2000L);
    } catch (InterruptedException e) {
        throw new RuntimeException(e);
    }
    return "CompletableFuture";
});

CompletableFuture<Void> voidCompletableFuture = CompletableFuture.anyOf(stringCompletableFuture, stringCompletableFuture2, stringCompletableFuture3).thenRun(() -> {
    System.out.println("存在任务都结束了: " + Thread.currentThread().getName());
    // 执行到这里所有任务肯定都结束了,所以我们是可以手动获取到结果的
    try {
        // 这里获取结果,相当于阻塞了任务的执行,可以保障所有任务都执行结束了
        System.out.println("获取任务1结果:" + stringCompletableFuture.get());
        System.out.println("获取任务2结果:" + stringCompletableFuture2.get());
        System.out.println("获取任务3结果:" + stringCompletableFuture3.get());
    } catch (Exception e) {
        throw new RuntimeException(e);
    }

});

// TODO 这个很重要,若是不对最终结果进行阻塞,可能会造成最后的任务不执行
System.out.println(voidCompletableFuture.get());


System.out.println("主线程执行结束了: "+Thread.currentThread().getName());
![[C++] string类常用接口的模拟实现](https://img-blog.csdnimg.cn/0167ff73d9c04965846dfb80bc702d47.png)