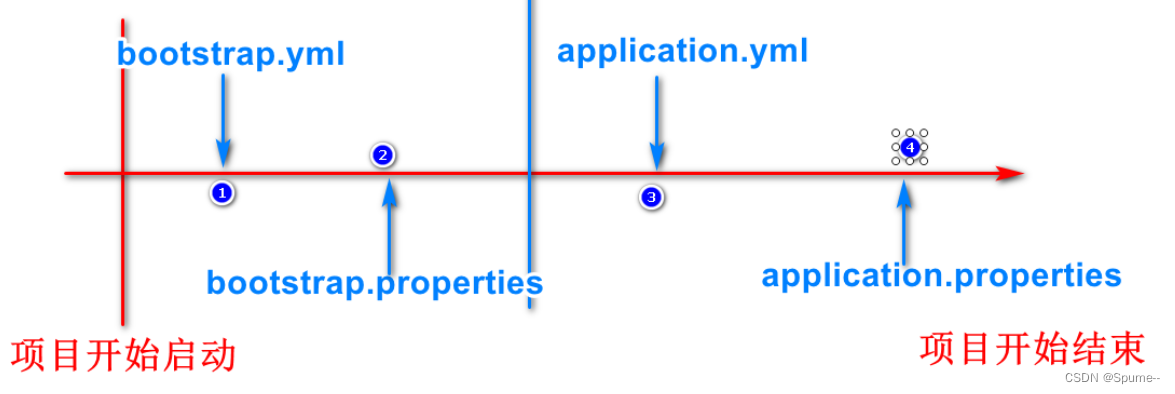
Spring boot
全局异常捕捉
在一个项目中的异常我们我们都会统一进行处理的,那么如何进行统一进行处理呢?
新建一个类 GlobalDefaultExceptionHandler,
在 class 注解上@ControllerAdvice,
@C
ONTROLLER
A
DVICE
:即把@C
ONTROLLER
A
DVICE
注解内部使用@E
XCEPTION
H
ANDLER
、@I
NIT
B
INDER
、
@M
ODEL
A
TTRIBUTE
注解的方法应用到所有的 @R
EQUEST
M
APPING
注解的方法。非常简单,不过只有当使用
@E
XCEPTION
H
ANDLER
最有用,另外两个用处不大。
在方法上注解上@ExceptionHandler(value = Exception.class),具体代码如下
package
com.hpit.base.exception;
import
javax.servlet.http.HttpServletRequest;
import
org.springframework.web.bind.annotation.ControllerAdvice;
import
org.springframework.web.bind.annotation.ExceptionHandler;
@ControllerAdvice
publicclass
GlobalDefaultExceptionHandler {
@ExceptionHandler
(value = Exception.
class
)
publicvoid
defaultErrorHandler(HttpServletRequest
req
, Exception
e
) {
// // If the exception is annotated with @ResponseStatus rethrow it and let
// // the framework handle it - like the OrderNotFoundException example
// // at the start of this post.
// // AnnotationUtils is a Spring Framework utility class.
// if (AnnotationUtils.findAnnotation(e.getClass(), ResponseStatus.class) != null)
// throw e;
//
// // Otherwise setup and send the user to a default error-view.
// ModelAndView mav = new ModelAndView();
// mav.addObject("exception", e);
关注公众号
Java
核⼼技术获取更多教程
10
/
108
// mav.addObject("url", req.getRequestURL());
// mav.setViewName(DEFAULT_ERROR_VIEW);
// return mav;
//
打印异常信息:
e
.printStackTrace();
System.
out
.println(
"GlobalDefaultExceptionHandler.defaultErrorHandler()"
);
/*
*
返回
json
数据或者
String
数据:
*
那么需要在方法上加上注解:
@ResponseBody
*
添加
return
即可。
*/
/*
*
返回视图:
*
定义一个
ModelAndView
即可,
*
然后
return;
*
定义视图文件
(
比如:
error.html,error.ftl,error.jsp);
*
*/
}
}
com.hpit.test.web.DemoController
加入方法:
@RequestMapping
(
"/zeroException"
)
publicint
zeroException(){
return
100/0;
}
访问:
http://127.0.0.1:8080/zeroException
这个方法肯定是抛出异常的
,
那么在控制台就可以看到我们全局捕捉
的异常信息了
5 Spring boot JPA
连接数据库
在任何一个平台都逃离不了数据库的操作,那么在
spring boot
中怎么接入数据库呢?
很简单,我们需要在 application.properties 进行配置一下,application.properties 路径是 src/main/resources 下,
对于 application.properties 更多的介绍请自行百度进行查找相关资料进行查看,在此不进行过多的介绍,以下只
是 mysql 的配置文件。
大体步骤:
(1)在 application.properties 中加入 datasouce 的配置
关注公众号
Java
核⼼技术获取更多教程
11
/
108
(2)在 pom.xml 加入 mysql 的依赖。
(3)获取 DataSouce 的 Connection 进行测试。
src/main/resouces/application.properties:
########################################################
###datasource
########################################################
spring.datasource.url =
jdbc:mysql://localhost:3306/test
spring.datasource.username =
root
spring.datasource.password =
root
spring.datasource.driverClassName =
com.mysql.jdbc.Driver
spring.datasource.max-active=
20
spring.datasource.max-idle=
8
spring.datasource.min-idle=
8
spring.datasource.initial-size=
10
pom.xml
配置:
<
dependency
>
<
groupId
>
mysql
</
groupId
>
<
artifactId
>
mysql-connector-java
</
artifactId
>
</
dependency
>
到此相关配置就
ok
了,那么就可以在项目中进行测试了,我们可以新建一个
class Demo
进行测试,实体类创建
完毕之后,我们可能需要手动进行编写建表语句,这时候我们可能就会想起
Hibernate
的好处了。