点击上方“小白学视觉”,选择加"星标"或“置顶”
重磅干货,第一时间送达基于OpenCV实现SIFT特征提取与BOW(Bag of Word)生成向量数据,然后使用sklearn的线性SVM分类器训练模型,实现图像分类预测。实现基于词袋模型的图像分类预测与搜索,大致要分为如下四步:
1.特征提取与描述生成
这里选择SIFT特征,SIFT特征具有放缩、旋转、光照不变性,同时兼有对几何畸变,图像几何变形的一定程度的鲁棒性,使用Python OpenCV扩展模块中的SIFT特征提取接口,就可以提取图像的SIFT特征点与描述子。
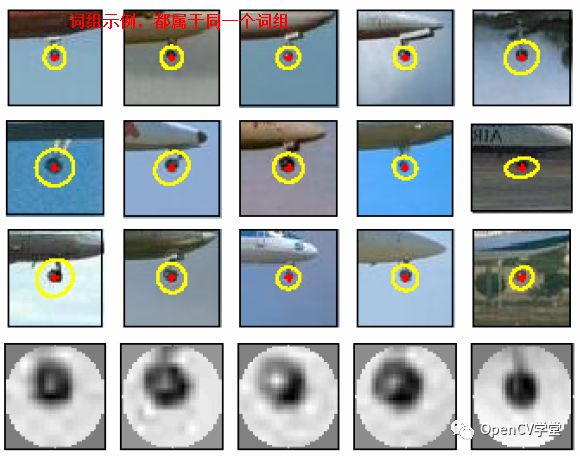
2.词袋生成
词袋生成,是基于描述子数据的基础上,生成一系列的向量数据,最常见就是首先通过K-Means实现对描述子数据的聚类分析,一般会分成100个聚类、得到每个聚类的中心数据,就生成了100 词袋,根据每个描述子到这些聚类中心的距离,决定了它属于哪个聚类,这样就生成了它的直方图表示数据。
3.SVM分类训练与模型生成
使用SVM进行数据的分类训练,得到输出模型,这里通过sklearn的线性SVM训练实现了分类模型训练与导出。
4.模型使用与预测
加载预训练好的模型,使用模型在测试集上进行数据预测,测试表明,对于一些简单的图像分类与相似图像预测都可以获得比较好的效果。
完整步骤图示如下:
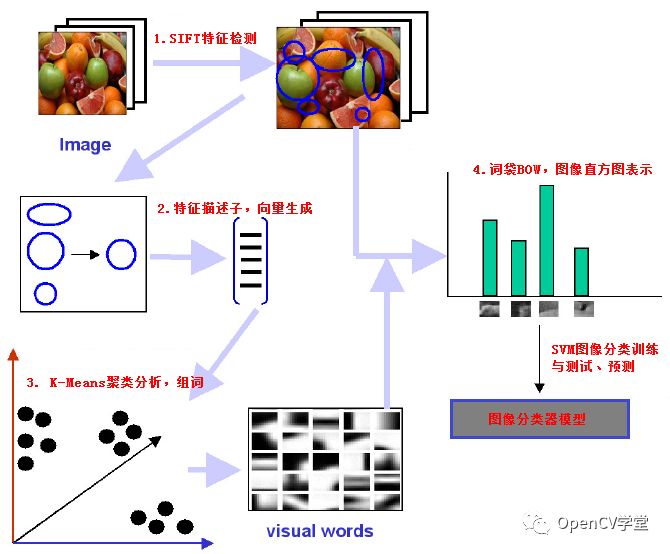
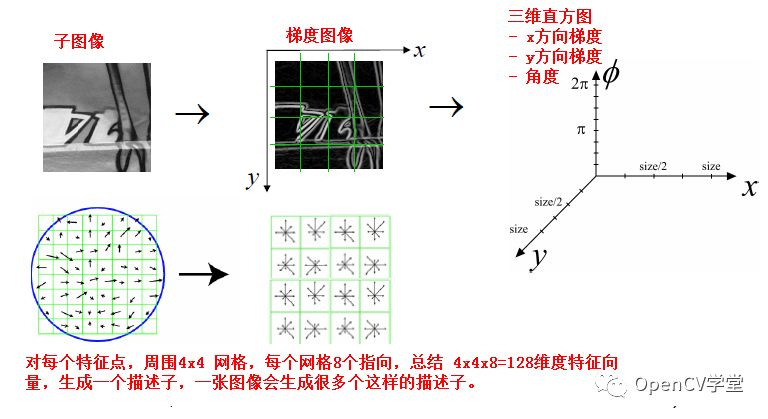
其中SIFT特征提取算法主要有如下几步:
1.构建高斯金子塔图像,寻找极值点 2.极值点亚像素级别定位 3.图像梯度与角度直方图建立 4.特征描述子建立
K-Means聚类方法 - 参见公众号以前的文章即可
OpenCV中KMeans算法介绍与应用
代码实现,特征提取与训练模型导出
import cv2
import imutils
import numpy as np
import os
from sklearn.svm import LinearSVC
from sklearn.externals import joblib
from scipy.cluster.vq import *
from sklearn.preprocessing import StandardScaler
# Get the training classes names and store them in a list
train_path = "dataset/train/"
training_names = os.listdir(train_path)
# Get all the path to the images and save them in a list
# image_paths and the corresponding label in image_paths
image_paths = []
image_classes = []
class_id = 0
for training_name in training_names:dir = os.path.join(train_path, training_name)class_path = imutils.imlist(dir)image_paths += class_pathimage_classes += [class_id] * len(class_path)class_id += 1
# 创建SIFT特征提取器
sift = cv2.xfeatures2d.SIFT_create()
# 特征提取与描述子生成
des_list = []
for image_path in image_paths:im = cv2.imread(image_path)im = cv2.resize(im, (300, 300))kpts = sift.detect(im)kpts, des = sift.compute(im, kpts)des_list.append((image_path, des))print("image file path : ", image_path)
# 描述子向量
descriptors = des_list[0][1]
for image_path, descriptor in des_list[1:]:descriptors = np.vstack((descriptors, descriptor))
# 100 聚类 K-Means
k = 100
voc, variance = kmeans(descriptors, k, 1)
# 生成特征直方图
im_features = np.zeros((len(image_paths), k), "float32")
for i in range(len(image_paths)):words, distance = vq(des_list[i][1], voc)for w in words:im_features[i][w] += 1
# 实现动词词频与出现频率统计
nbr_occurences = np.sum((im_features > 0) * 1, axis=0)
idf = np.array(np.log((1.0 * len(image_paths) + 1) / (1.0 * nbr_occurences + 1)), 'float32')
# 尺度化
stdSlr = StandardScaler().fit(im_features)
im_features = stdSlr.transform(im_features)
# Train the Linear SVM
clf = LinearSVC()
clf.fit(im_features, np.array(image_classes))
# Save the SVM
print("training and save model...")
joblib.dump((clf, training_names, stdSlr, k, voc), "bof.pkl", compress=3)
在训练图像上的运行输出:
"C:\Program Files\Python\Python36\python.exe" D:/python/image_classification/feature_detection.py
image file path :  dataset/train/aeroplane\1.jpg
image file path :  dataset/train/aeroplane\10.jpg
image file path :  dataset/train/aeroplane\11.jpg
image file path :  dataset/train/aeroplane\12.jpg
image file path :  dataset/train/aeroplane\13.jpg
image file path :  dataset/train/aeroplane\14.jpg
image file path :  dataset/train/aeroplane\15.jpg
image file path :  dataset/train/aeroplane\16.jpg
image file path :  dataset/train/aeroplane\17.jpg
image file path :  dataset/train/aeroplane\2.jpg
image file path :  dataset/train/aeroplane\3.jpg
image file path :  dataset/train/aeroplane\4.jpg
image file path :  dataset/train/aeroplane\5.jpg
image file path :  dataset/train/aeroplane\6.jpg
image file path :  dataset/train/aeroplane\7.jpg
image file path :  dataset/train/aeroplane\8.jpg
image file path :  dataset/train/aeroplane\9.jpg
image file path :  dataset/train/bicycle\1.jpg
image file path :  dataset/train/bicycle\10.jpg
image file path :  dataset/train/bicycle\11.jpg
image file path :  dataset/train/bicycle\12.jpg
image file path :  dataset/train/bicycle\13.jpg
image file path :  dataset/train/bicycle\14.JPG
image file path :  dataset/train/bicycle\15.png
image file path :  dataset/train/bicycle\16.jpg
image file path :  dataset/train/bicycle\17.jpg
image file path :  dataset/train/bicycle\2.jpg
image file path :  dataset/train/bicycle\3.jpg
image file path :  dataset/train/bicycle\4.png
image file path :  dataset/train/bicycle\5.jpg
image file path :  dataset/train/bicycle\6.jpg
image file path :  dataset/train/bicycle\7.jpg
image file path :  dataset/train/bicycle\8.JPG
image file path :  dataset/train/bicycle\9.jpg
image file path :  dataset/train/car\1.jpg
image file path :  dataset/train/car\10.jpg
image file path :  dataset/train/car\11.jpg
image file path :  dataset/train/car\12.jpg
image file path :  dataset/train/car\13.jpg
image file path :  dataset/train/car\14.jpg
image file path :  dataset/train/car\15.jpg
image file path :  dataset/train/car\16.jpg
image file path :  dataset/train/car\17.jpg
image file path :  dataset/train/car\2.jpeg
image file path :  dataset/train/car\3.jpg
image file path :  dataset/train/car\4.jpg
image file path :  dataset/train/car\5.jpg
image file path :  dataset/train/car\6.jpg
image file path :  dataset/train/car\7.jpg
image file path :  dataset/train/car\8.jpg
image file path :  dataset/train/car\9.jpg
training and save model...
程序测试
import os
import imutils
import cv2 as cv
import numpy as np
from sklearn.externals import joblib
from scipy.cluster.vq import *
# Load the classifier, class names, scaler, number of clusters and vocabulary
clf, classes_names, stdSlr, k, voc = joblib.load("bof.pkl")
# Create feature extraction and keypoint detector objects
sift = cv.xfeatures2d.SIFT_create()
def predict_image(image_path):# List where all the descriptors are storeddes_list = []im = cv.imread(image_path, cv.IMREAD_GRAYSCALE)im = cv.resize(im, (300, 300))kpts = sift.detect(im)kpts, des = sift.compute(im, kpts)des_list.append((image_path, des))descriptors = des_list[0][1]for image_path, descriptor in des_list[0:]:descriptors = np.vstack((descriptors, descriptor))test_features = np.zeros((1, k), "float32")words, distance = vq(des_list[0][1], voc)for w in words:test_features[0][w] += 1# Perform Tf-Idf vectorizationnbr_occurences = np.sum((test_features > 0) * 1, axis=0)idf = np.array(np.log((1.0 + 1) / (1.0 * nbr_occurences + 1)), 'float32')# Scale the featurestest_features = stdSlr.transform(test_features)# Perform the predictionspredictions = [classes_names[i] for i in clf.predict(test_features)]return predictions
if __name__ == "__main__":test_path = "dataset/test/"testing_names = os.listdir(test_path)image_paths = []for training_name in testing_names:dir = os.path.join(test_path, training_name)class_path = imutils.imlist(dir)image_paths += class_pathfor image_path in image_paths:predictions = predict_image(image_path)print("image: %s, classes : %s"%(image_path, predictions))
测试集预测运行结果:
"C:\Program Files\Python\Python36\python.exe" D:/python/image_classification/demo.py
image: dataset/test/aeroplane\test_1.jpg, classes : ['aeroplane']
image: dataset/test/aeroplane\test_2.jpg, classes : ['aeroplane']
image: dataset/test/aeroplane\test_3.jpg, classes : ['aeroplane']
image: dataset/test/bicycle\test_1.jpg, classes : ['bicycle']
image: dataset/test/bicycle\test_2.JPG, classes : ['bicycle']
image: dataset/test/bicycle\test_3.jpg, classes : ['bicycle']
image: dataset/test/car\test_1.jpg, classes : ['car']
image: dataset/test/car\test_2.jpg, classes : ['car']
image: dataset/test/car\test_3.jpg, classes : ['car']
总结
只需要几十张图像训练集,就可以对后续的图像做出一个简单的分类预测,对于一些要求不高的web项目来说,植入的成本与代价很小,值得一试!同时为了减小计算量,我对图像的最大尺度resize到300x300大小。
下载1:OpenCV-Contrib扩展模块中文版教程
在「小白学视觉」公众号后台回复:扩展模块中文教程,即可下载全网第一份OpenCV扩展模块教程中文版,涵盖扩展模块安装、SFM算法、立体视觉、目标跟踪、生物视觉、超分辨率处理等二十多章内容。
下载2:Python视觉实战项目52讲
在「小白学视觉」公众号后台回复:Python视觉实战项目,即可下载包括图像分割、口罩检测、车道线检测、车辆计数、添加眼线、车牌识别、字符识别、情绪检测、文本内容提取、面部识别等31个视觉实战项目,助力快速学校计算机视觉。
下载3:OpenCV实战项目20讲
在「小白学视觉」公众号后台回复:OpenCV实战项目20讲,即可下载含有20个基于OpenCV实现20个实战项目,实现OpenCV学习进阶。
交流群
欢迎加入公众号读者群一起和同行交流,目前有SLAM、三维视觉、传感器、自动驾驶、计算摄影、检测、分割、识别、医学影像、GAN、算法竞赛等微信群(以后会逐渐细分),请扫描下面微信号加群,备注:”昵称+学校/公司+研究方向“,例如:”张三 + 上海交大 + 视觉SLAM“。请按照格式备注,否则不予通过。添加成功后会根据研究方向邀请进入相关微信群。请勿在群内发送广告,否则会请出群,谢谢理解~