2019独角兽企业重金招聘Python工程师标准>>> 
使用Redis进行全页面缓存,如何实现呢?本文使用简单的思路来实现这个功能。
一、环境介绍
- 使用的开源框架主要是springmvc、spring-data-redis、redis
- 开发工具:Intellij IDEA 2017.2.4
- jdk版本:1.8
- maven版本:3.5.0
- redis版本:4.0.1
- 操作系统是MacOS
二、具体实现以及源码
本工程使用maven构建的,pom.xml内容如下:
<?xml version="1.0" encoding="UTF-8"?>
<project xmlns="http://maven.apache.org/POM/4.0.0"xmlns:xsi="http://www.w3.org/2001/XMLSchema-instance"xsi:schemaLocation="http://maven.apache.org/POM/4.0.0 http://maven.apache.org/xsd/maven-4.0.0.xsd"><modelVersion>4.0.0</modelVersion><groupId>com.xwszt721</groupId><artifactId>pagecache</artifactId><version>1.0</version><packaging>war</packaging><properties><!-- logback --><logback.version>1.2.2</logback.version><slf4j.version>1.7.25</slf4j.version><encoding>UTF-8</encoding><!-- 属性定义 --><maven.compile.source>1.7</maven.compile.source><maven.compile.target>1.7</maven.compile.target></properties><dependencies><dependency><groupId>redis.clients</groupId><artifactId>jedis</artifactId><version>2.9.0</version></dependency><dependency><groupId>org.springframework</groupId><artifactId>spring-webmvc</artifactId><version>4.3.10.RELEASE</version></dependency><dependency><groupId>org.springframework.data</groupId><artifactId>spring-data-redis</artifactId><version>1.8.6.RELEASE</version></dependency><dependency><groupId>commons-lang</groupId><artifactId>commons-lang</artifactId><version>2.6</version></dependency><!-- logback --><dependency><groupId>org.slf4j</groupId><artifactId>slf4j-api</artifactId><version>${slf4j.version}</version></dependency><dependency><groupId>org.slf4j</groupId><artifactId>jcl-over-slf4j</artifactId><version>${slf4j.version}</version></dependency><dependency><groupId>ch.qos.logback</groupId><artifactId>logback-core</artifactId><version>${logback.version}</version></dependency><dependency><groupId>ch.qos.logback</groupId><artifactId>logback-classic</artifactId><version>${logback.version}</version></dependency><dependency><groupId>javax.servlet</groupId><artifactId>servlet-api</artifactId><version>2.5</version></dependency></dependencies><build><plugins><plugin><groupId>org.apache.maven.plugins</groupId><artifactId>maven-compiler-plugin</artifactId><configuration><source>${maven.compile.source}</source><target>${maven.compile.target}</target><encoding>${encoding}</encoding></configuration></plugin><plugin><groupId>org.eclipse.jetty</groupId><artifactId>jetty-maven-plugin</artifactId><version>9.4.2.v20170220</version><configuration><webAppConfig><contextPath>/</contextPath></webAppConfig></configuration></plugin></plugins></build>
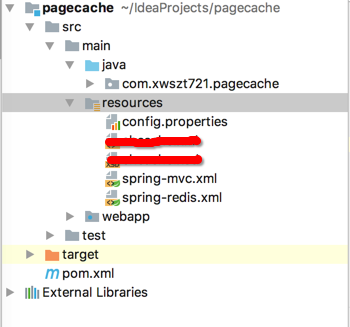
</project>工程目录结构如下:
(红线划掉的内容与本文无关)
spring-mvc.xml内容如下:
<?xml version="1.0" encoding="UTF-8"?>
<beans xmlns="http://www.springframework.org/schema/beans" xmlns:xsi="http://www.w3.org/2001/XMLSchema-instance"xmlns:context="http://www.springframework.org/schema/context" xsi:schemaLocation="http://www.springframework.org/schema/beanshttp://www.springframework.org/schema/beans/spring-beans.xsdhttp://www.springframework.org/schema/context  http://www.springframework.org/schema/context/spring-context.xsd"><!-- 加载系统配置文件 --><context:property-placeholder location="classpath:config.properties"/><!-- 自动扫描该包,使SpringMVC认为包下用了@controller注解的类是控制器 --><context:component-scan base-package="com.xwszt721.pagecache.controller" use-default-filters="false"><context:include-filter type="annotation" expression="org.springframework.stereotype.Controller"/><context:include-filter type="annotation" expression="org.springframework.web.bind.annotation.ControllerAdvice"/></context:component-scan><!-- REST中根据URL后缀自动判定Content-Type及相应的View --><bean id="contentNegotiationManager" class="org.springframework.web.accept.ContentNegotiationManagerFactoryBean"><property name="mediaTypes" ><map><entry key="xml" value="application/xml"/><entry key="json" value="application/json"/></map></property><property name="ignoreAcceptHeader" value="true"/><property name="favorPathExtension" value="true"/></bean><!-- 配置视图解析 --><!-- 定义跳转的文件的前后缀 ,视图模式配置 --><bean id="internalResourceViewResolver" class="org.springframework.web.servlet.view.InternalResourceViewResolver"><!-- 这里的配置我的理解是自动给后面action的方法return的字符串加上前缀和后缀,变成一个 可用的url地址 --><property name="prefix" value="${web.view.prefix}"/><property name="suffix" value="${web.view.suffix}"/></bean>
</beans>
spring-redis.xml内容如下:
<?xml version="1.0" encoding="UTF-8"?>
<beans xmlns="http://www.springframework.org/schema/beans" xmlns:xsi="http://www.w3.org/2001/XMLSchema-instance"xmlns:context="http://www.springframework.org/schema/context" xmlns:c="http://www.springframework.org/schema/c"xsi:schemaLocation="http://www.springframework.org/schema/beanshttp://www.springframework.org/schema/beans/spring-beans.xsdhttp://www.springframework.org/schema/contexthttp://www.springframework.org/schema/context/spring-context.xsd" default-autowire="byName"default-lazy-init="false"><!-- 采用注释的方式配置bean --><context:annotation-config /><bean id="jedisPoolConfig" class="redis.clients.jedis.JedisPoolConfig"><property name="maxIdle" value="1" /><property name="maxTotal" value="5" /><property name="blockWhenExhausted" value="true" /><property name="maxWaitMillis" value="30000" /><property name="testOnBorrow" value="true" /></bean><bean id="jedisConnectionFactory" class="org.springframework.data.redis.connection.jedis.JedisConnectionFactory"><property name="hostName" value="127.0.0.1" /><property name="port" value="6379"/><property name="poolConfig" ref="jedisPoolConfig" /><property name="usePool" value="true"/></bean><bean id="redisTemplate" class="org.springframework.data.redis.core.StringRedisTemplate"><property name="connectionFactory"   ref="jedisConnectionFactory" /></bean></beans>
config.properties文件内容如下:
## springmvc
web.view.prefix=/WEB-INF/views/
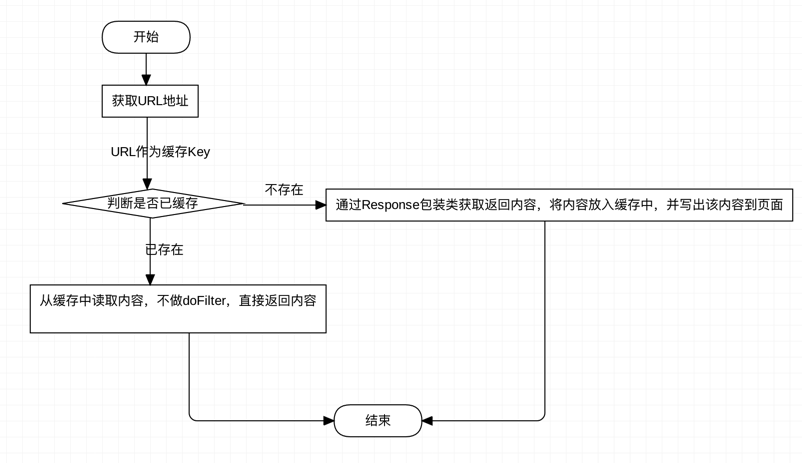
web.view.suffix=.jspfilter的实现流程图如下:
filter的实现源码如下:
package com.xwszt721.pagecache.filter;import org.apache.commons.lang.StringUtils;
import org.slf4j.Logger;
import org.slf4j.LoggerFactory;
import org.springframework.context.ApplicationContext;
import org.springframework.data.redis.core.StringRedisTemplate;
import org.springframework.web.context.support.WebApplicationContextUtils;import javax.servlet.*;
import javax.servlet.http.HttpServletRequest;
import javax.servlet.http.HttpServletResponse;
import java.io.IOException;
import java.util.concurrent.TimeUnit;/*** Project: pagecache* Description:** @author: xwszt* @version: 1.0* Create Date: 2017/9/15*/
public class CacheFilter implements Filter {private static final Logger log = LoggerFactory.getLogger(CacheFilter.class);private ApplicationContext ctx;@Overridepublic void init(FilterConfig filterConfig) throws ServletException {this.ctx = WebApplicationContextUtils.getWebApplicationContext(filterConfig.getServletContext());}@Overridepublic void doFilter(ServletRequest request, ServletResponse response, FilterChain chain) throws IOException, ServletException {HttpServletResponse resp = (HttpServletResponse) response;HttpServletRequest req = (HttpServletRequest) request;// 返回响应String requestURL = req.getRequestURI().toString();String queryString = req.getQueryString();String key;if (!StringUtils.isEmpty(queryString)) {queryString = "?" + queryString;key = requestURL + queryString;log.info("当前请求被缓存:" + requestURL + queryString);} else {key = requestURL;log.info("当前请求被缓存:" + requestURL);}String pageContent = getHtmlFromCache(key);if (null == pageContent) {//缓存中没有//截取生成的html并放入缓存log.info("缓存不存在,生成缓存");ResponseWrapper wrapper = new ResponseWrapper(resp);chain.doFilter(request, wrapper);pageContent = wrapper.getResult();putIntoCache(key, pageContent);}resp.setContentType("text/html; charset=utf-8");ServletOutputStream outputStream = resp.getOutputStream();outputStream.print(pageContent);}@Overridepublic void destroy() {//nothing to do}private String getHtmlFromCache(String key) {StringRedisTemplate redis = ctx.getBean(StringRedisTemplate.class);return redis.opsForValue().get(key);}private void putIntoCache(String key, String html) {StringRedisTemplate redis = ctx.getBean(StringRedisTemplate.class);redis.opsForValue().set(key, html, 5000, TimeUnit.MILLISECONDS);}
}
ResponseWrapper.java类源码如下:
package com.xwszt721.pagecache.filter;import javax.servlet.ServletOutputStream;
import javax.servlet.http.HttpServletResponse;
import javax.servlet.http.HttpServletResponseWrapper;
import java.io.ByteArrayOutputStream;
import java.io.CharArrayWriter;
import java.io.IOException;
import java.io.PrintWriter;/*** Project: pagecache* Description:** @author: xwszt* @version: 1.0* Create Date: 2017/9/15*/
public class ResponseWrapper extends HttpServletResponseWrapper {private PrintWriter cacheWriter;private ByteArrayOutputStream outputStream;/*** Constructs a response adaptor wrapping the given response.** @param response* @throws IllegalArgumentException if the response is null*/public ResponseWrapper(HttpServletResponse response) {super(response);outputStream = new ByteArrayOutputStream();cacheWriter = new PrintWriter(outputStream, true);}@Overridepublic PrintWriter getWriter() throws IOException {return cacheWriter;}@Overridepublic ServletOutputStream getOutputStream() throws IOException {return new ServletOutputStream() {@Overridepublic void write(int b) throws IOException {outputStream.write(b);}};}public ByteArrayOutputStream getByteArrayOutputStream() {return outputStream;}/*** 获取原始的HTML页面内容* @return*/public String getResult() {flush();return outputStream.toString();}public void flush() {try {cacheWriter.flush();cacheWriter.close();outputStream.flush();outputStream.close();} catch (IOException e) {e.printStackTrace();}}
}
再来一个超级简单的controller类.
package com.xwszt721.pagecache.controller;import org.springframework.stereotype.Controller;
import org.springframework.web.bind.annotation.RequestMapping;import javax.servlet.http.HttpServletRequest;
import javax.servlet.http.HttpServletResponse;/*** Project: pagecache* Description:** @author: xwszt* @version: 1.0* Create Date: 2017/9/15*/
@Controller
@RequestMapping("/main")
public class IndexController {@RequestMapping("/idxPage")public String index() throws Exception {return "idxmain";}
}
看到这里,还需要在/WEB-INF/views/目录下写一个名字为idxmain.jsp文件,内容如下:
<%@ page import="java.text.SimpleDateFormat" %>
<%@ page import="java.util.Date" %>
<%--Created by IntelliJ IDEA.User: xwsztDate: 2017/8/6Time: 10:55To change this template use File | Settings | File Templates.
--%>
<%@ page contentType="text/html;charset=UTF-8" language="java" pageEncoding="utf-8" %>
<html>
<head><meta http-equiv=”Content-Type” content=”text/html; charset=UTF-8”><title>首页</title>
</head>
<body>
<div style="text-align:center;margin-top:360px;"><font style="color:green;font-weight:bold;font-size: 18px"><%=new SimpleDateFormat("yyyy-MM-dd hh:mm:ss").format(new Date())%></font><br><br><font style="color:red;font-weight:bold;font-size: 27px">每次刷新页面,如果时间是变动的,则说明该页面没有被缓存或缓存已经过期,否则则说明该页面已经被缓存。</font>
</div>
</body></body>
</html>
到此位置,所有的源码已经写完了,那就测试一下呗。
1、启动本地redis服务(mac下安装redis,很简单。使用homebrew安装即可)
2、启动pom中指定的jetty容器;
在浏览器地址输入:http://localhost:8080/main/idxPage.do,我们看到的内容如下截图:
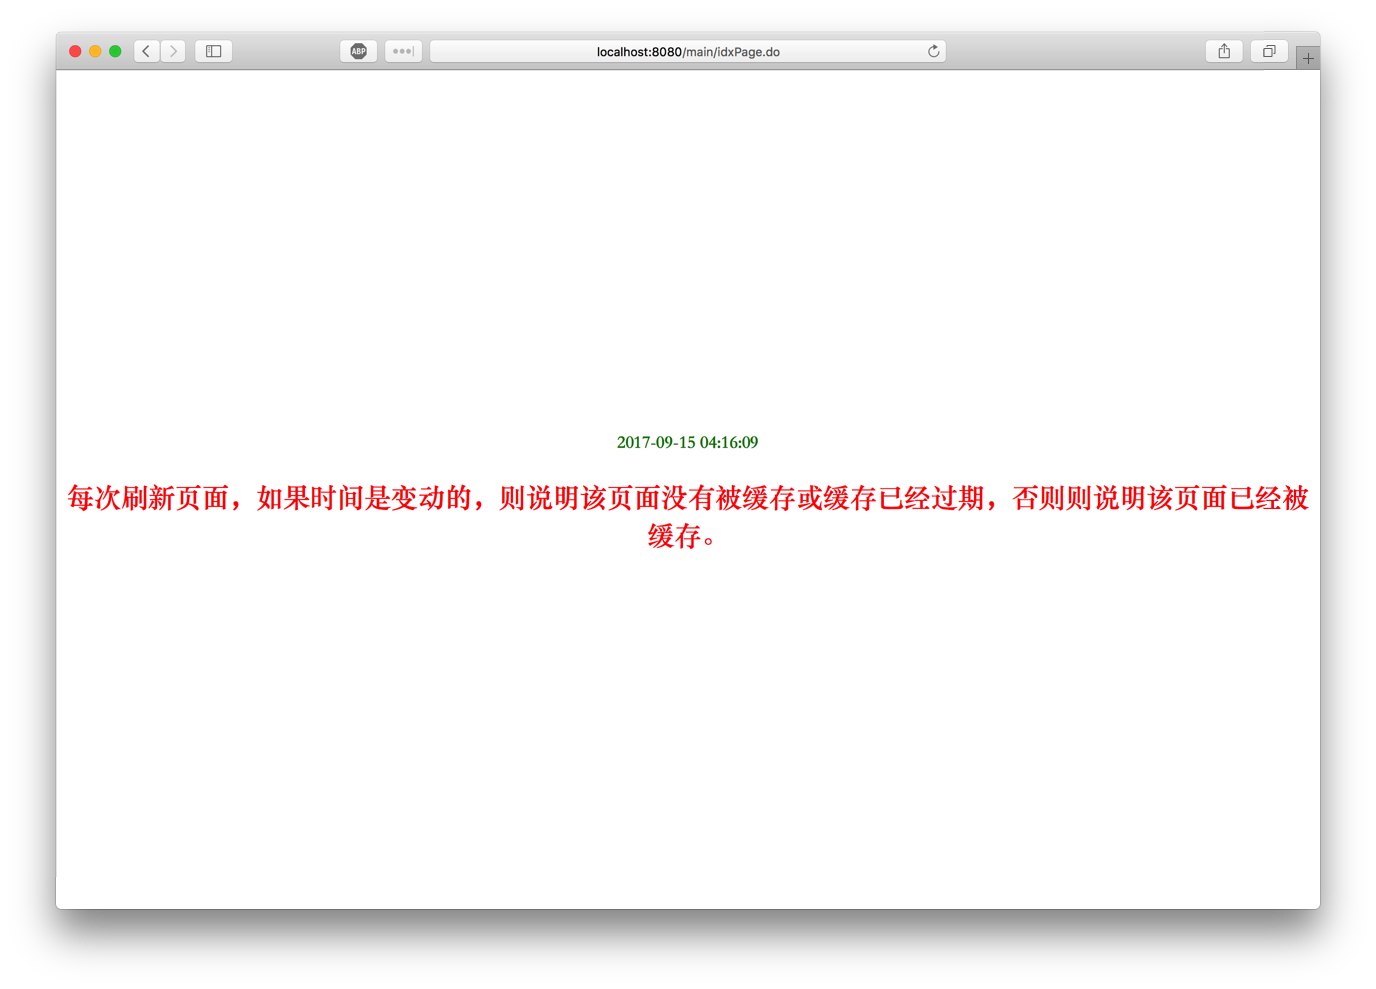
然后不停的刷新页面,看看页面的内容是否发生了变化(不要关注字体)。在filter中我们将页面内容存放到缓存中设置了内容的有效期为5秒,所以,页面上时间内容是五秒中改变一次,如果刷新的够快,就能看到结果的变化。
(完)

