最近在做一个项目,一个界面的按钮UI给画成了这样(默认状态是蓝色的然后触摸后变成灰色的)
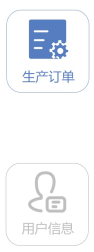
UI效果
然后本着给低版本系统APP适配的职业素养(其实是不想画这种按钮),想让UI兄弟给将图标改成整个按钮效果的图片,可是。。。人说人也很忙不给俺做咋办。。。。没办法只好自己写了一个满足这种需求的按钮了。。。

职业素养
整体流程如下
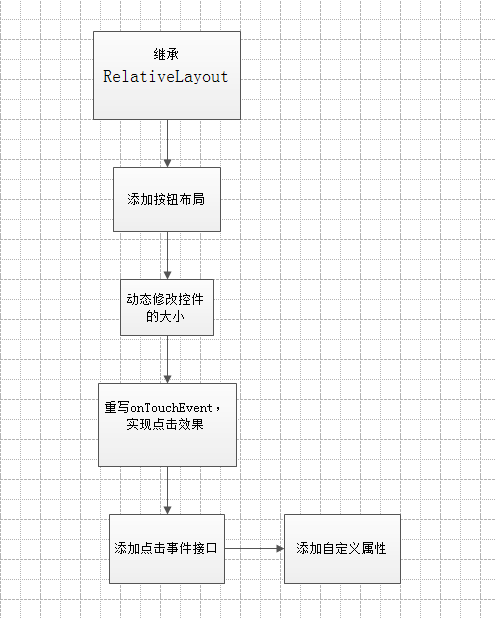
实现流程
下面说一下主要功能的实现代码
○动态的修改控件大小,这里没什么难处,主要是动态修改控件大小的代码要放在onLayout方法里,之前试了onMeasure方法里设置然并卵。
@Override
protected void onLayout(boolean changed, int l, int t, int r, int b) {super.onLayout(changed, l, t, r, b);int width = getWidth();LinearLayout.LayoutParams layoutParams = (LinearLayout.LayoutParams) imageView.getLayoutParams();layoutParams.width= (int) (width*0.5);layoutParams.height=(int) (width*0.5);layoutParams.topMargin=(int) (width*0.05);textView.setTextSize((float) (width*0.09));
}
○重写onTouchEvent,实现点击效果,这里是通过判断按下、抬起来动态的设置显示效果
 @Override
public boolean onTouchEvent(MotionEvent event) {switch (event.getAction()){case MotionEvent.ACTION_DOWN:;if(pressImage!=0){imageView.setImageResource(pressImage);}break;case MotionEvent.ACTION_UP:textView.setTextColor(textcolorDefault);if(defaultImage!=0){imageView.setImageResource(defaultImage);}break;}return true;
}
○添加点击事件,这里选择在抬起的时候执行点击事件
//点击事件接口
public interface MyStateButtonClickListener {void onClick(View view);
}@Override
public boolean onTouchEvent(MotionEvent event) {switch (event.getAction()){case MotionEvent.ACTION_DOWN:;textView.setTextColor(textcolorPress);if(pressImage!=0){imageView.setImageResource(pressImage);}break;case MotionEvent.ACTION_UP:textView.setTextColor(textcolorDefault);if(defaultImage!=0){imageView.setImageResource(defaultImage);}//抬起时执行点击事件if(myStateButtonClickListener!=null){myStateButtonClickListener.onClick(view);}break;}return true;
}
○通过代码添加边框,并添加自定义属性(默认图片、点击图片、默认文字颜色、点击文字颜色、边框宽度、边框圆角大小、默认边框颜色、点击边框颜色)
○attrs文件
<?xml version="1.0" encoding="utf-8"?>
<resources>
<declare-styleable name="MyStateButton"><attr name="defaultImage" format="reference"/><attr name="pressImage" format="reference"/><attr name="text" format="string"/><attr name="defaultTextColor" format="color"/><attr name="pressTextColor" format="color"/><attr name="defaultBorderColor" format="color"/><attr name="pressBorderColor" format="color"/><attr name="cornerRadius" format="float"/><attr name="borderWidth" format="integer"/>
</declare-styleable>
</resources>
○获取属性值
//        初始化GradientDrawable用于显示边框defaultDrawable = new GradientDrawable();pressDrawable = new GradientDrawable();TypedArray typedArray = context.obtainStyledAttributes(attrs, R.styleable.MyStateButton);if(typedArray!=null){
//            默认图片defaultImage = typedArray.getResourceId(R.styleable.MyStateButton_defaultImage, R.mipmap.one);
//            点击图片pressImage = typedArray.getResourceId(R.styleable.MyStateButton_pressImage, R.mipmap.one_press);
//            设置文字String text = typedArray.getString(R.styleable.MyStateButton_text);
//            默认文字颜色textcolorDefault = typedArray.getColor(R.styleable.MyStateButton_defaultTextColor, Color.parseColor("#567DBF"));
//            点击文字颜色textcolorPress = typedArray.getColor(R.styleable.MyStateButton_pressTextColor, Color.parseColor("#BFBFBF"));imageView.setImageResource(defaultImage);textView.setTextColor(textcolorDefault);textView.setText(text);
//            默认边框颜色borderColorDefault = typedArray.getColor(R.styleable.MyStateButton_defaultBorderColor, Color.parseColor("#567DBF"));
//            点击边框颜色borderColorPress = typedArray.getColor(R.styleable.MyStateButton_pressBorderColor, Color.parseColor("#BFBFBF"));
//            边框宽度borderWidth = typedArray.getInteger(R.styleable.MyStateButton_borderWidth, 2);
//            边框圆角大小cornerRadius = typedArray.getFloat(R.styleable.MyStateButton_cornerRadius, 8);defaultDrawable.setStroke(borderWidth,borderColorDefault);pressDrawable.setStroke(borderWidth,borderColorPress);defaultDrawable.setCornerRadius(cornerRadius);pressDrawable.setCornerRadius(cornerRadius);setBackground(defaultDrawable);}
最终效果
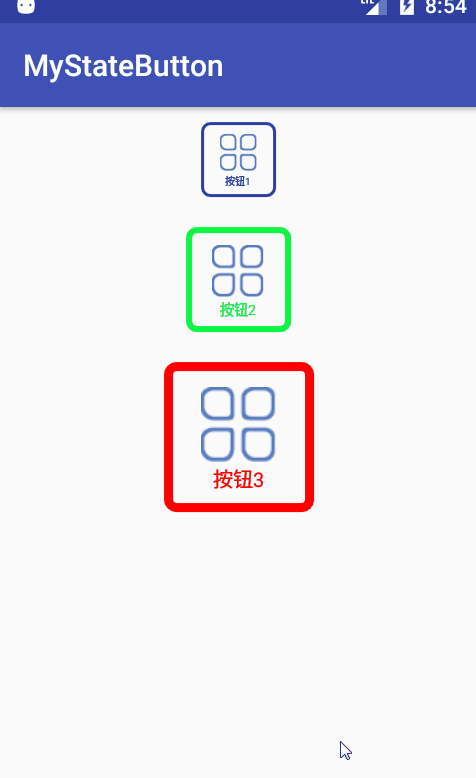
最终效果

![[USACO07JAN]平衡的阵容Balanced Lineup BZOJ 1699](/images/no-images.jpg)

![[每日短篇] 17 - 正确使用随机数 Random](https://www.oschina.net/img/hot3.png)