实现效果

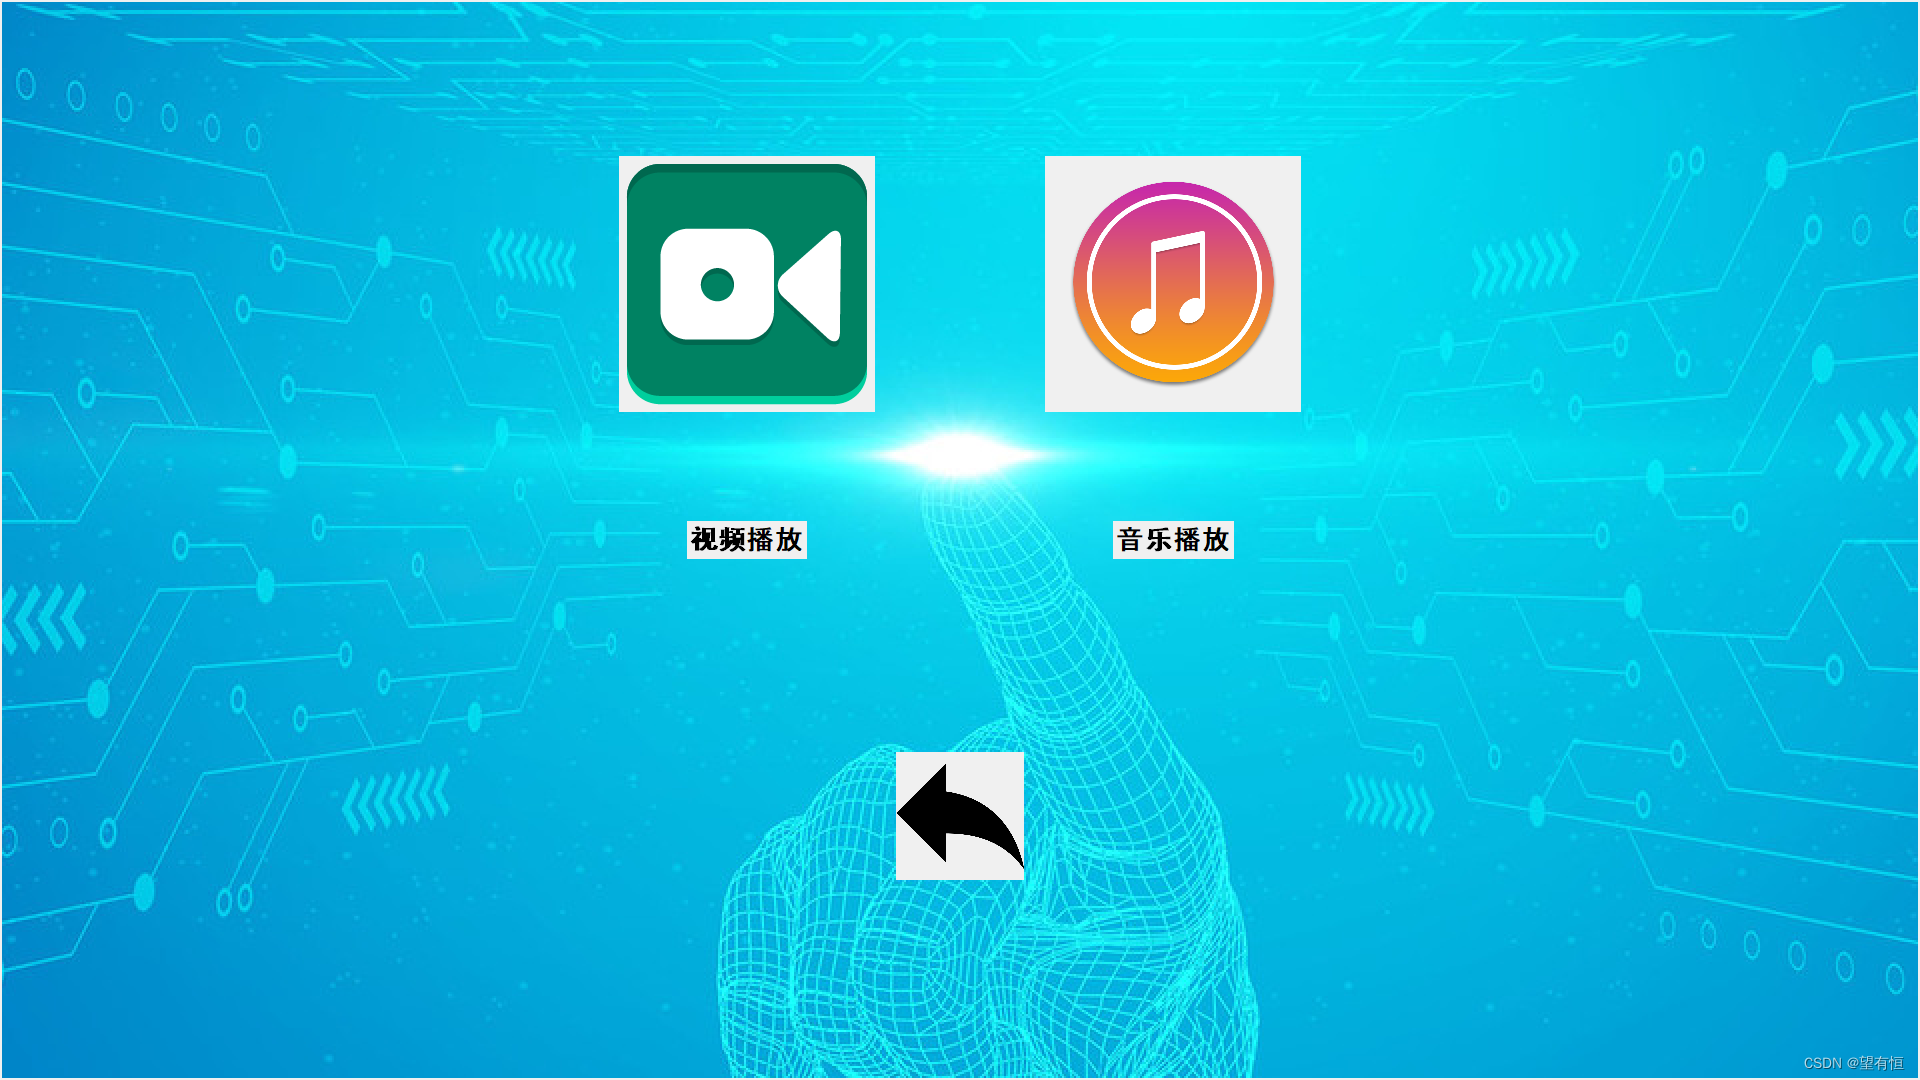
实现代码
import tkinter as tk
import threading
import pygetwindow as gw
import subprocess
import cv2
import pygame
import time
import screeninfo


def func1():
    print("影音播放")
    open_child_window()


def func5():
    print("视频播放")
    video_path = "C:/Users/Fengzhen/Videos/全向步态视频/侧向步态.mp4"
    threading.Thread(target=open_video, args=(video_path,)).start()


def func6():
    print("音乐播放")
    audio_path = "C:/Users/Fengzhen/Videos/music.mp3"
    threading.Thread(target=open_music, args=(audio_path,)).start()


def open_child_window():
    # 创建子窗口
    child_window = tk.Toplevel(window)
    child_window.attributes('-fullscreen', True)  # 设置子窗口为全屏显示
    child_window.geometry(
        "{0}x{1}+0+0".format(child_window.winfo_screenwidth(), child_window.winfo_screenheight()))  # 设置子窗口大小为屏幕大小
    # 添加子窗口的内容
    child_canvas = tk.Canvas(child_window, width=child_window.winfo_screenwidth(),
                             height=child_window.winfo_screenheight())

    # 在画布上创建背景图像
    child_canvas.create_image(child_window.winfo_screenwidth() / 2, child_window.winfo_screenheight() / 2,
                              image=scaled_bg_image)

    # 加载图片按钮图像
    video_button_image = tk.PhotoImage(file="videoshow.png")
    music_button_image = tk.PhotoImage(file="music.png")

    # 缩放图片按钮图像
    global scaled_video_button_image
    global scaled_music_button_image
    scaled_video_button_image = video_button_image.subsample(1, 1)  # 3倍缩放
    scaled_music_button_image = music_button_image.subsample(2, 2)

    # 布局图片按钮
    button_width = scaled_video_button_image.width()
    button_height = scaled_video_button_image.height()
    canvas_center_x = child_window.winfo_screenwidth() // 2
    button_y = (child_window.winfo_screenheight() - button_height * 2) // 2

    video_button_x = canvas_center_x - (button_width + 10) * 0.8
    music_button_x = canvas_center_x + (button_width + 10) * 0.8

    video_button = tk.Button(child_canvas, image=scaled_video_button_image, command=func5, borderwidth=0,
                             highlightthickness=0)
    music_button = tk.Button(child_canvas, image=scaled_music_button_image, command=func6, borderwidth=0,
                             highlightthickness=0)

    # 添加文字说明
    video_label = tk.Label(child_canvas, text="视频播放", font=("Arial", 20, "bold"), bg=child_canvas["bg"])
    music_label = tk.Label(child_canvas, text="音乐播放", font=("Arial", 20, "bold"), bg=child_canvas["bg"])

    # 显示图片按钮和文字说明
    child_canvas.create_window(video_button_x, button_y, anchor=tk.CENTER, window=video_button)
    child_canvas.create_window(music_button_x, button_y, anchor=tk.CENTER, window=music_button)

    child_canvas.create_window(video_button_x, button_y + button_height, anchor=tk.CENTER, window=video_label)
    child_canvas.create_window(music_button_x, button_y + button_height, anchor=tk.CENTER, window=music_label)

    # 添加返回主页的按钮
    home_button_image = tk.PhotoImage(file="return.png")
    global scaled_home_button_image
    scaled_home_button_image = home_button_image.subsample(4, 4)
    home_button = tk.Button(child_canvas, image=scaled_home_button_image, command=lambda: return_to_home(child_window),
                            borderwidth=0, highlightthickness=0)
    child_canvas.create_window(canvas_center_x, button_y + button_height * 2 + 20, anchor=tk.CENTER, window=home_button)

    # 显示画布
    child_canvas.pack()


def return_to_home(child_window):
    print("返回主页")
    child_window.destroy()
    close_video()
    close_music()


def open_video(file_path):
    try:
        # 使用cv2读取视频
        cap = cv2.VideoCapture(file_path)

        # 创建窗口并设置位置
        cv2.namedWindow("Video", cv2.WINDOW_NORMAL)
        # cv2.moveWindow("Video", 3000, 100)
        cv2.setWindowProperty("Video", cv2.WND_PROP_FULLSCREEN, cv2.WINDOW_FULLSCREEN)

        while True:
            ret, frame = cap.read()
            if not ret:
                break

            # 在指定位置显示视频帧
            cv2.imshow("Video", frame)

            if cv2.waitKey(1) & 0xFF == ord('q'):
                break

        cap.release()
        cv2.destroyWindow("Video")

    except Exception as e:
        print(e)


def close_video():
    print("关闭视频")
    # cv2.destroyWindow("Video")


def open_music(file_path):
    try:
        # 初始化pygame
        pygame.init()

        # 设置音频设备
        pygame.mixer.init()

        # 加载音乐文件
        pygame.mixer.music.load(file_path)

        # 播放音乐
        pygame.mixer.music.play()

        # 等待音乐播放完毕
        while pygame.mixer.music.get_busy():
            continue

        # 停止音乐播放
        pygame.mixer.music.stop()

    except Exception as e:
        print(e)


def close_music():
    print("关闭音乐")
    pygame.mixer.init()
    pygame.mixer.music.stop()
    pygame.mixer.quit()
    pygame.quit()


# def func2():
#     print("浏览器")
#     software_path = "C:/Program Files (x86)/Microsoft/Edge/Application/msedge.exe"
#     subprocess.Popen(software_path)
#     window.attributes("-fullscreen", True)

def func2():
    print("浏览器")
    software_path = "C:/Program Files (x86)/Microsoft/Edge/Application/msedge.exe"
    # software_path = "C:/Program Files (x86)/Thunder Network/Thunder/Program/ThunderStart.exe"
    # software_path = "D:/Program Files/uvnc bvba/UltraVNC/vncviewer.exe"
    subprocess.Popen(software_path)

    # 等待打开的窗口出现
    time.sleep(0.35)

    # 获取所有窗口
    windows = gw.getAllWindows()
    # 获取副屏幕的尺寸
    screen = screeninfo.get_monitors()[1]  # 假设副屏幕是第二个屏幕
    screen_width = screen.width
    screen_height = screen.height

    # 遍历窗口,找到浏览器窗口
    for window in windows:
        # print(window.title)
        # if "UltraVNC Viewer - 1.4.0.9" in window.title:
        if "新建标签页" in window.title:
            # 将浏览器窗口移动到副屏上
            window.moveTo(3000, 100)

            # 设置窗口大小为副屏幕大小
            window.resizeTo(screen_width, screen_height)

            # 最大化浏览器窗口
            window.maximize()

            break


def func3():
    print("游戏")
    software_path = "C:/Program Files (x86)/Thunder Network/Thunder/Program/ThunderStart.exe"
    subprocess.Popen(software_path)
    # 等待打开的窗口出现
    time.sleep(0.35)
    # 获取所有窗口
    windows = gw.getAllWindows()
    # 获取副屏幕的尺寸
    screen = screeninfo.get_monitors()[1]  # 假设副屏幕是第二个屏幕
    screen_width = screen.width
    screen_height = screen.height
    # 遍历窗口,找到指定的窗口
    for window in windows:
        print(window.title)
        if "迅雷" in window.title:  # 替换为你想要找到的窗口标题
            # 将窗口移动到副屏上
            window.moveTo(3000, 10)

            # 设置窗口大小为副屏幕大小
            window.resizeTo(screen_width, screen_height)

            # 最大化窗口
            window.maximize()

            break


def func4():
    print("设置")
    folder_path = "C:/"  # 替换为你要打开的文件夹路径

    # 使用 explorer.exe 应用程序打开指定文件夹
    subprocess.Popen(["explorer.exe", folder_path])

    # 等待打开的窗口出现
    time.sleep(0.5)

    # 获取所有窗口
    windows = gw.getAllWindows()

    # 获取副屏幕的尺寸
    screen = screeninfo.get_monitors()[1]  # 假设副屏幕是第二个屏幕
    screen_width = screen.width
    screen_height = screen.height

    # 遍历窗口,找到指定的窗口
    for window in windows:
        print(window.title)
        if "文档" in window.title:  # 替换为你想要找到的窗口标题
            # 将窗口移动到副屏上
            window.moveTo(3000, 10)

            # 设置窗口大小为副屏幕大小
            window.resizeTo(screen_width, screen_height)

            # 最大化窗口
            window.maximize()

            break

# 创建主窗口
window = tk.Tk()

# 设置窗口全屏显示
window.attributes('-fullscreen', True)  # 设置窗口为全屏显示
window.geometry("{0}x{1}+0+0".format(window.winfo_screenwidth(), window.winfo_screenheight()))  # 设置窗口大小为屏幕大小

# 加载背景图像
background_image = tk.PhotoImage(file="background.png")

# 创建画布
canvas_width = window.winfo_screenwidth()  # 获取屏幕宽度
canvas_height = window.winfo_screenheight()  # 获取屏幕高度
canvas = tk.Canvas(window, width=canvas_width, height=canvas_height)

# 缩放背景图像
scaled_bg_image = background_image.zoom(2, 2)

# 在画布上创建背景图像
canvas.create_image(canvas_width / 2, canvas_height / 2, image=scaled_bg_image)

# 加载按钮图像
button1_image = tk.PhotoImage(file="video.png")
button2_image = tk.PhotoImage(file="edge.png")
button3_image = tk.PhotoImage(file="play.png")
button4_image = tk.PhotoImage(file="setting.png")

# 缩放按钮图像
scaled_button1_image = button1_image.subsample(2, 2)  # 2倍缩放
scaled_button2_image = button2_image.subsample(2, 2)
scaled_button3_image = button3_image.subsample(2, 2)
scaled_button4_image = button4_image.subsample(2, 2)

# 布局图标按钮
button_width = scaled_button1_image.width()
button_height = scaled_button1_image.height()
canvas_center_x = canvas_width // 2
button_y = (canvas_height - button_height * 2) // 2

button1_x = canvas_center_x - (button_width + 10) * 2.2
button2_x = canvas_center_x - (button_width + 10) * 0.7
button3_x = canvas_center_x + (button_width + 10) * 0.8
button4_x = canvas_center_x + (button_width + 10) * 2.2

button1 = tk.Button(canvas, image=scaled_button1_image, command=func1, borderwidth=0, highlightthickness=0)
button2 = tk.Button(canvas, image=scaled_button2_image, command=func2, borderwidth=0, highlightthickness=0)
button3 = tk.Button(canvas, image=scaled_button3_image, command=func3, borderwidth=0, highlightthickness=0)
button4 = tk.Button(canvas, image=scaled_button4_image, command=func4, borderwidth=0, highlightthickness=0)

# 添加文字说明
label1 = tk.Label(canvas, text="影音播放", font=("Arial", 20, "bold"), bg=canvas["bg"])
label2 = tk.Label(canvas, text="浏览器", font=("Arial", 20, "bold"), bg=canvas["bg"])
label3 = tk.Label(canvas, text="游戏", font=("Arial", 20, "bold"), bg=canvas["bg"])
label4 = tk.Label(canvas, text="设置", font=("Arial", 20, "bold"), bg=canvas["bg"])

# 显示按钮和文字说明
canvas.create_window(button1_x, button_y, anchor=tk.CENTER, window=button1)
canvas.create_window(button2_x, button_y, anchor=tk.CENTER, window=button2)
canvas.create_window(button3_x, button_y, anchor=tk.CENTER, window=button3)
canvas.create_window(button4_x, button_y, anchor=tk.CENTER, window=button4)

canvas.create_window(button1_x, button_y + button_height, anchor=tk.CENTER, window=label1)
canvas.create_window(button2_x, button_y + button_height, anchor=tk.CENTER, window=label2)
canvas.create_window(button3_x, button_y + button_height, anchor=tk.CENTER, window=label3)
canvas.create_window(button4_x, button_y + button_height, anchor=tk.CENTER, window=label4)

# 显示画布
canvas.pack()

# 运行主循环
window.mainloop()
问题
将ImageTk.PhotoImage()放在函数里图片不显示
不显示图片的代码如下:
def open_child_window():
    # 创建子窗口
    child_window = tk.Toplevel(window)
    child_window.attributes('-fullscreen', True)  # 设置子窗口为全屏显示
    child_window.geometry(
        "{0}x{1}+0+0".format(child_window.winfo_screenwidth(), child_window.winfo_screenheight()))  # 设置子窗口大小为屏幕大小
    # 添加子窗口的内容
    child_canvas = tk.Canvas(child_window, width=child_window.winfo_screenwidth(),
                             height=child_window.winfo_screenheight())

    # 在画布上创建背景图像
    child_canvas.create_image(child_window.winfo_screenwidth() / 2, child_window.winfo_screenheight() / 2,
                              image=scaled_bg_image)

    # 加载图片按钮图像
    video_button_image = tk.PhotoImage(file="videoshow.png")
    music_button_image = tk.PhotoImage(file="music.png")

    # 缩放图片按钮图像
    scaled_video_button_image = video_button_image.subsample(1, 1)  # 3倍缩放
    scaled_music_button_image = music_button_image.subsample(2, 2)

    # 布局图片按钮
    button_width = scaled_video_button_image.width()
    button_height = scaled_video_button_image.height()
    canvas_center_x = child_window.winfo_screenwidth() // 2
    button_y = (child_window.winfo_screenheight() - button_height * 2) // 2

    video_button_x = canvas_center_x - (button_width + 10) * 0.8
    music_button_x = canvas_center_x + (button_width + 10) * 0.8

    video_button = tk.Button(child_canvas, image=scaled_video_button_image, command=func5, borderwidth=0,
                             highlightthickness=0)
    music_button = tk.Button(child_canvas, image=scaled_music_button_image, command=func6, borderwidth=0,
                             highlightthickness=0)

    # 添加文字说明
    video_label = tk.Label(child_canvas, text="视频播放", font=("Arial", 20, "bold"), bg=child_canvas["bg"])
    music_label = tk.Label(child_canvas, text="音乐播放", font=("Arial", 20, "bold"), bg=child_canvas["bg"])

    # 显示图片按钮和文字说明
    child_canvas.create_window(video_button_x, button_y, anchor=tk.CENTER, window=video_button)
    child_canvas.create_window(music_button_x, button_y, anchor=tk.CENTER, window=music_button)

    child_canvas.create_window(video_button_x, button_y + button_height, anchor=tk.CENTER, window=video_label)
    child_canvas.create_window(music_button_x, button_y + button_height, anchor=tk.CENTER, window=music_label)

    # 添加返回主页的按钮
    home_button_image = tk.PhotoImage(file="return.png")
    scaled_home_button_image = home_button_image.subsample(4, 4)
    home_button = tk.Button(child_canvas, image=scaled_home_button_image, command=lambda: return_to_home(child_window),
                            borderwidth=0, highlightthickness=0)
    child_canvas.create_window(canvas_center_x, button_y + button_height * 2 + 20, anchor=tk.CENTER, window=home_button)

    # 显示画布
    child_canvas.pack()
运行后,图片并没有显示,究竟是怎么回事?
原因:在调用load_img()函数后,垃圾回收机制会把变量photo给回收了。
解决办法:使用global全局变量。如下(为了做对比,代码用图片展示):
def open_child_window():
    # 创建子窗口
    child_window = tk.Toplevel(window)
    child_window.attributes('-fullscreen', True)  # 设置子窗口为全屏显示
    child_window.geometry(
        "{0}x{1}+0+0".format(child_window.winfo_screenwidth(), child_window.winfo_screenheight()))  # 设置子窗口大小为屏幕大小
    # 添加子窗口的内容
    child_canvas = tk.Canvas(child_window, width=child_window.winfo_screenwidth(),
                             height=child_window.winfo_screenheight())

    # 在画布上创建背景图像
    child_canvas.create_image(child_window.winfo_screenwidth() / 2, child_window.winfo_screenheight() / 2,
                              image=scaled_bg_image)

    # 加载图片按钮图像
    video_button_image = tk.PhotoImage(file="videoshow.png")
    music_button_image = tk.PhotoImage(file="music.png")

    # 缩放图片按钮图像
    global scaled_video_button_image
    global scaled_music_button_image
    scaled_video_button_image = video_button_image.subsample(1, 1)  # 3倍缩放
    scaled_music_button_image = music_button_image.subsample(2, 2)

    # 布局图片按钮
    button_width = scaled_video_button_image.width()
    button_height = scaled_video_button_image.height()
    canvas_center_x = child_window.winfo_screenwidth() // 2
    button_y = (child_window.winfo_screenheight() - button_height * 2) // 2

    video_button_x = canvas_center_x - (button_width + 10) * 0.8
    music_button_x = canvas_center_x + (button_width + 10) * 0.8

    video_button = tk.Button(child_canvas, image=scaled_video_button_image, command=func5, borderwidth=0,
                             highlightthickness=0)
    music_button = tk.Button(child_canvas, image=scaled_music_button_image, command=func6, borderwidth=0,
                             highlightthickness=0)

    # 添加文字说明
    video_label = tk.Label(child_canvas, text="视频播放", font=("Arial", 20, "bold"), bg=child_canvas["bg"])
    music_label = tk.Label(child_canvas, text="音乐播放", font=("Arial", 20, "bold"), bg=child_canvas["bg"])

    # 显示图片按钮和文字说明
    child_canvas.create_window(video_button_x, button_y, anchor=tk.CENTER, window=video_button)
    child_canvas.create_window(music_button_x, button_y, anchor=tk.CENTER, window=music_button)

    child_canvas.create_window(video_button_x, button_y + button_height, anchor=tk.CENTER, window=video_label)
    child_canvas.create_window(music_button_x, button_y + button_height, anchor=tk.CENTER, window=music_label)

    # 添加返回主页的按钮
    home_button_image = tk.PhotoImage(file="return.png")
    global scaled_home_button_image
    scaled_home_button_image = home_button_image.subsample(4, 4)
    home_button = tk.Button(child_canvas, image=scaled_home_button_image, command=lambda: return_to_home(child_window),
                            borderwidth=0, highlightthickness=0)
    child_canvas.create_window(canvas_center_x, button_y + button_height * 2 + 20, anchor=tk.CENTER, window=home_button)

    # 显示画布
    child_canvas.pack()
只需要在声明变量scaled_video_button_image、scaled_music_button_image、scaled_home_button_image之前将它设为全局变量即可。
注意:global不要放在函数外面,否则会没效果。

