Spring Boot集成第三方登录之微博登录
- 准备工作
- 网站接入
- 开发者信息认证
- 创建应用
- 流程分析
- 引导授权用户
- 用户授权
- 授权成功
- 换取Access Token
- HTTP客户端
- 使用Access Token请求相关接口
- 根据用户ID获取用户信息
- 获取用户的粉丝列表
- Spring Boot集成微博登录
- 添加依赖
- 封装Token等信息
- 创建Login页面
- 创建Home页面
- 微博登录逻辑
准备工作
微博开放平台:https://open.weibo.com/
网站接入
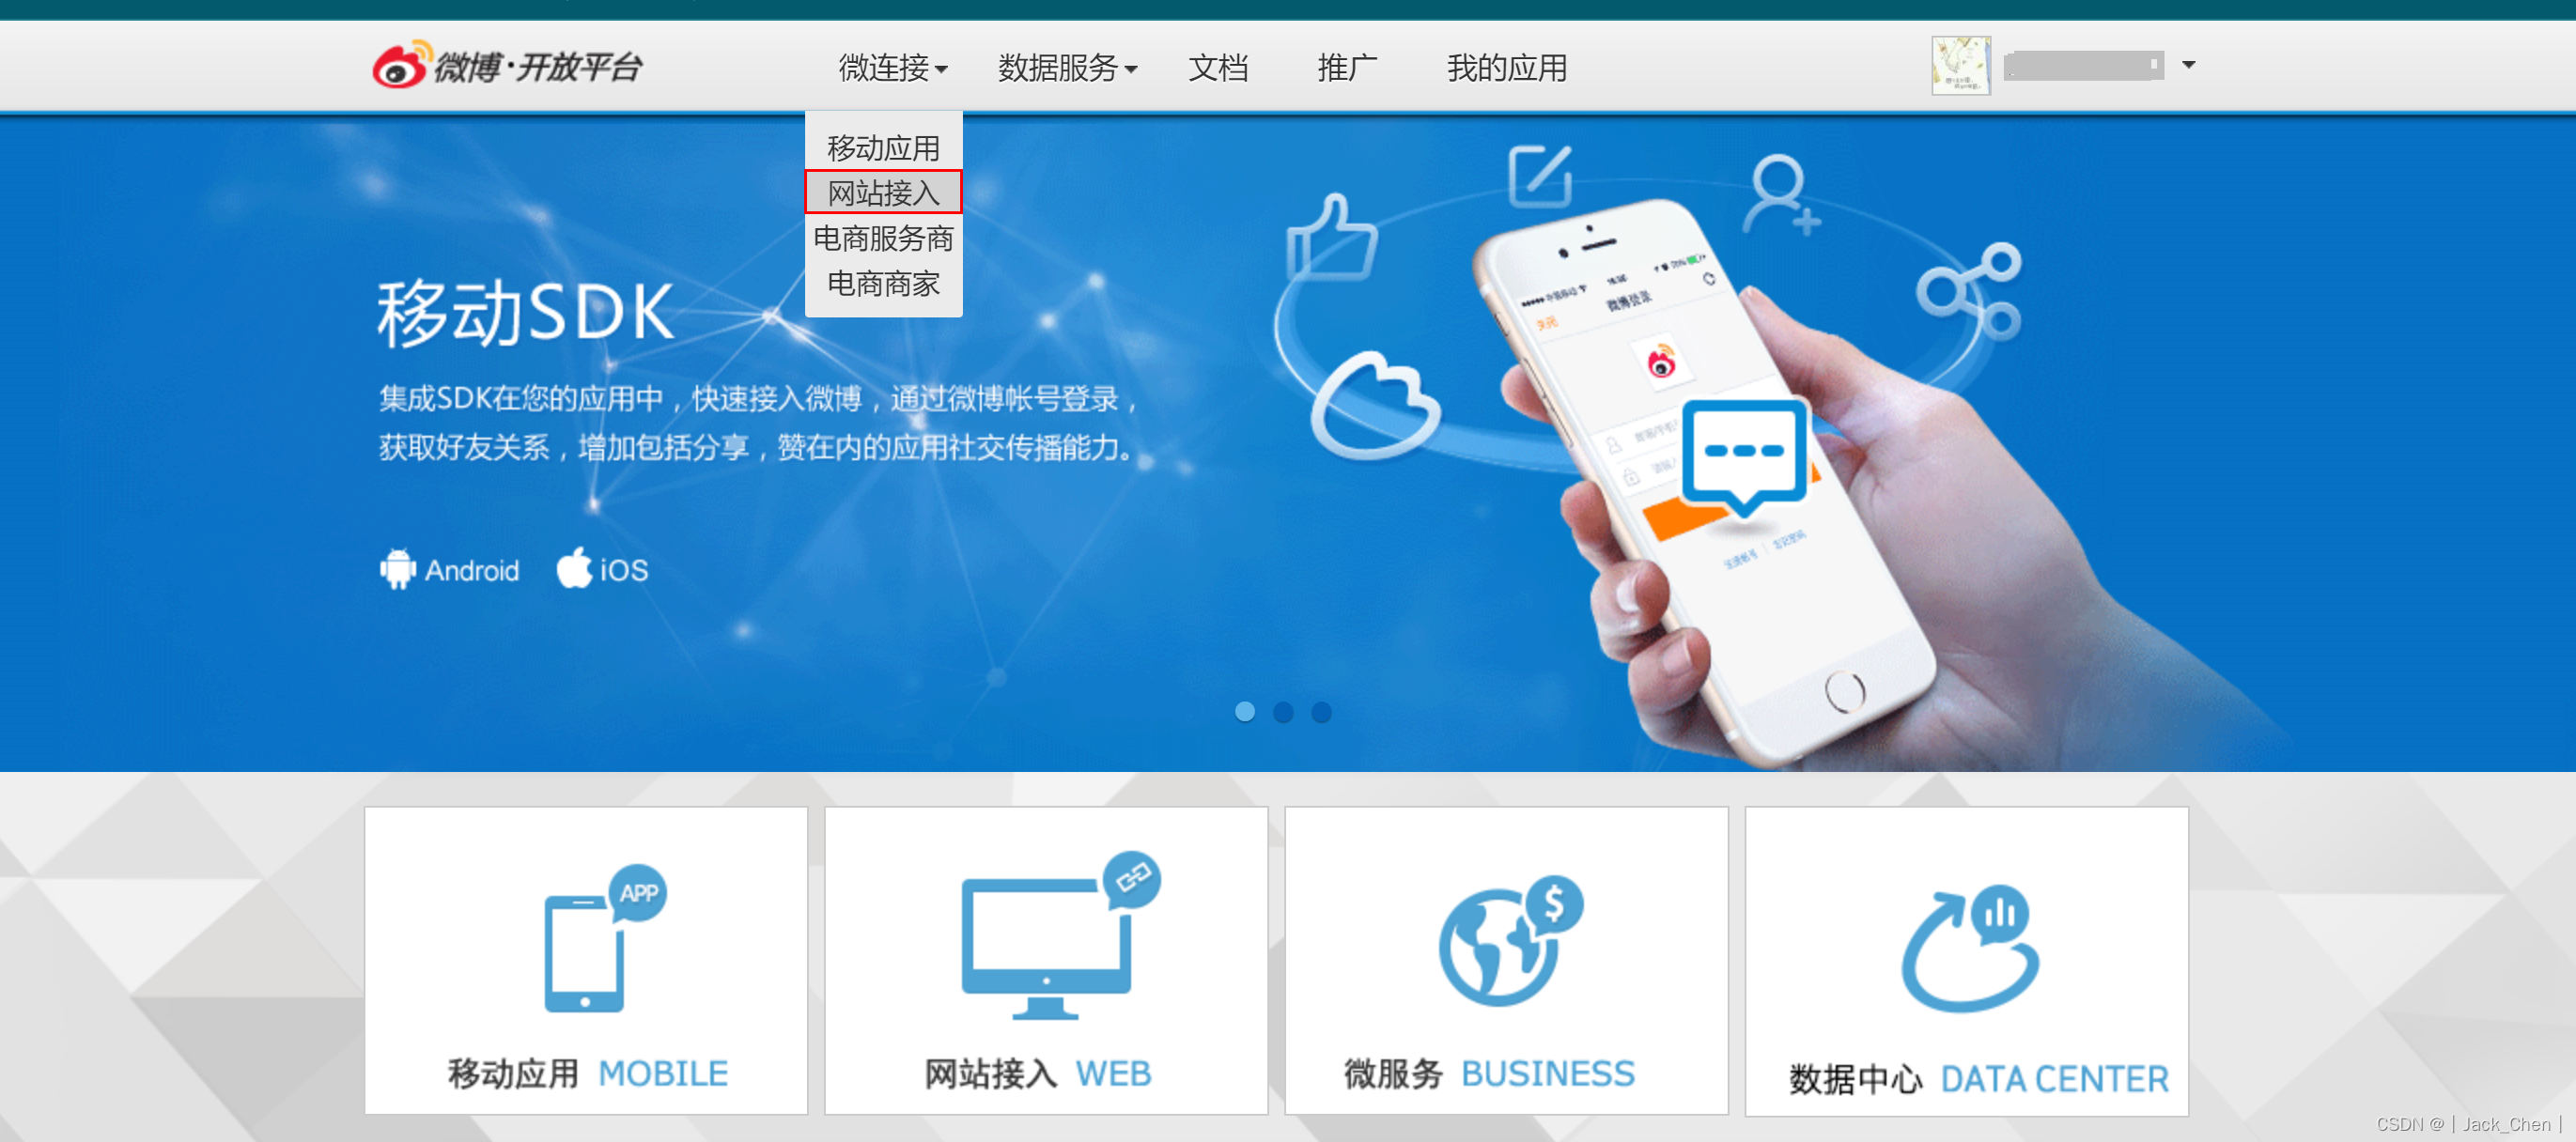
登陆微博开放平台,进入微连接,选择网站接入
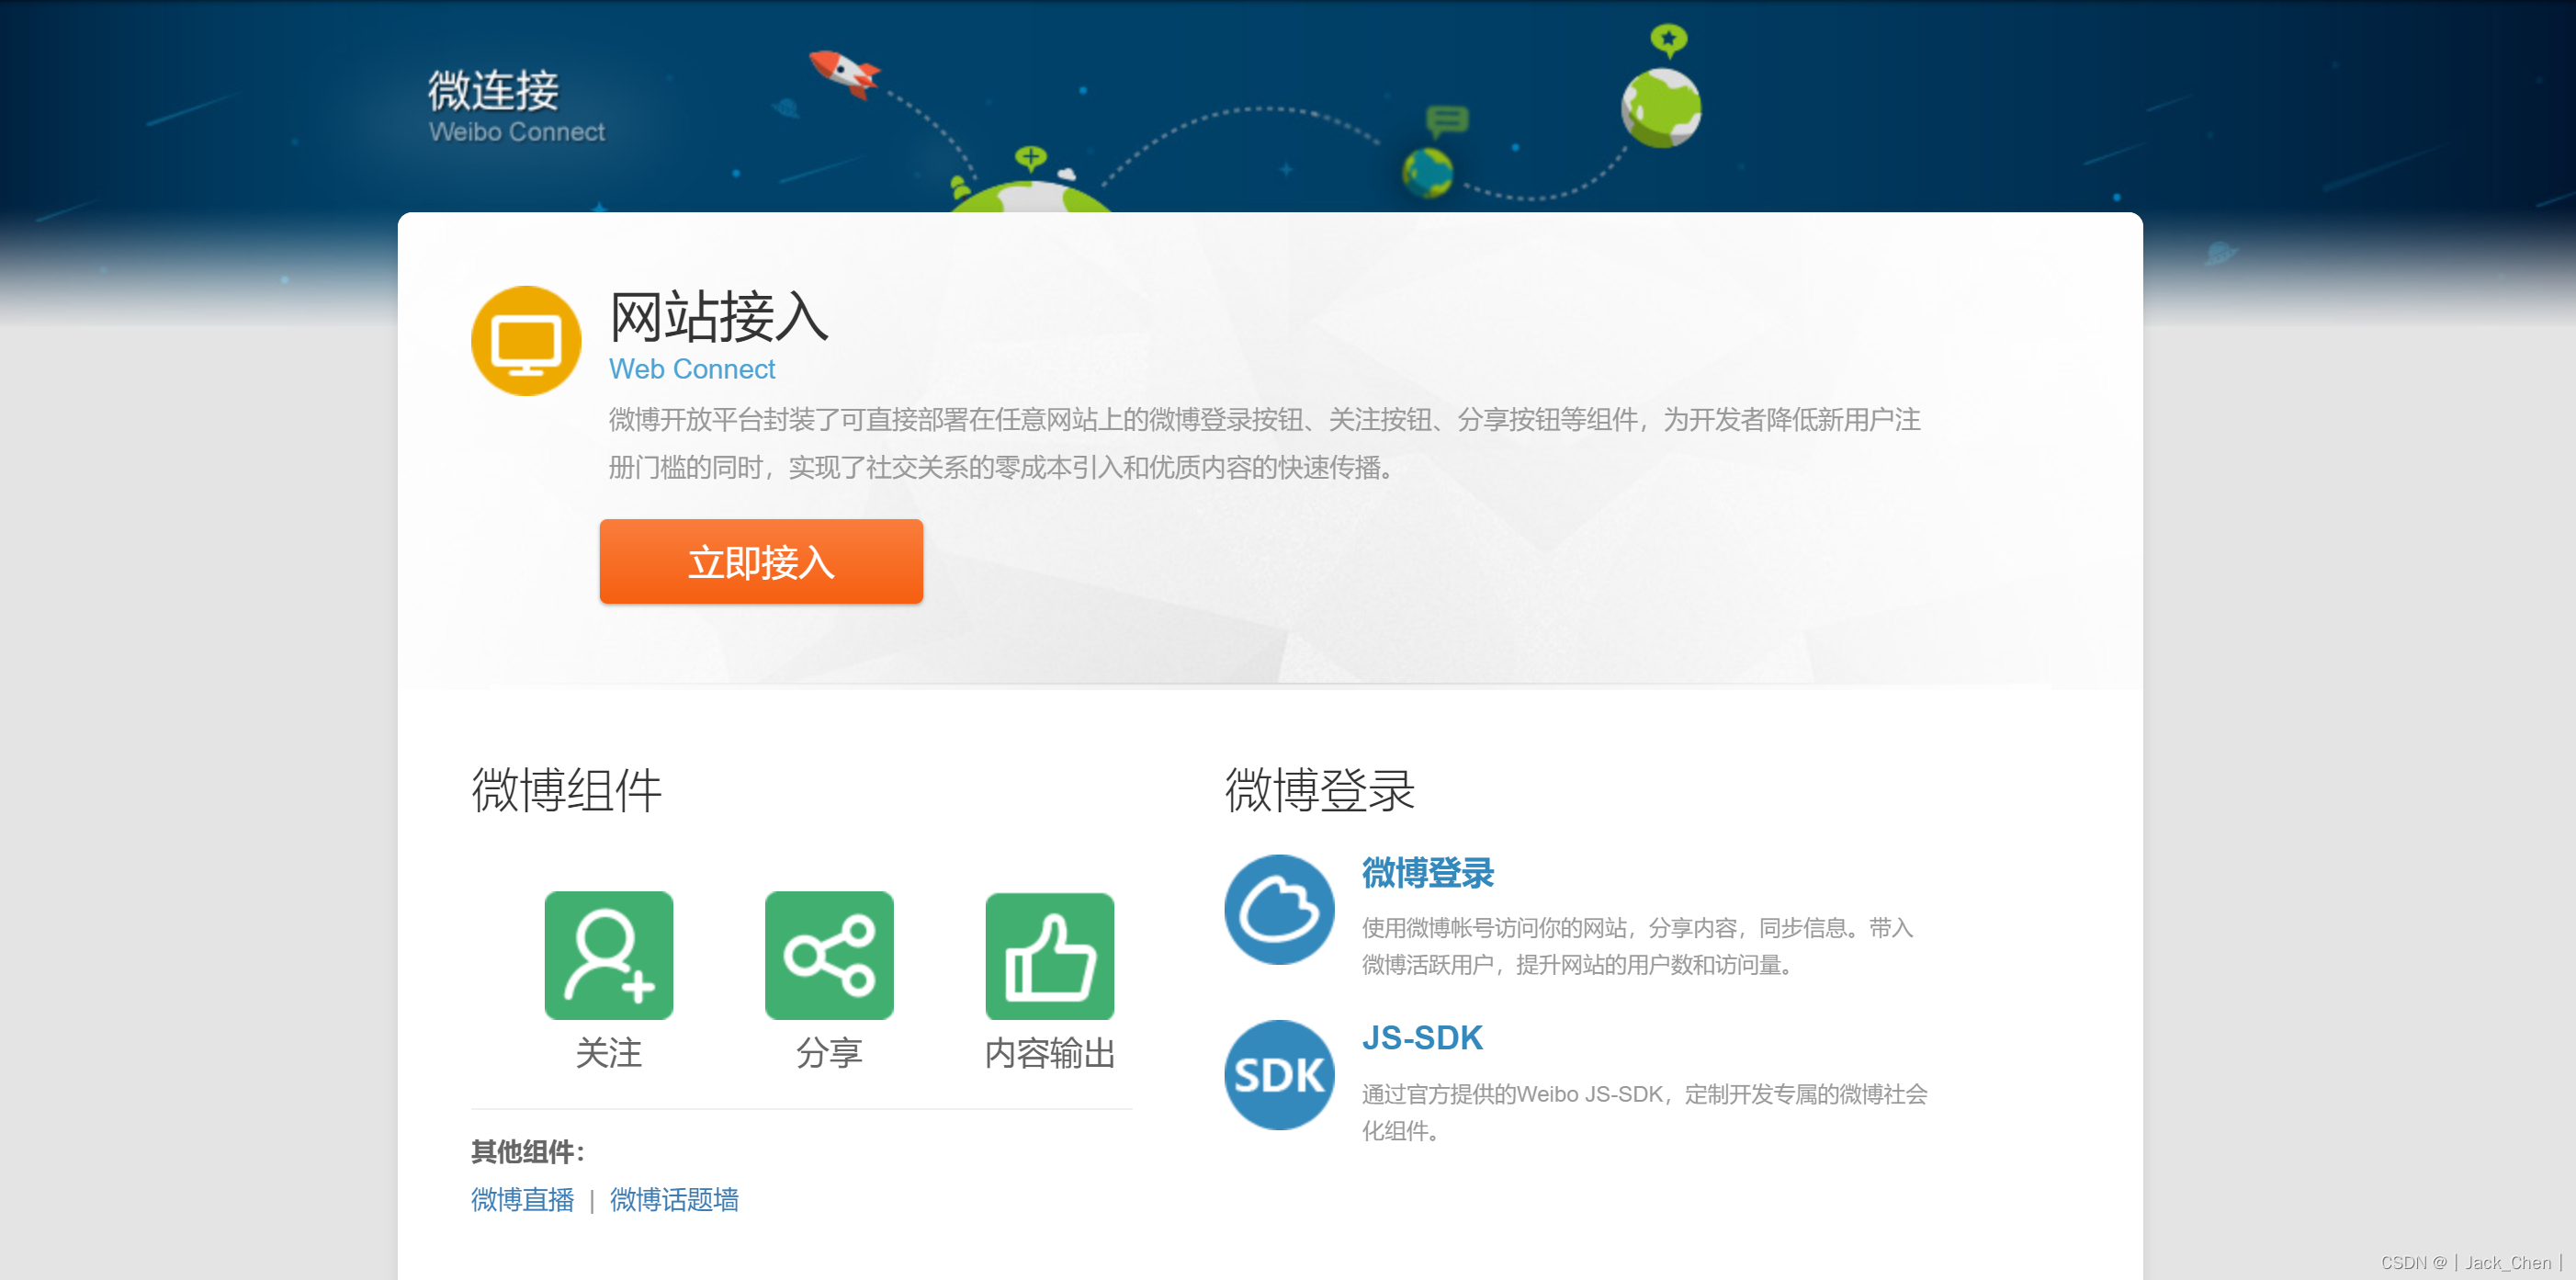
点击立即接入
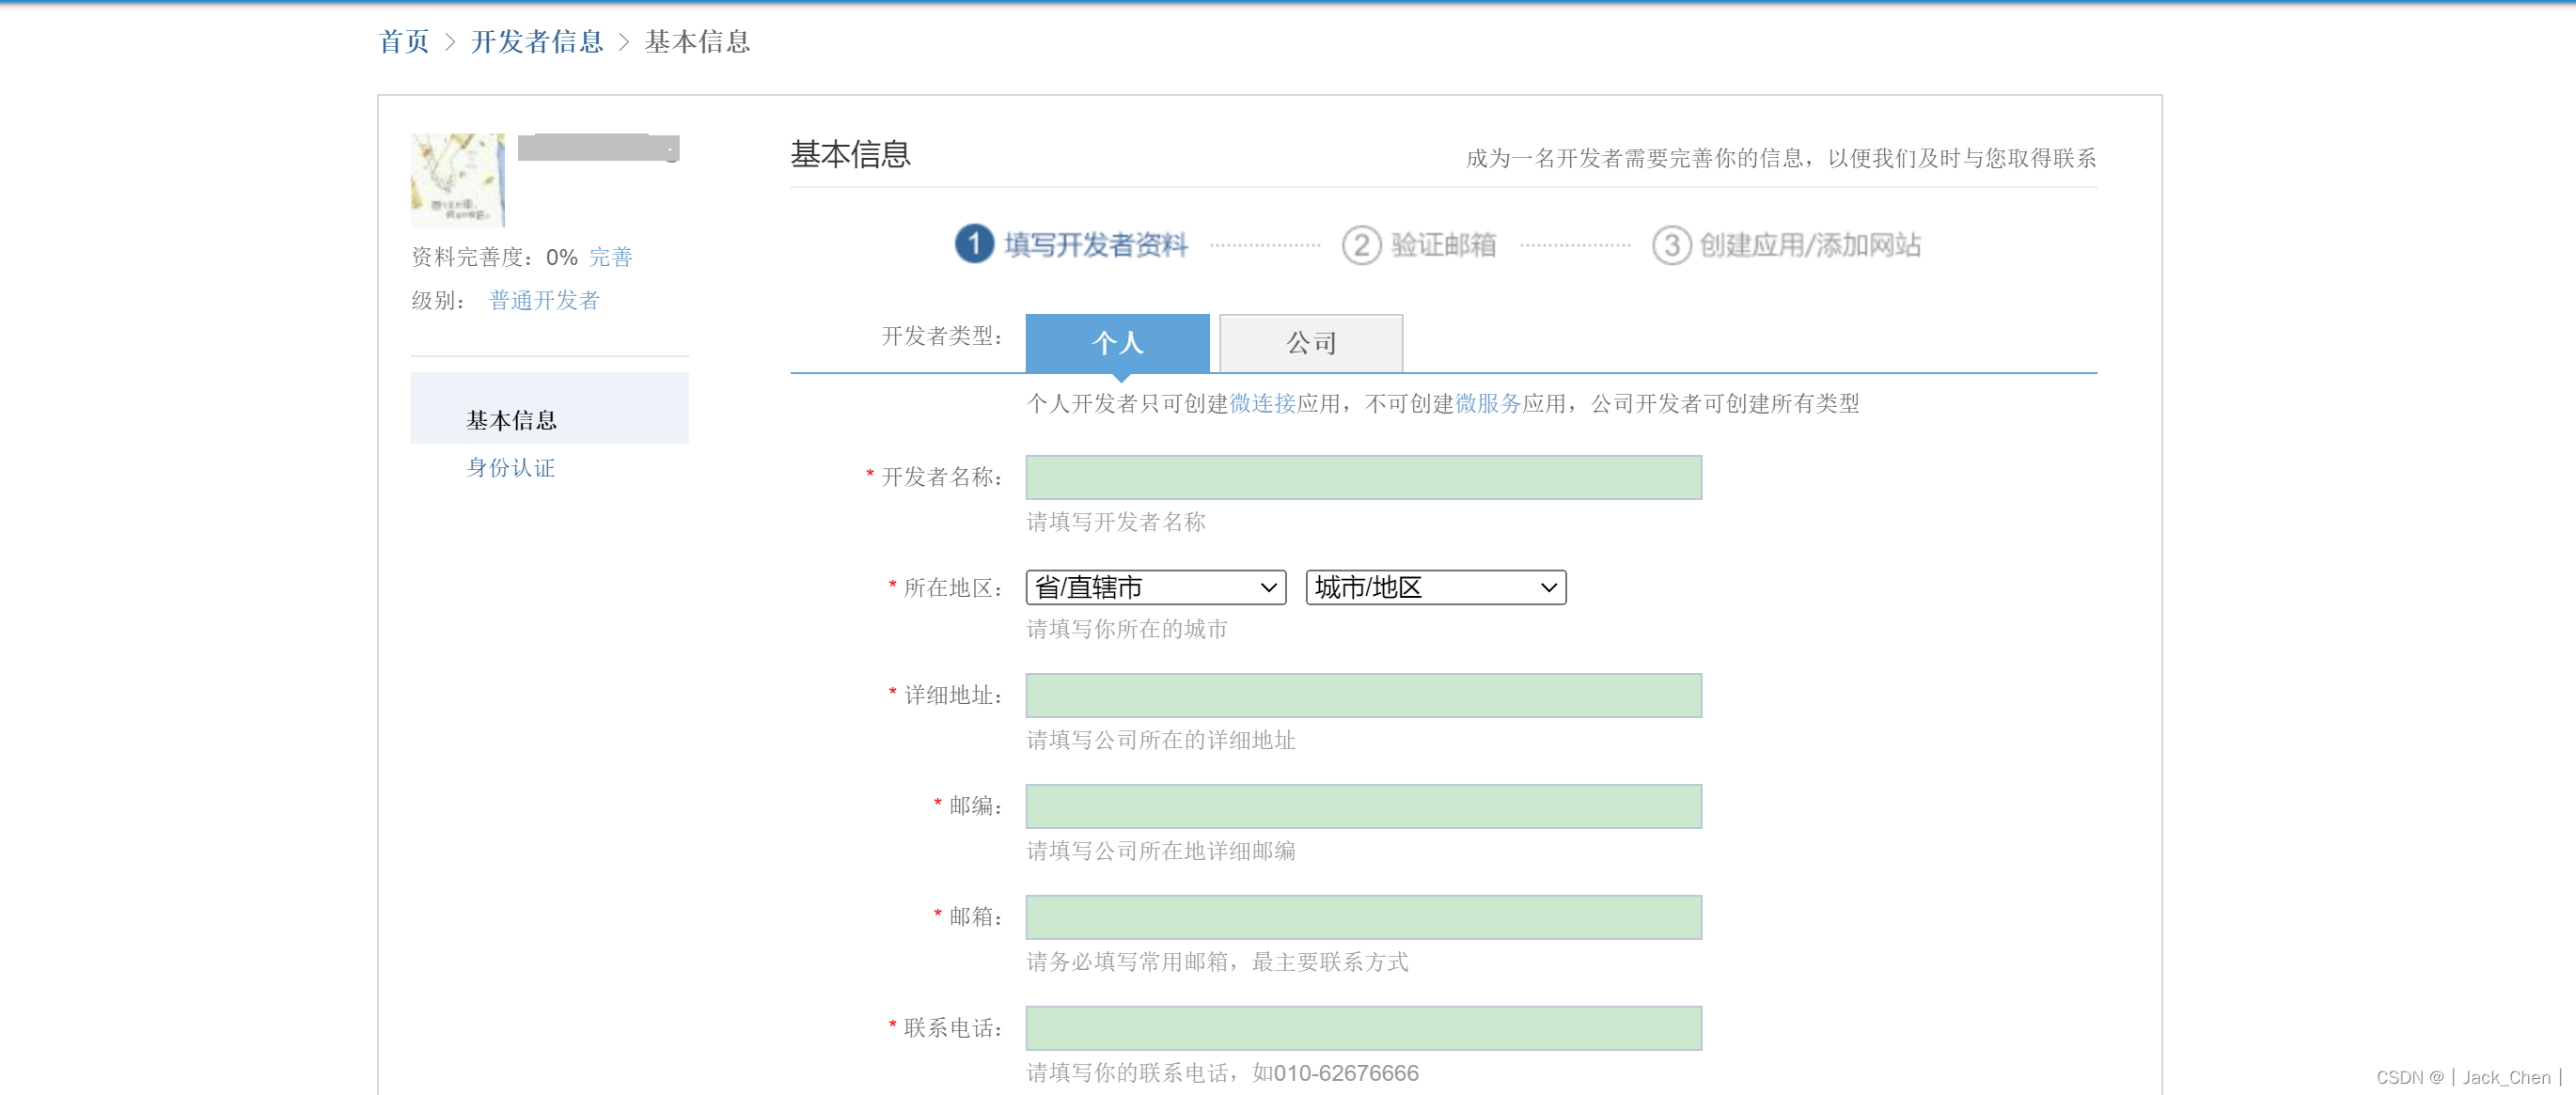
开发者信息认证
填写开发者信息与身份认证信息
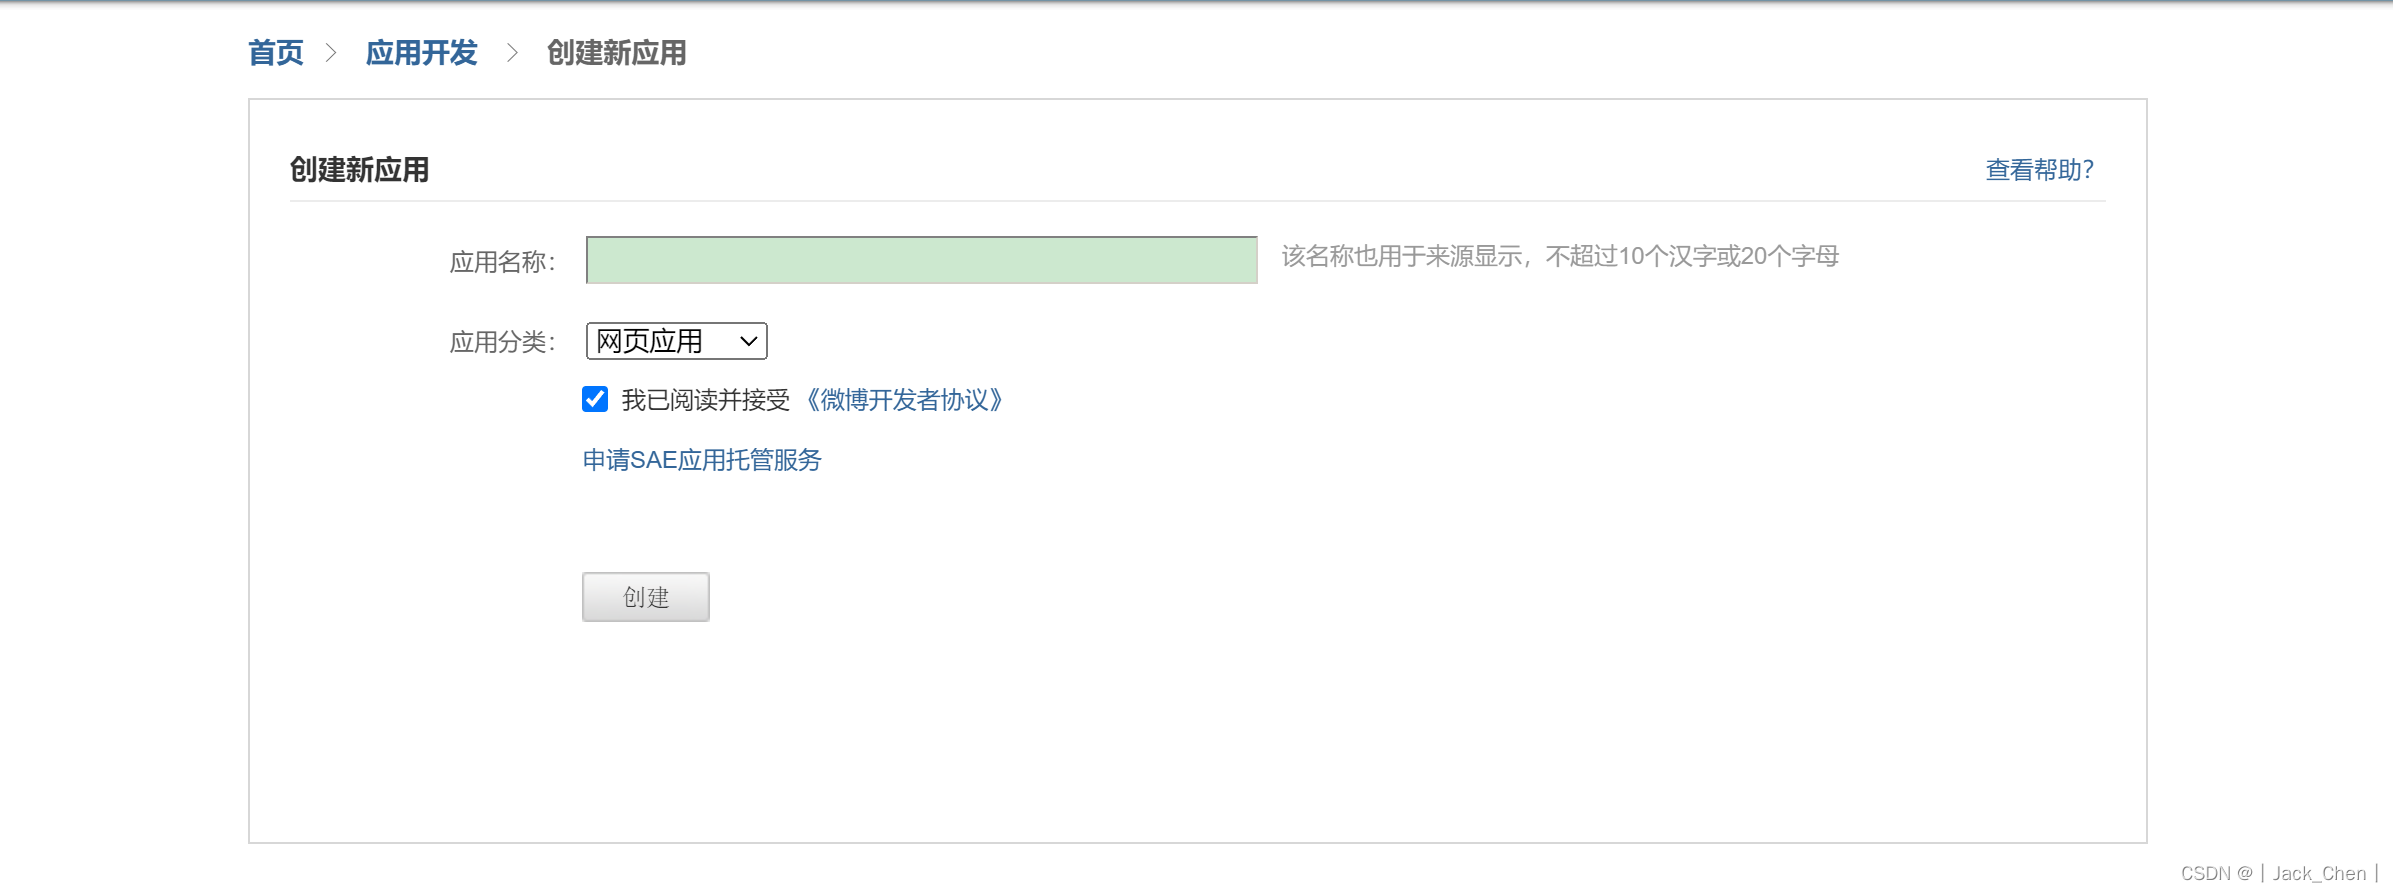
创建应用
开发者信息认证通过后即可创建应用。
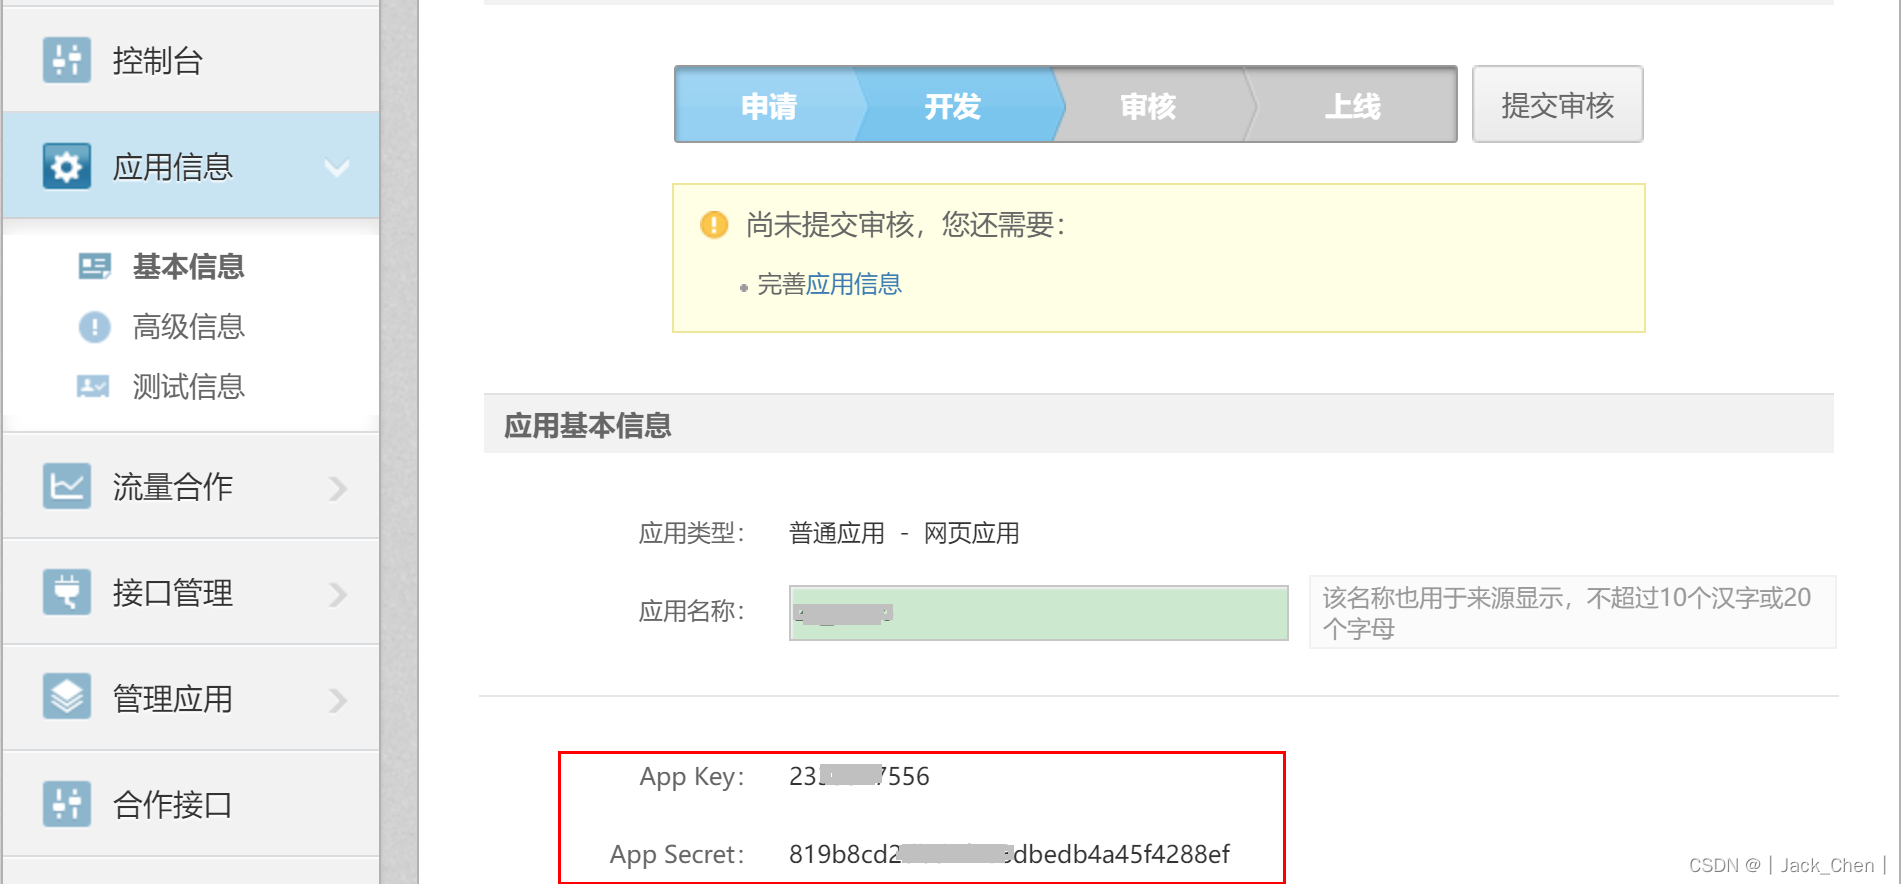
应用创建成功后会得到app key和app secret
在应用信息的高级信息中设置授权回调地址

添加测试账号,这里使用开发者账号测试。

流程分析
Web网站的授权流程如下
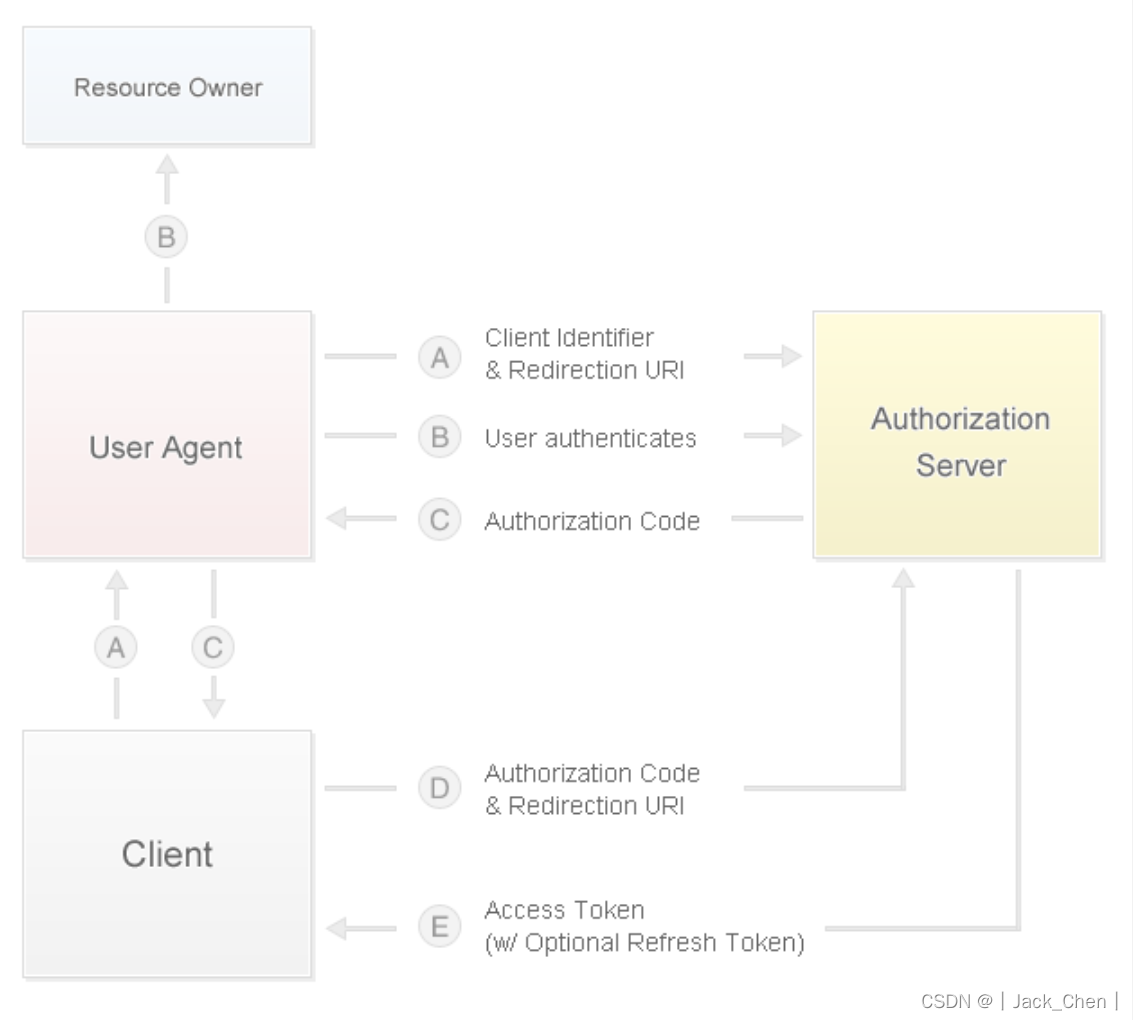
参考文档:https://open.weibo.com/wiki/%E6%8E%88%E6%9D%83%E6%9C%BA%E5%88%B6%E8%AF%B4%E6%98%8E
引导授权用户
引导需要授权的用户到如下地址
https://api.weibo.com/oauth2/authorize?client_id=YOUR_CLIENT_ID&response_type=code&redirect_uri=YOUR_REGISTERED_REDIRECT_URI
 <a href="https://api.weibo.com/oauth2/authorize?client_id=123456789&response_type=code&redirect_uri=https://ws20264753.zicp.fun/weibo/success">
    <span>微博</span>
</a>

用户授权
来到授权地址后,需要用户授权,授权成功返回Code码

授权成功
如果用户同意授权,页面跳转至回调地址并携带Code码

换取Access Token
通过授权返回的CODE,请求如下地址,换取Access Token。
https://api.weibo.com/oauth2/access_token?client_id=YOUR_CLIENT_ID&client_secret=YOUR_CLIENT_SECRET&grant_type=authorization_code&redirect_uri=YOUR_REGISTERED_REDIRECT_URI&code=CODE
https://api.weibo.com/oauth2/access_token?code=0c55753fe19a5bcf0a4a42afd4a64353&grant_type=authorization_code&client_secret=81abcdefghijkmllb4a45f4288ef&redirect_uri=https://ws20264753.zicp.fun/weibo/success&client_id=231234566
得到如下响应结果
body: {"access_token":"","remind_in":"15896999","expires_in":157679999,"uid":"12345678","isRealName":"true"}
HTTP客户端
Code获取后,需要使用Code获取Access Token,以及使用token请求其他接口,此时需要使用发送请求的HTTP客户端,这里使用
hutool工具类
发送一个POST请求示例:
//链式构建请求
String result2 = HttpRequest.post(url)
    .header(Header.USER_AGENT, "Hutool http")//头信息,多个头信息多次调用此方法即可
    .form(paramMap)//表单内容
    .timeout(20000)//超时,毫秒
    .execute().body();
Console.log(result2);
使用Access Token请求相关接口
Access Token得到后,就可以使用Access Token请求相关接口获取对应数据,这里使用2个接口举例使用说明。
相关接口如下:
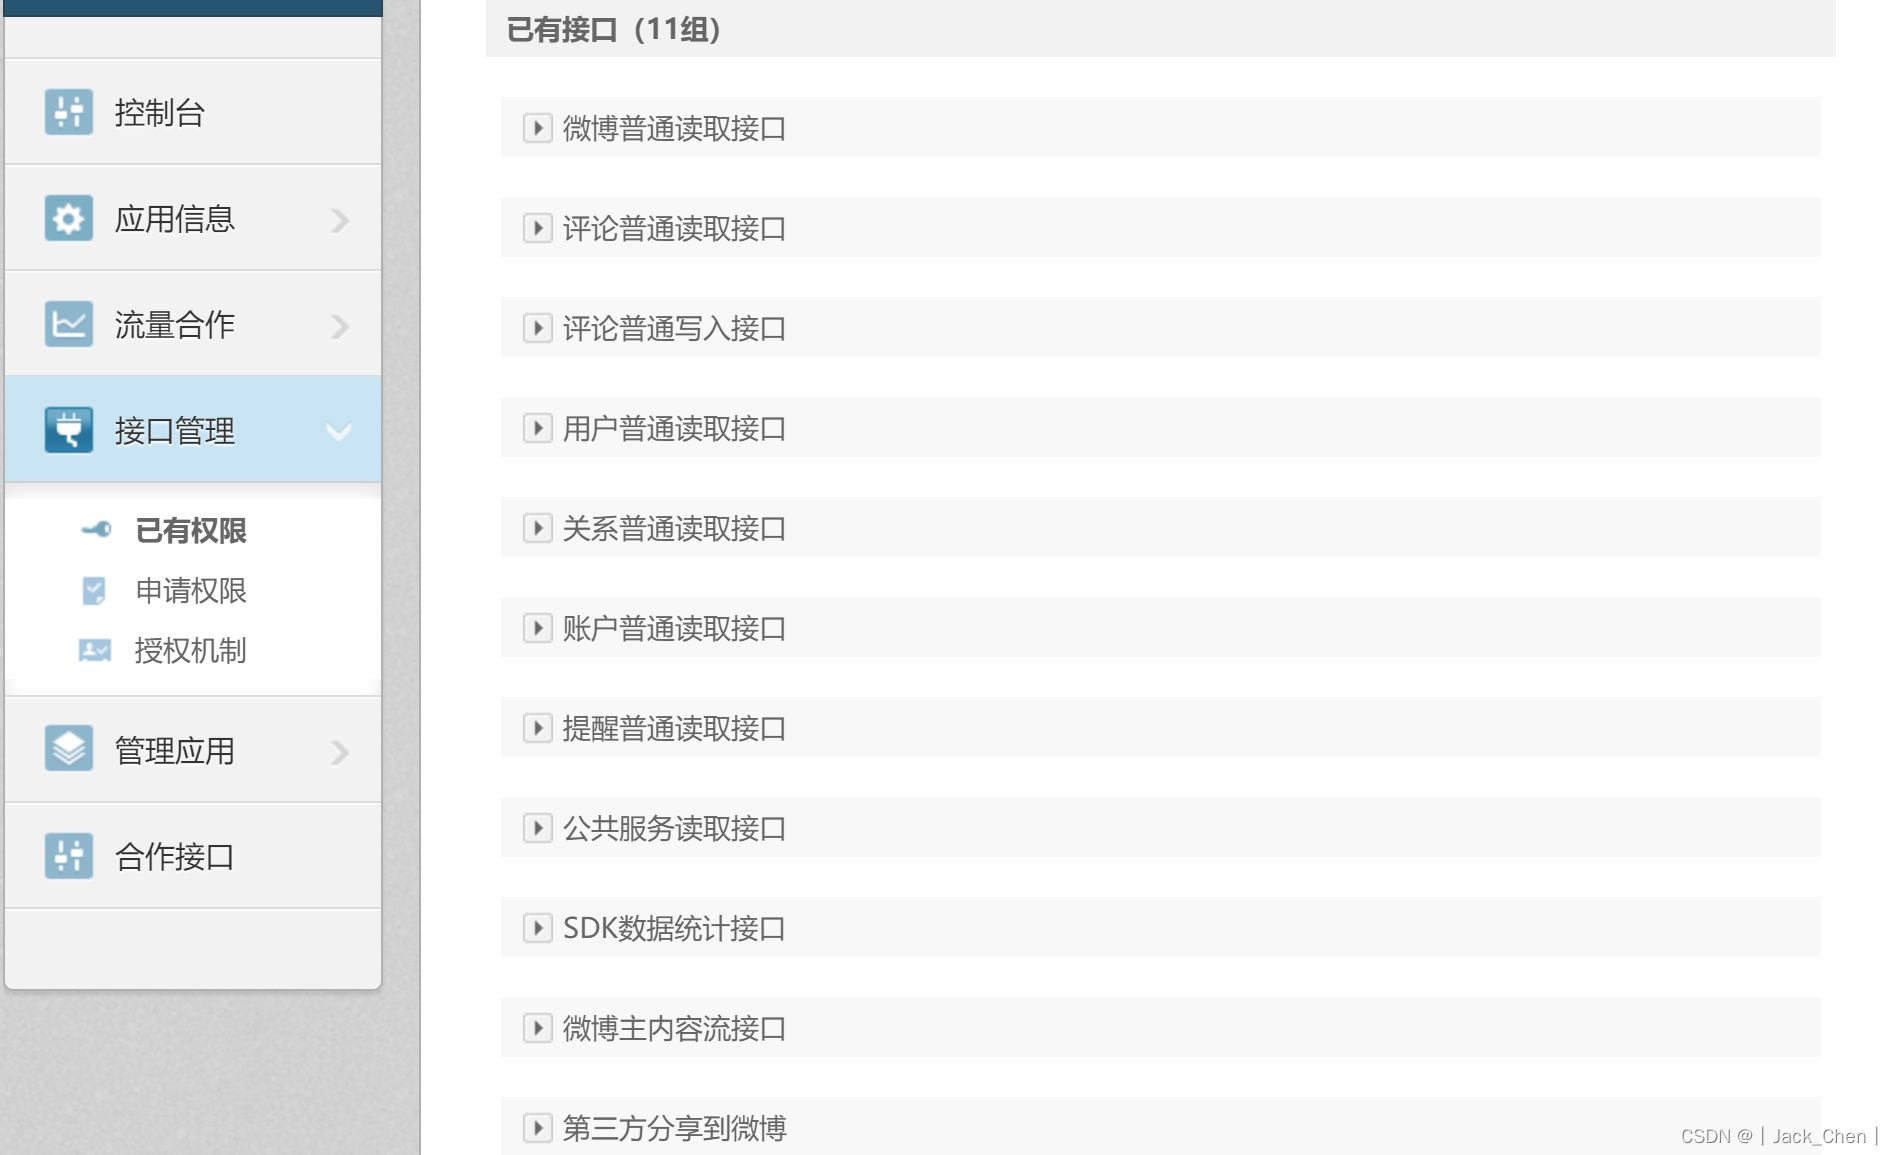
根据用户ID获取用户信息
根据用户ID获取用户信息接口描述信息如下
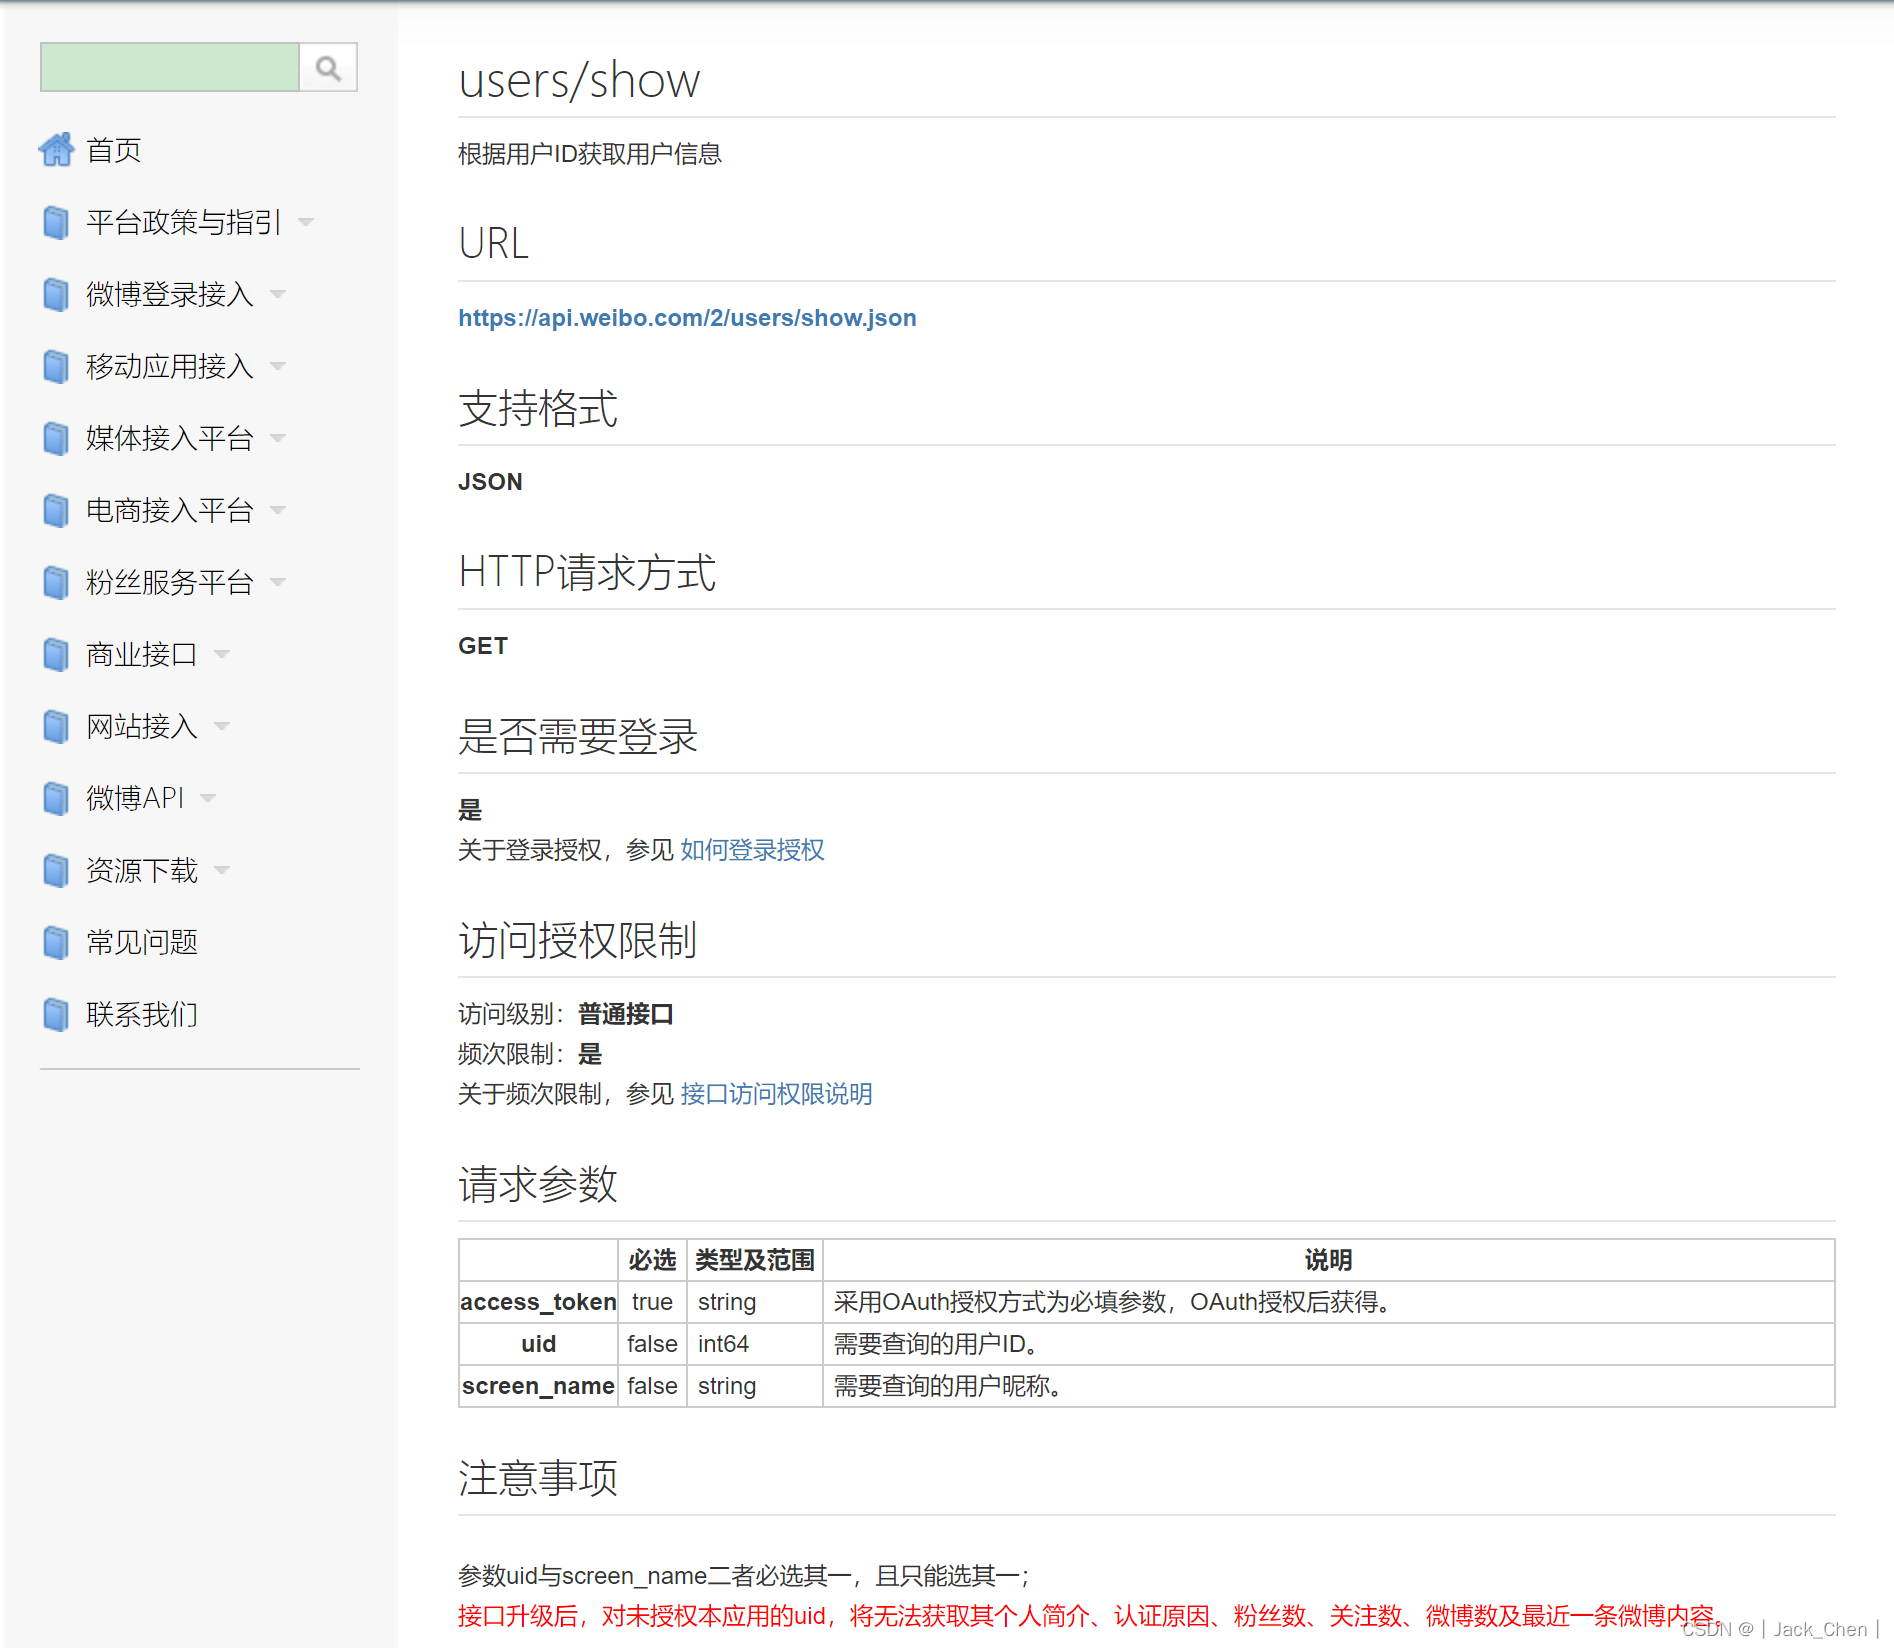
只需要如下设置请求参数,请求地址即可获取用户信息
Map<String, Object> selectUserParam = new HashMap<>();
selectUserParam.put("access_token", "token");
selectUserParam.put("uid", "uid");

HttpResponse execute = HttpRequest.get("https://api.weibo.com/2/users/show.json").form(selectUserParam).timeout(2000).execute();
响应如下类似信息
{
	"id": 51234100,
	"idstr": "58812345464100",
	"class": 1,
	"screen_name": "XX",
	"name": "XX",
	"province": "51",
	"city": "14",
	"location": "四川 成都",
	"description": "真正的强者,不是流泪的人,而是含泪奔跑的人。",
	"url": "",
	"profile_image_url": "https://tva3.sinaimg.cn/crop.0.0.996.996.50/006qils8jw8f2cztnnp6vj30ro0rpgnj.jpg?KID=imgbed,tva&Expires=1663398489&ssig=JM0ZTUEYbs",
	"light_ring": false,
	"cover_image_phone": "http://ww1.sinaimg.cn/crop.0.0.640.640.640/549d0121tw1egm1kjly3jj20hs0hsq4f.jpg",
	"profile_url": "u/58812345464100",
	"domain": "",
	"weihao": "",
	"gender": "m",
}
获取用户的粉丝列表
获取用户的粉丝列表接口描述信息如下
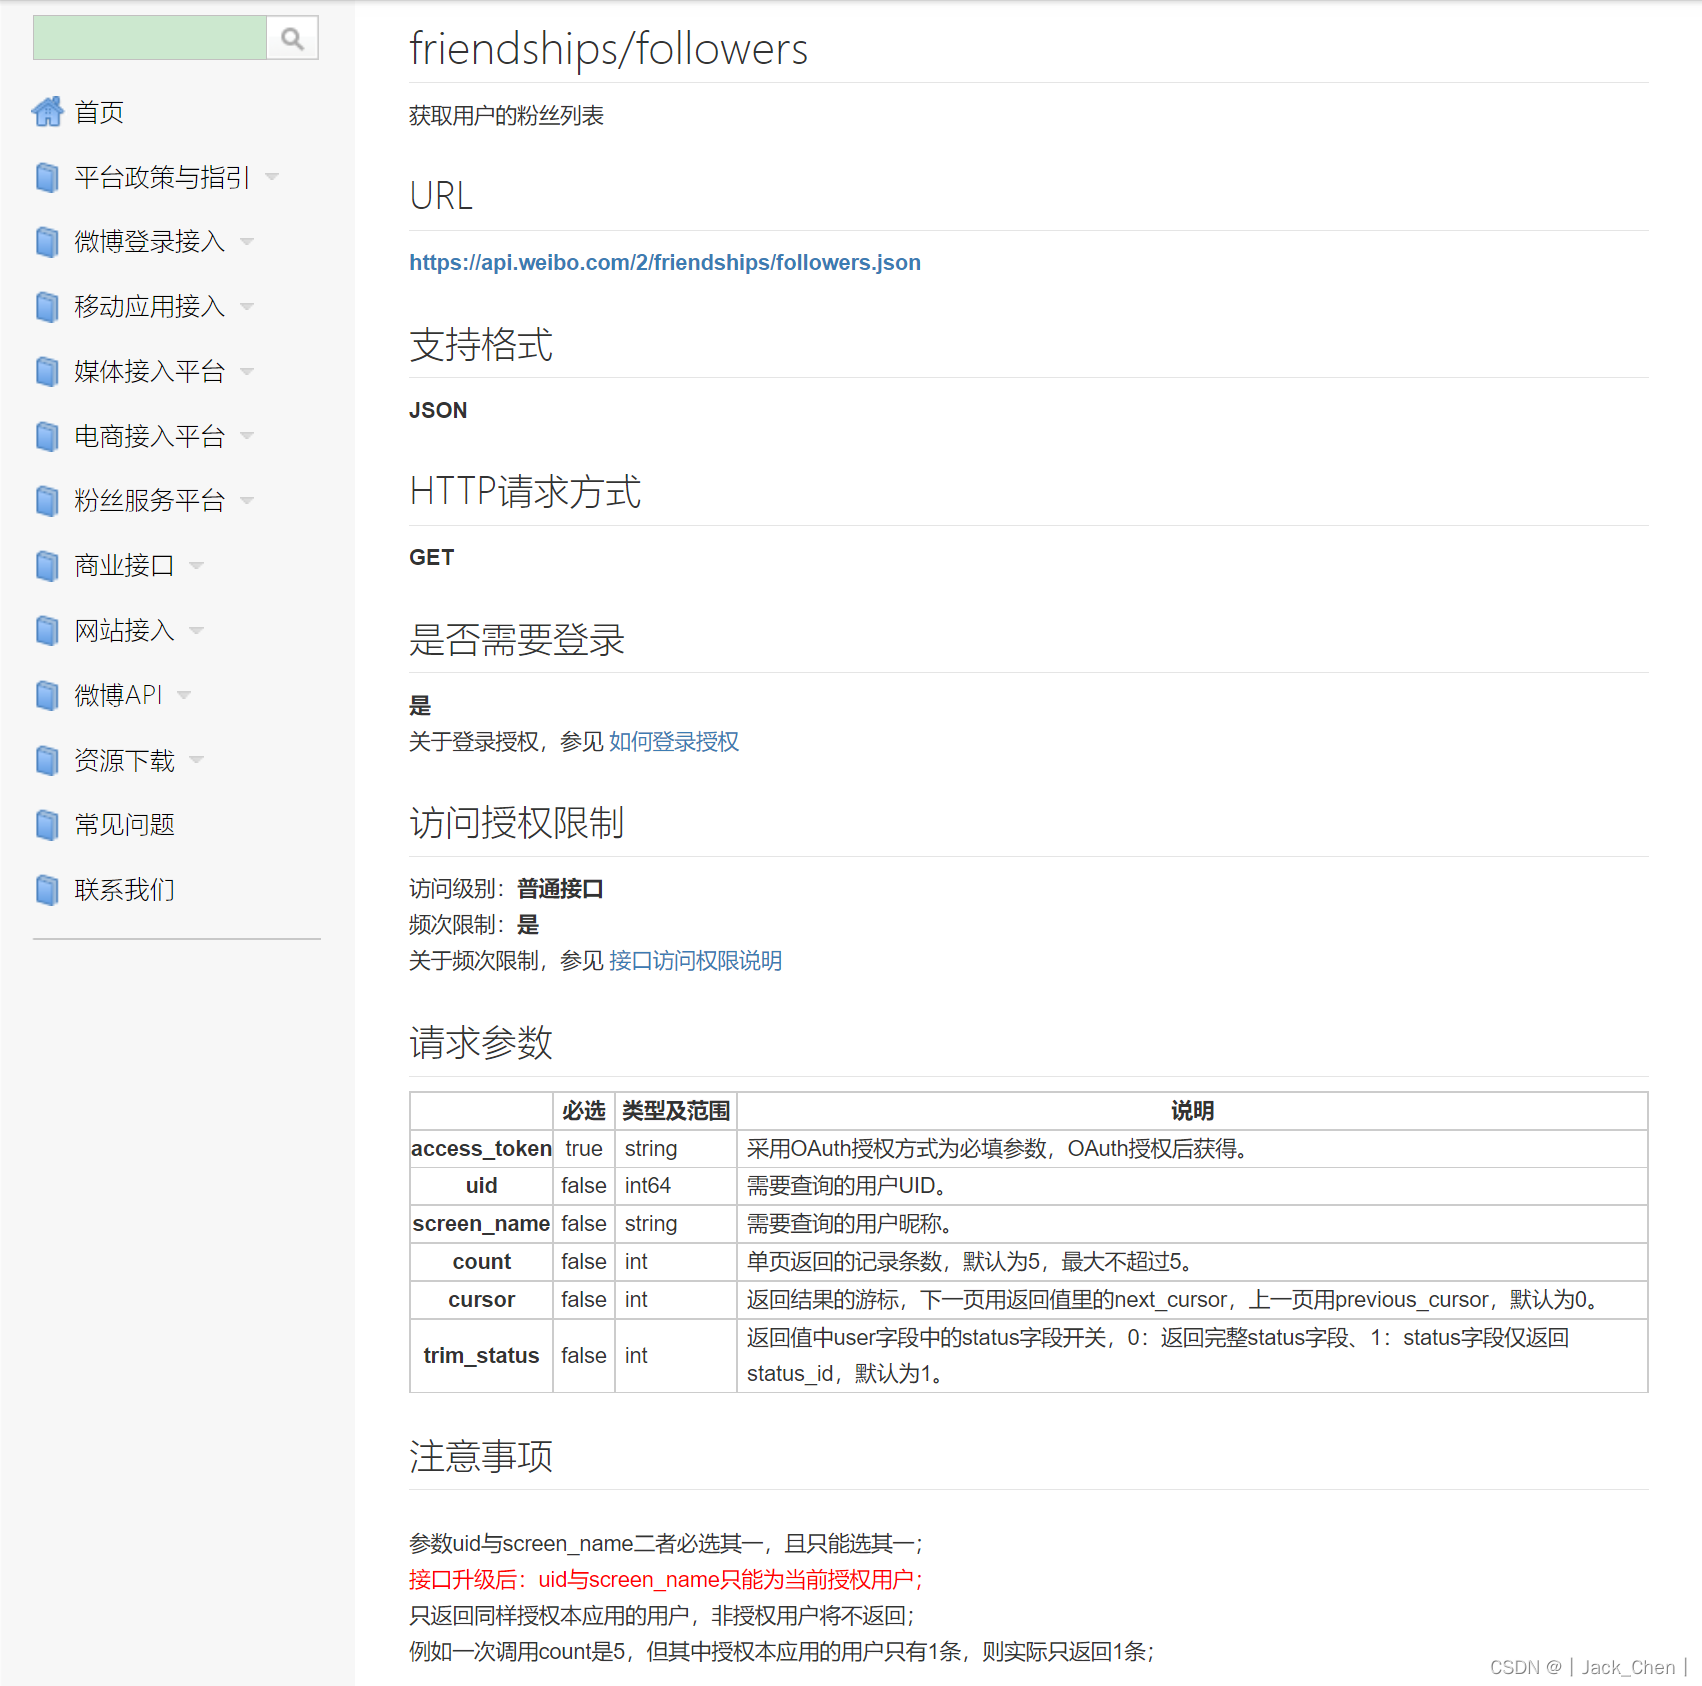
Map<String, Object> selectUserParam = new HashMap<>();
selectUserParam.put("access_token", weiboUser.getAccess_token());
selectUserParam.put("uid", weiboUser.getUid());

HttpResponse execute = HttpRequest.get("https://api.weibo.com/2/friendships/followers.json").form(selectUserParam).timeout(2000).execute();
响应结果
粉丝信息: {"users":[],"has_filtered_attentions":false,"next_cursor":600,"previous_cursor":0,"total_number":1789,"use_sink_stragety":false,"has_filtered_fans":true,"use_status_strategy":false,"show_related_topic":false,"display_total_number":1789,"display_total_number_str":"1789","show_unread":false}
Spring Boot集成微博登录
添加依赖
添加hutool开发工具包,核心用于发送Http请求。
<dependency>
     <groupId>cn.hutool</groupId>
     <artifactId>hutool-all</artifactId>
     <version>5.8.2</version>
</dependency>

<!-- thymeleaf页面 -->
<dependency>
   <groupId>org.springframework.boot</groupId>
   <artifactId>spring-boot-starter-thymeleaf</artifactId>
</dependency>
封装Token等信息
用户授权成功后,使用WeiboUser类封装相关信息
/**
 * 封装登录认证后的令牌等信息
 */
@Data
public class WeiboUser {
    /**
     * 令牌
     */
    private String access_token;
    /**
     * 令牌过期时间,该参数即将废弃
     */
    private String remind_in;
    /**
     * 令牌过期时间,单位是秒数
     */
    private long expires_in;
    /**
     * 该社交用户的唯一标识
     */
    private String uid;
    /**
     * 是否记住我
     */
    private String isRealName;
}
创建Login页面
<!DOCTYPE html>
<html lang="en">
<head>
    <meta charset="UTF-8">
    <title>Title</title>
</head>
<body>
<div>
    <a href="https://api.weibo.com/oauth2/authorize?client_id=23123456556&response_type=code&redirect_uri=https://ws20264753.zicp.fun/weibo/success">
        <span>微博</span>
    </a>
</div>
</body>
</html>
创建Home页面
<!DOCTYPE html>
<html lang="en">
<head>
    <meta charset="UTF-8">
    <title>Title</title>
</head>
<body>
  <div>
    <h3>登录成功</h3>
  </div>
</body>
</html>
微博登录逻辑
package com.example.demo.controller;

import cn.hutool.http.HttpRequest;
import cn.hutool.http.HttpResponse;
import com.alibaba.fastjson.JSON;
import lombok.extern.slf4j.Slf4j;
import org.springframework.stereotype.Controller;
import org.springframework.web.bind.annotation.RequestMapping;

import javax.servlet.http.HttpSession;
import java.io.UnsupportedEncodingException;
import java.net.URLEncoder;
import java.util.HashMap;
import java.util.Map;

@Slf4j
@Controller
public class WeiBoController {


    @RequestMapping("/weibo/login")
    public String login() {
        return "login";
    }

    @RequestMapping("/weibo/success")
    public String authorize(String code, HttpSession session) throws Exception {
        // 使用code换取token,换取成功则继续,否则重定向登录页
        Map<String, Object> paramMap = new HashMap<>();
        paramMap.put("client_id", "212345676");
        paramMap.put("client_secret", "819b8cd2dbd1f188dbedb4a45f4288ef");
        paramMap.put("grant_type", "authorization_code");
        paramMap.put("redirect_uri", "https://ws20264753.zicp.fun/weibo/success");
        paramMap.put("code", code);
        String url = this.buildUrl("https://api.weibo.com", "/oauth2/access_token", paramMap);
        //发送post请求换取token
        HttpResponse httpResponse = HttpRequest.post(url)
                .timeout(20000)//超时,毫秒
                .execute();

        Map<String, String> errors = new HashMap<>();
        if (httpResponse.getStatus() == 200) {
            String body = httpResponse.body();
            log.info("body: {}", body);
            WeiboUser weiboUser = JSON.parseObject(body, WeiboUser.class);
            // TODO 使用 weiboUser.getUid() 查询数据库 若查询结果为null,则之前未登陆过,查询其社交信息进行注册
            Boolean selectUser = true;
            if (selectUser) {
                log.info("用户未注册,查询用户信息进行注册");
                this.register(weiboUser);

                // 获取粉丝信息
                this.getFan(weiboUser);
            } else {
                log.info("用户已注册,更新相关信息");
                // TODO 更新TOKEN、UID、登录过期时间等信息
                weiboUser.getAccess_token();
                weiboUser.getUid();
                weiboUser.getExpires_in();
            }

            // 将用户信息返回
            session.setAttribute("userInfo", weiboUser.toString());
            return "home";
        } else {
            errors.put("msg", "获得第三方授权失败,请重试");
            session.setAttribute("errors", errors);
            return "login";
        }
    }


    @RequestMapping("/weibo/fail")
    public void authorize() {
        log.info("weibo fail...");
    }


    /**
     * 获取用户信息
     */
    public void register(WeiboUser weiboUser) {
        Map<String, Object> selectUserParam = new HashMap<>();
        selectUserParam.put("access_token", weiboUser.getAccess_token());
        selectUserParam.put("uid", weiboUser.getUid());
//      String selectUserUrl = this.buildUrl("https://api.weibo.com", "/2/users/show.json", selectUserParam);

        HttpResponse execute = HttpRequest.get("https://api.weibo.com/2/users/show.json").form(selectUserParam).timeout(2000).execute();
        if (execute.getStatus() == 200) {
            String userInfo = execute.body();
            log.info("userInfo: {}", userInfo);
            //TODO 调用微博api接口获取用户信息,然后进行注册,记录以下值
            weiboUser.getAccess_token();
            weiboUser.getUid();
            weiboUser.getExpires_in();
        }
    }

    /**
     * 获取
     */
    public void getFan(WeiboUser weiboUser) {
        Map<String, Object> selectUserParam = new HashMap<>();
        selectUserParam.put("access_token", weiboUser.getAccess_token());
        selectUserParam.put("uid", weiboUser.getUid());
//      String selectUserUrl = this.buildUrl("https://api.weibo.com", "/2/users/show.json", selectUserParam);

        HttpResponse execute = HttpRequest.get("https://api.weibo.com/2/friendships/followers.json").form(selectUserParam).timeout(2000).execute();
        if (execute.getStatus() == 200) {
            String fanList = execute.body();
            log.info("粉丝信息: {}", fanList);
        }
    }


    /**
     * 构建请求URl地址
     *
     * @return
     */
    private static String buildUrl(String host, String path, Map<String, Object> querys) throws
            UnsupportedEncodingException {
        StringBuilder sbUrl = new StringBuilder();
        sbUrl.append(host).append(path);

        StringBuilder sbQuery = new StringBuilder();

        for (Map.Entry<String, Object> query : querys.entrySet()) {
            if (sbQuery.length() > 0) {
                sbQuery.append("&");
            }
            sbQuery.append(query.getKey());
            sbQuery.append("=");
            sbQuery.append(URLEncoder.encode(query.getValue().toString(), "utf-8"));
        }

        if (sbQuery.length() > 0) {
            sbUrl.append("?").append(sbQuery);
        }

        return sbUrl.toString();
    }
}


