微信支付
扫码支付
微信扫码支付介绍
具体参考官方文档
微信扫码支付流程
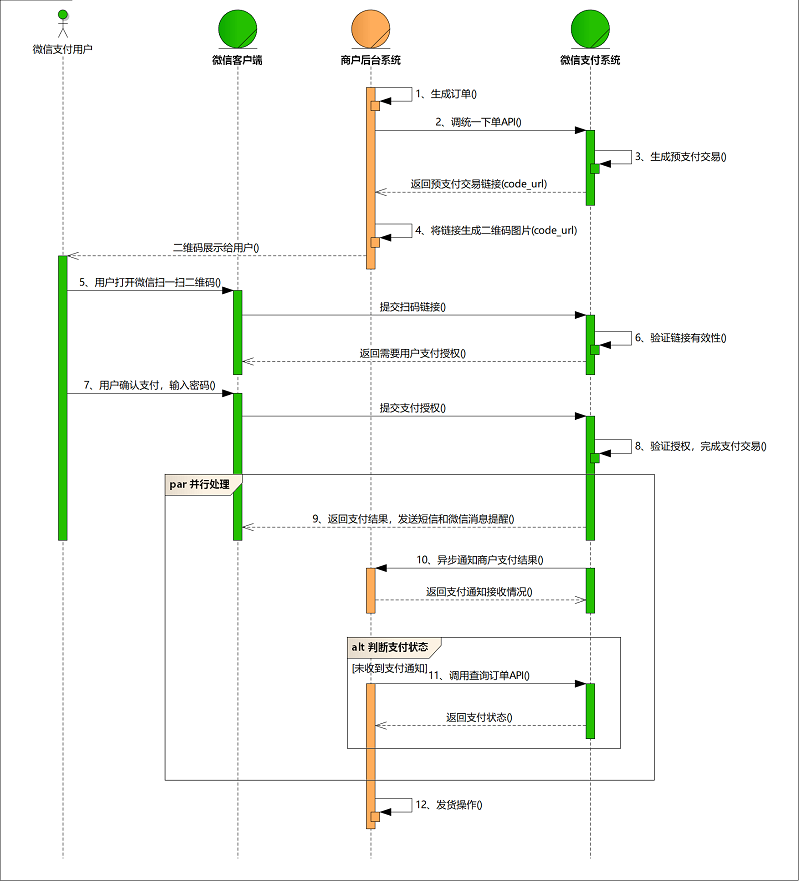
总结我们接下来要做的事情
- 调用下单接口,获取code_url
- 根据code_url生成二维码
- 查询订单的支付状态
统一下单
核心对象创建
1.添加依赖
<dependency>
    <groupId>com.github.wechatpay-apiv3</groupId>
    <artifactId>wechatpay-apache-httpclient</artifactId>
    <version>0.4.9</version>
</dependency>
2.初始化httpclient对象、加载商户私钥、加载平台证书
@Before
public void setup() throws IOException {
    // 加载商户私钥(privateKey:私钥字符串)
    PrivateKey merchantPrivateKey = PemUtil
            .loadPrivateKey(new ByteArrayInputStream(privateKey.getBytes("utf-8")));

    // 加载平台证书(mchId:商户号,mchSerialNo:商户证书序列号,apiV3Key:V3密钥)
    AutoUpdateCertificatesVerifier verifier = new AutoUpdateCertificatesVerifier(
            new WechatPay2Credentials(mchId, new PrivateKeySigner(mchSerialNo, merchantPrivateKey)),apiV3Key.getBytes("utf-8"));

    // 初始化httpClient
    httpClient = WechatPayHttpClientBuilder.create()
            .withMerchant(mchId, mchSerialNo, merchantPrivateKey)
            .withValidator(new WechatPay2Validator(verifier)).build();
}

@After
public void after() throws IOException {
    httpClient.close();
}
3.定义商户私钥等参数
    private String mchId = "xxx"; //商户号
    //private String appId = "wx6592a2db3f85ed25"; //应用号
    private String appId = "xxx"; //应用号
    private String privateKey = "xx" +
            "-----END PRIVATE KEY-----\n"; //私钥字符串
    private String mchSerialNo = "xxx"; //商户证书序列号
    private String apiV3Key = "xxx"; //V3密钥
native下单接口代码
1.定义参数实体
金额实体类:
package com.itheima.pojo;

import lombok.Builder;
import lombok.Data;

@Builder
@Data
public class Amount {
    private Integer total;
    private String currency;
}
请求参数实体类:
package com.itheima.pojo;

import lombok.Builder;
import lombok.Data;

@Builder
@Data
public class NativePayParams {

    private String appid; // 应用id
    private String mchid;  // 商户id
    private String description; //商品描述
    private String out_trade_no; //订单号
    private String notify_url; // 支付成功回调通知地址
    private Amount amount; //订单金额信息
}
2.修改官方提供的代码如下:
@Test
public void testNativePay() throws Exception{
HttpPost httpPost = new HttpPost("https://api.mch.weixin.qq.com/v3/pay/transactions/native");
// 请求body参数
Amount amount = Amount.builder().currency("CNY").total(1).build();
NativePayParams nativePayParams = NativePayParams.builder().appid(appId)
.description("百世可乐")
.mchid(mchId)
.notify_url("http://localhost:8080")
.out_trade_no("AEFA234DAF342342FRADFAS1")
.amount(amount)
.build();
String reqdata = JSON.toJSONString(nativePayParams);
StringEntity entity = new StringEntity(reqdata,"utf-8");
entity.setContentType("application/json");
httpPost.setEntity(entity);
httpPost.setHeader("Accept", "application/json");
//完成签名并执行请求
CloseableHttpResponse response = httpClient.execute(httpPost);
try {
int statusCode = response.getStatusLine().getStatusCode();
if (statusCode == 200) { //处理成功
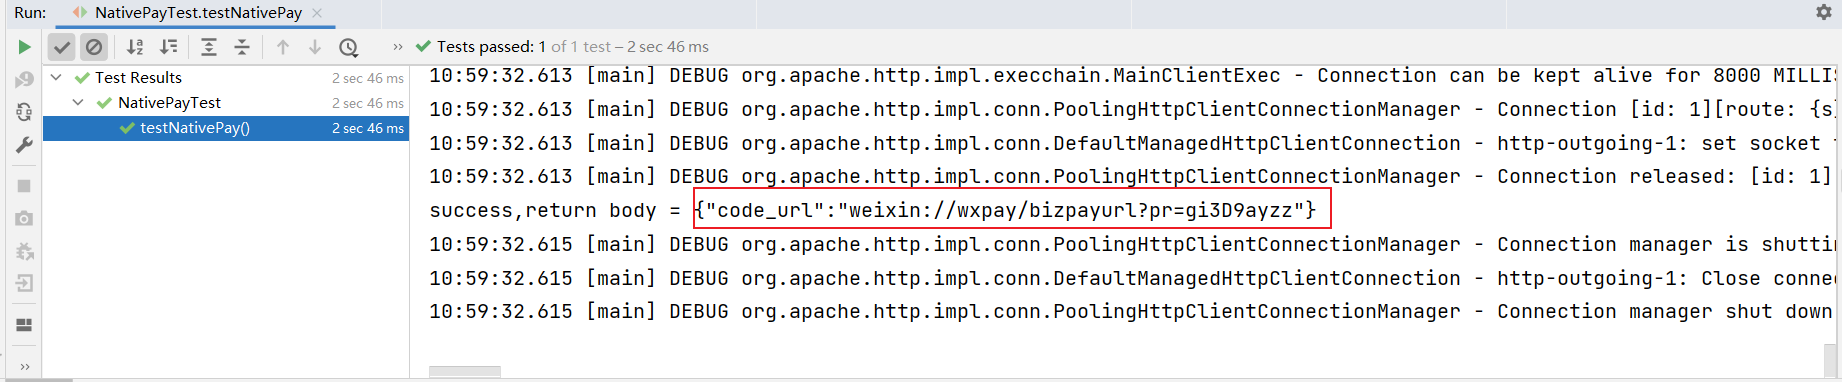
System.out.println("success,return body = " + EntityUtils.toString(response.getEntity()));
} else if (statusCode == 204) { //处理成功,无返回Body
System.out.println("success");
} else {
System.out.println("failed,resp code = " + statusCode+ ",return body = " + EntityUtils.toString(response.getEntity()));
throw new IOException("request failed");
}
} finally {
response.close();
}
}测试
二维码
二维码生成
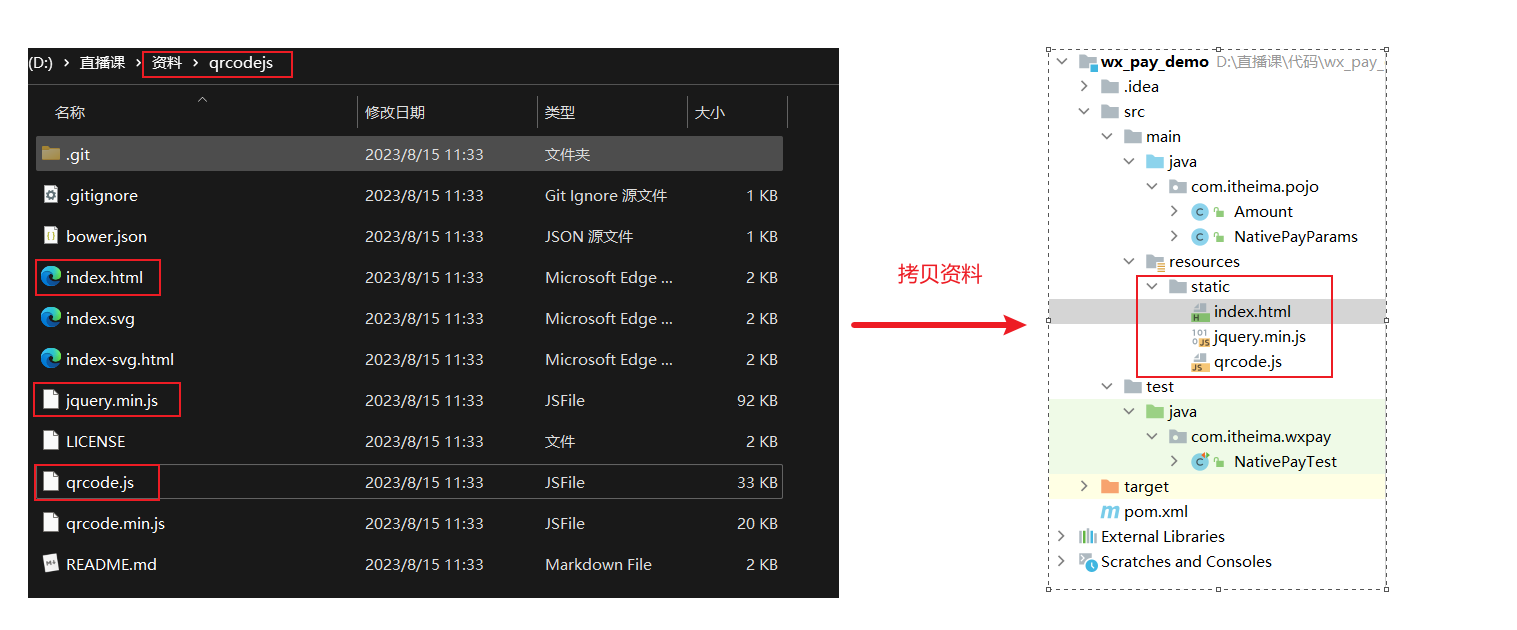
直接拷贝资料/qrcodejs中的index.html和jquery.min.js和qrcode.js文件到工程的resource/static目录下,如下图所示:
二维码扫码测试
直接打开index.html文件,然后将微信支付的地址粘贴到数据框中,按下enter键,生成新的二维码图片,如下图所示:

打开手机微信进行扫码测试
支付成功通知
微信主动通知
详细查阅微信官方文档
核心思路分析
- 编写接口,接受微信的支付成功通知
- 支付通知的内容需要解密
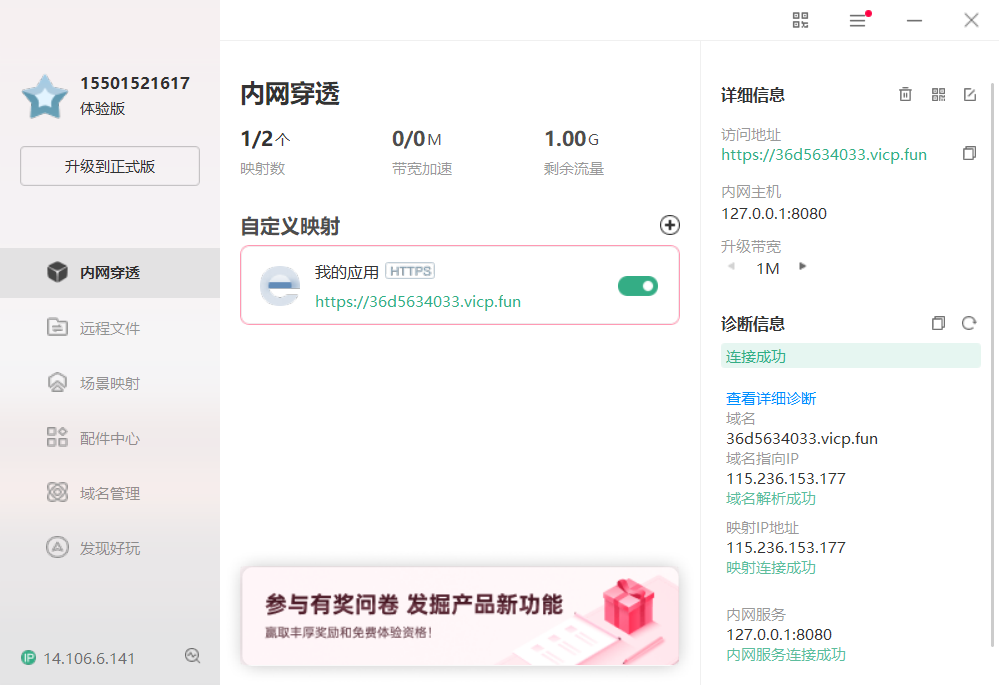
- 本地测试的ip不是公网ip,外部无法访问,需要域名穿透
- 微信主动通知的地址是通过下单接口中的请求参数“notify_url”来设置的 ,要求必须为https地址 。
代码实现
根据微信官方的接口文档定义实体,接收参数
package com.itheima.pojo;

import lombok.Data;

@Data
public class ResourceDto {

    private String algorithm;
    private String ciphertext;
    private String associated_data;
    private String original_type;
    private String nonce;

}
package com.itheima.pojo;
import lombok.Data;
@Data
public class NotifyDto {
private String id;
private String create_time;
private String event_type;
private String resource_type;
private ResourceDto resource;
private String summary;
}定义接口:
package com.itheima.controller;

import com.itheima.pojo.NotifyDto;
import com.itheima.service.NativePayService;
import lombok.extern.log4j.Log4j2;
import org.springframework.beans.factory.annotation.Autowired;
import org.springframework.web.bind.annotation.PostMapping;
import org.springframework.web.bind.annotation.RequestBody;
import org.springframework.web.bind.annotation.RequestMapping;
import org.springframework.web.bind.annotation.RestController;

import javax.servlet.ServletInputStream;
import javax.servlet.http.HttpServletRequest;
import java.util.HashMap;
import java.util.Map;

@RestController
@RequestMapping("/native")
@Log4j2
public class NativePayController {


    @Autowired
    private NativePayService nativePayService;

    @PostMapping("/notify")
    public Map<String,String> nativeNotify(@RequestBody NotifyDto dto){
        System.out.println("--微信回调--");
        Map<String ,String> map = null;
        try {
            nativePayService.notify(dto);
        } catch (Exception e) {
            e.printStackTrace();
            map = new HashMap<>();
            map.put("code","FAIL");
            map.put("message","失败");
        }

        return map;
    }
}
service
此处的解密参考官方文档
package com.itheima.service.impl;

import com.alibaba.fastjson2.JSON;
import com.itheima.pojo.NotifyDto;
import com.itheima.service.NativePayService;
import com.itheima.utils.AesUtil;
import org.springframework.stereotype.Service;

import java.io.IOException;
import java.security.GeneralSecurityException;
import java.util.Map;


@Service
public class NativePayServiceImpl implements NativePayService {

    private String apiV3Key ="CZBK51236435wxpay435434323FFDuv3";

    @Override
    public void notify(NotifyDto dto) {


        String jsonStr = null;
        try {
            jsonStr = new AesUtil(apiV3Key.getBytes())
                    .decryptToString(dto.getResource().getAssociated_data().getBytes(),
                            dto.getResource().getNonce().getBytes(),
                            dto.getResource().getCiphertext());
        } catch (GeneralSecurityException e) {
            e.printStackTrace();
        } catch (IOException e) {
            e.printStackTrace();
        }

        Map map = JSON.parseObject(jsonStr, Map.class);
        String outTradeNo = map.get("out_trade_no").toString();

        System.out.println("订单"+outTradeNo+"支付成功");
    }
}
域名穿透
本地电脑的ip是局域网ip,外界无法访问。此处我们只能使用域名穿透的一些软件。此处个人使用的是花生壳
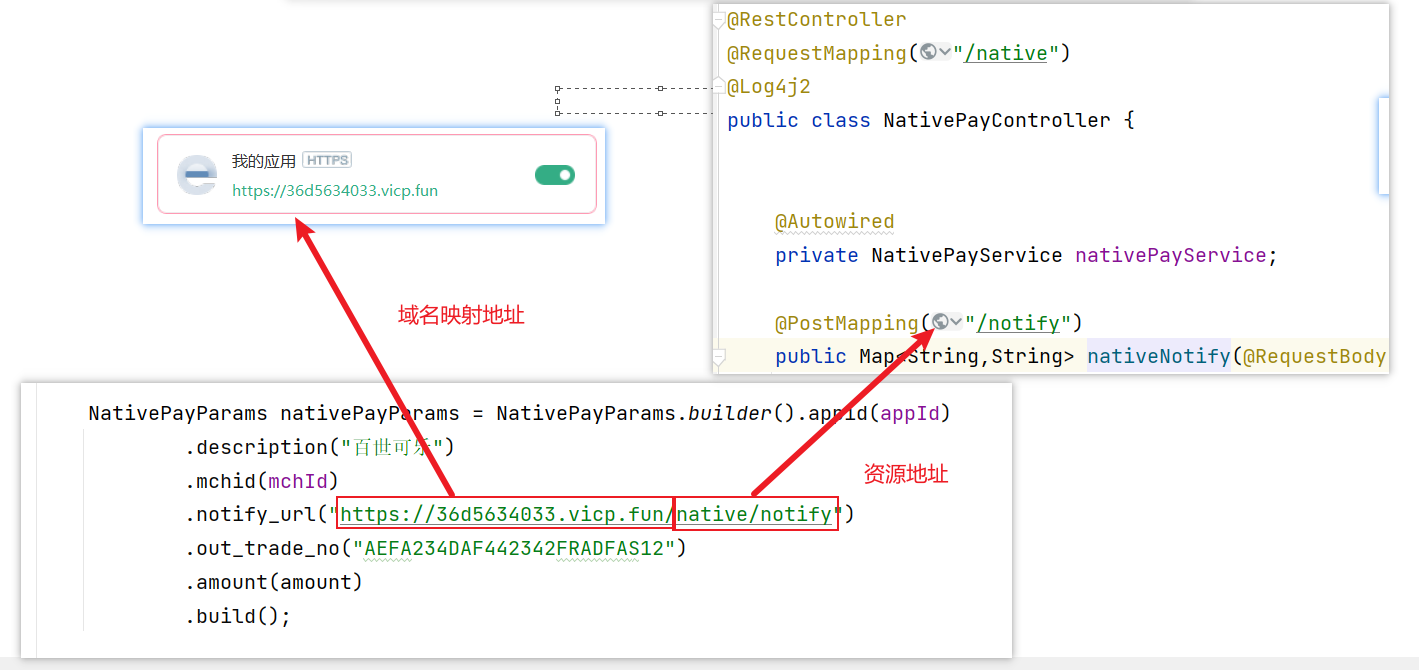
然后再下单的代码中修改notify_url的地址为域名穿透地址/资源路径,代码如下:
测试
此时只需要再次支付即可,对比解析后的订单号和支付的订单号:

主动查询支付结果
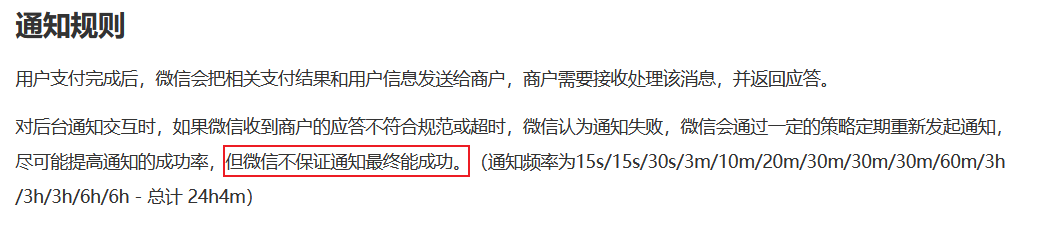
微信官方不保证支付通知的调用是正确的,所以我们必须加上双保险,可以主动去查询支付的结果,参考官方文档
参考下单的api和接口文档,编写测试代码如下:
@Test
public void checkPayStatus() throws Exception{
String url = "https://api.mch.weixin.qq.com/v3/pay/transactions/out-trade-no/1AEFA234DAF442342FRADFAS12?mchid=1561414331";
HttpGet httpGet = new HttpGet(url);
httpGet.setHeader("Accept", "application/json");
//完成签名并执行请求
CloseableHttpResponse response = httpClient.execute(httpGet);
try {
int statusCode = response.getStatusLine().getStatusCode();
if (statusCode == 200) { //处理成功
System.out.println("success,return body = " + EntityUtils.toString(response.getEntity()));
} else if (statusCode == 204) { //处理成功,无返回Body
System.out.println("success");
} else {
System.out.println("failed,resp code = " + statusCode+ ",return body = " + EntityUtils.toString(response.getEntity()));
throw new IOException("request failed");
}
} finally {
response.close();
}
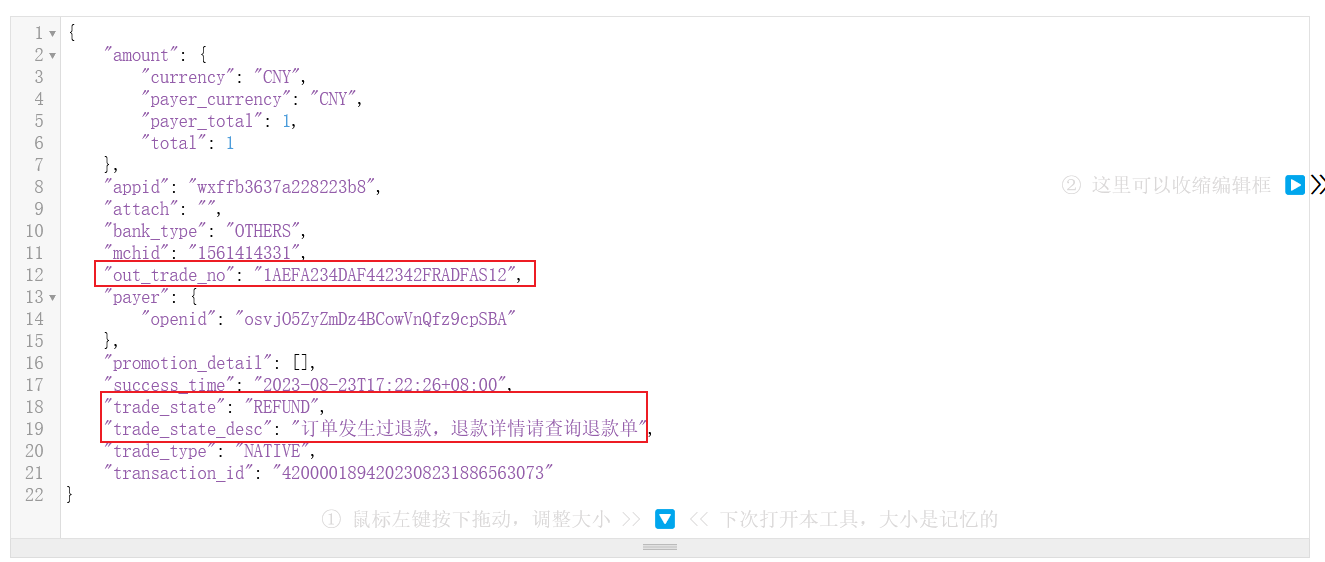
}将请求的结果通过三方json解析工具解析:得到如下结果:

提问:什么时候去查询订单的支付状态呢?
退款
api介绍
详细参考官方文档

代码实现
实体对象
package com.itheima.pojo;

import lombok.Builder;
import lombok.Data;

@Data
@Builder
public class RefundAmount {
    private int refund;// 退款金额
    private int total; //原支付交易的订单总金额

    private String currency;//

}
package com.itheima.pojo;
import lombok.Builder;
import lombok.Data;
@Data
@Builder
public class RefundParams {
private String out_trade_no; //支付交易对应的商户订单号
private String out_refund_no; //商户系统内部的退款单号
private RefundAmount amount;
}接口代码:
@Test
public void refund() throws Exception{
    HttpPost httpPost = new HttpPost("https://api.mch.weixin.qq.com/v3/refund/domestic/refunds");
    // 请求body参数

    RefundAmount refundAmount = RefundAmount.builder()
                                .currency("CNY")
                                .refund(1)
                                .total(1)
                                .build();

    RefundParams refundParams = RefundParams.builder()
                                .out_refund_no("AAAAAEWRTWERWE23432423")
                                .amount(refundAmount)
                                .out_trade_no("1AEFA234DAF442342FRADFAS12")
                                .build();


    String reqdata = JSON.toJSONString(refundParams);
    StringEntity entity = new StringEntity(reqdata,"utf-8");
    entity.setContentType("application/json");
    httpPost.setEntity(entity);
    httpPost.setHeader("Accept", "application/json");

    //完成签名并执行请求
    CloseableHttpResponse response = httpClient.execute(httpPost);

    try {
        int statusCode = response.getStatusLine().getStatusCode();
        if (statusCode == 200) { //处理成功
            System.out.println("success,return body = " + EntityUtils.toString(response.getEntity()));
        } else if (statusCode == 204) { //处理成功,无返回Body
            System.out.println("success");
        } else {
            System.out.println("failed,resp code = " + statusCode+ ",return body = " + EntityUtils.toString(response.getEntity()));
            throw new IOException("request failed");
        }
    } finally {
        response.close();
    }

}
测试
将结果使用三方json工具解析:如下图所示
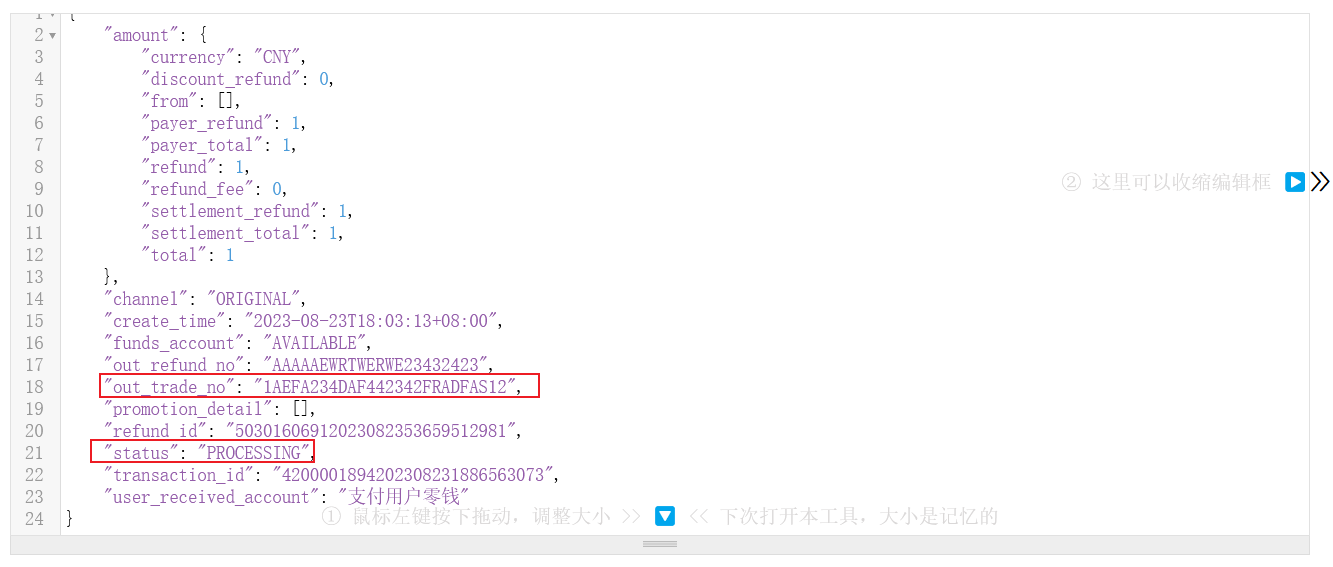
然后再调用上面的查单,查询结果
springBoot的starter封装
springBoot自动化配置原理
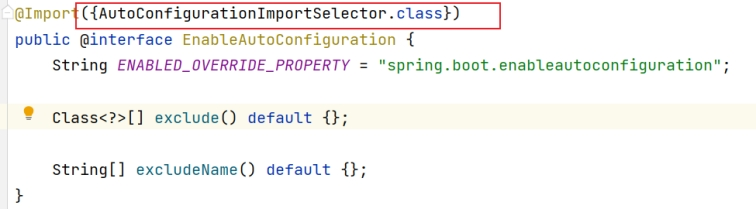
基于启动类上的注解@SpringBootApplication中的@EnableAutoConfiguration来开启自动化配置,这个注解通过@Import来导入了配置类,如下图所示:
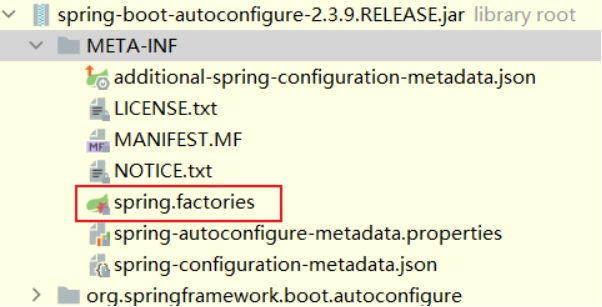
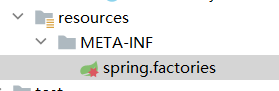
上述配置类会加载所有jar包以及源码下的META-INF下得spring.factories文件,如下图所示:
然后会加载配置中指定的自动化配置key所对应的所有自动化配置类,示例如下图所示:

但是自动化配置类并不是都需要加载的,springBoot通过自动化配置类上添加的各种条件注解@Conditional来判断这个自动化配置类是否满足条件,如果满足条件,即加载配置类,如下图webmvc自动化配置类示例:

微信扫码支付starter封装
流程分析--逆向思维
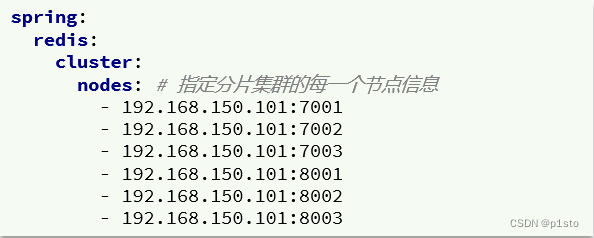
我们最终需要能够实现的目的 -->引入依赖,yaml中做好配置,直接依赖注入xxxTemplate能够直接使用
--->需要创建一个xxxTemplate对象---> 提供一个xxxTemplate类,封装扫码支付的api,一些环境级别的参数做成配置
--> 提供xxxProperties配置类,然后加载yaml中的配置
最终实现步骤整理
0.创建工程,引入相关依赖
- 提供WxPayProperties配置类,用于加载application.yaml中的环境配置
- 提供WxPayTemplate类,封装扫码支付的api,环境配置依赖注入得到
- 提供配置类,启动WxPayProperties类对象,创建WxPayTemplate对象
- 提供META-INF/spring.factory配置类,配置自动化配置
- 创建新测试工程,测试starter使用
代码实现
0.创建工程,引入相关依赖
<dependencies>
        <dependency>
            <groupId>com.github.wechatpay-apiv3</groupId>
            <artifactId>wechatpay-apache-httpclient</artifactId>
            <version>0.4.9</version>
        </dependency>
        <dependency>
            <groupId>org.projectlombok</groupId>
            <artifactId>lombok</artifactId>
        </dependency>
        <dependency>
            <groupId>org.springframework.boot</groupId>
            <artifactId>spring-boot-starter</artifactId>
        </dependency>
        <dependency>
            <groupId>org.springframework.boot</groupId>
            <artifactId>spring-boot-configuration-processor</artifactId>
            <optional>true</optional>
        </dependency>
        <dependency>
            <groupId>com.alibaba</groupId>
            <artifactId>fastjson</artifactId>
            <version>1.2.83</version>
        </dependency>
</dependencies>- 提供WxPayProperties配置类,用于加载application.yaml中的环境配置
package com.heima.wxpay.config;

import lombok.Data;
import org.springframework.boot.context.properties.ConfigurationProperties;
import org.springframework.stereotype.Component;

@Data
@ConfigurationProperties(prefix = "wxpay")
public class WxPayProperties {

    private String mchId = "1561414331"; //商户号
    //private String appId = "wx6592a2db3f85ed25"; //应用号
    private String appId = "wxffb3637a228223b8"; //应用号
    private String privateKey = "-----BEGIN PRIVATE KEY-----\n" +
            "MIIEvQIBADANBgkqhkiG9w0BAQEFAASCBKcwggSjAgEAAoIBAQDBHGgIh80193Gh\n" +
            "dpD1LtMZfTRpcWI0fImyuBCyrd3gYb3rrsARebGcHdJsQA3mVjVqVp5ybhEZDPa4\n" +
            "ecoK4Ye1hTppNpI/lmLt4/uUV/zhF5ahli7hi+116Ty6svHSbuMQBuUZeTFOwGrx\n" +
            "jvofU/4pGIwh8ZvkcSnyOp9uX2177UVxDBkhgbZbJp9XF2b83vUa5eHo93CziPzn\n" +
            "3hFdAlBCdTXB7DH+m0nN3Jou0szGukvq7cIgGpHku4ycKSTkIhhl9WRhN6OoSEJx\n" +
            "q88MXzjkzTruc85PHN52aUTUifwg3T8Y4XqFQ61dTnEmgxeD2O6/pLdB9gLsp6yC\n" +
            "GqN5Lqk7AgMBAAECggEBAL4X+WzUSbSjFS9NKNrCMjm4H1zgqTxjj6TnPkC1mGEl\n" +
            "tjAHwLgzJBw62wWGdGhWWpSIGccpBBm1wjTMZpAZfF66fEpP1t1Ta6UjtGZNyvfF\n" +
            "IZmE3jdWZ/WXGBnsxtFQKKKBNwrBW0Fbdqq9BQjLxLitmlxbmwrgPttcy855j6vZ\n" +
            "qq4MBT1v8CtUT/gz4UWW2xWovVnmWOrRSScv7Nh0pMbRpPLkNHXrBwSSNz/keORz\n" +
            "XB9JSm85wlkafa7n5/IJbdTml3A/uAgW3q3JZZQotHxQsYvD4Zb5Cnc9CPAXE5L2\n" +
            "Yk877kVXZMGt5QPIVcPMj/72AMtaJT67Y0fN0RYHEGkCgYEA38BIGDY6pePgPbxB\n" +
            "7N/l6Df0/OKPP0u8mqR4Q0aQD3VxeGiZUN1uWXEFKsKwlOxLfIFIFk1/6zQeC0xe\n" +
            "tNTKk0gTL8hpMUTNkE7vI9gFWws2LY6DE86Lm0bdFEIwh6d7Fr7zZtyQKPzMsesC\n" +
            "3XV9sdSUExEi5o/VwAyf+xZlOXcCgYEA3PGZYlILjg3esPNkhDz2wxFw432i8l/B\n" +
            "CPD8ZtqIV9eguu4fVtFYcUVfawBb0T11RamJkc4eiSOqayC+2ehgb+GyRLJNK4Fq\n" +
            "bFcsIT+CK0HlscZw51jrMR0MxTc4RzuOIMoYDeZqeGB6/YnNyG4pw2sD8bIwHm84\n" +
            "06gtJsX/v10CgYAo8g3/aEUZQHcztPS3fU2cTkkl0ev24Ew2XGypmwsX2R0XtMSB\n" +
            "uNPNyFHyvkgEKK2zrhDcC/ihuRraZHJcUyhzBViFgP5HBtk7VEaM36YzP/z9Hzw7\n" +
            "bqu7kZ85atdoq6xpwC3Yn/o9le17jY8rqamD1mv2hUdGvAGYsHbCQxnpBwKBgHTk\n" +
            "eaMUBzr7yZLS4p435tHje1dQVBJpaKaDYPZFrhbTZR0g+IGlNmaPLmFdCjbUjiPy\n" +
            "A2+Znnwt227cHz0IfWUUAo3ny3419QkmwZlBkWuzbIO2mms7lwsf9G6uvV6qepKM\n" +
            "eVd5TWEsokVbT/03k27pQmfwPxcK/wS0GFdIL/udAoGAOYdDqY5/aadWCyhzTGI6\n" +
            "qXPLvC+fsJBPhK2RXyc+jYV0KmrEv4ewxlK5NksuFsNkyB7wlI1oMCa/xB3T/2vT\n" +
            "BALgGFPi8BJqceUjtnTYtI4R2JIVEl08RtEJwyU5JZ2rvWcilsotVZYwfuLZ9Kfd\n" +
            "hkTrgNxlp/KKkr+UuKce4Vs=\n" +
            "-----END PRIVATE KEY-----\n"; //私钥字符串
    private String mchSerialNo = "25FBDE3EFD31B03A4377EB9A4A47C517969E6620"; //商户证书序列号
    private String apiV3Key = "CZBK51236435wxpay435434323FFDuv3"; //V3密钥

}- 提供WxPayTemplate类,封装扫码支付的api,环境配置依赖注入得到
2个参数实体类:
package com.heima.wxpay.dto;

import lombok.Builder;
import lombok.Data;

@Builder
@Data
public class NativePayParams {

    private String appid; // 应用id
    private String mchid;  // 商户id
    private String description; //商品描述
    private String out_trade_no; //订单号
    private String notify_url; // 支付成功回调通知地址
    private Amount amount; //订单金额信息
}
package com.heima.wxpay.dto;
import lombok.Builder;
import lombok.Data;
@Builder
@Data
public class Amount {
private Integer total;
private String currency;
}工具类:
package com.heima.wxpay.config;

import com.alibaba.fastjson.JSON;
import com.heima.wxpay.dto.Amount;
import com.heima.wxpay.dto.NativePayParams;
import org.apache.http.client.methods.CloseableHttpResponse;
import org.apache.http.client.methods.HttpPost;
import org.apache.http.entity.StringEntity;
import org.apache.http.impl.client.CloseableHttpClient;
import org.apache.http.util.EntityUtils;

import java.io.IOException;
import java.util.Map;

public class WxPayTemplate {

    private WxPayProperties wxPayProperties;

    private CloseableHttpClient httpClient;

    public WxPayTemplate(WxPayProperties wxPayProperties,CloseableHttpClient httpClient) {
        this.wxPayProperties = wxPayProperties;
        this.httpClient = httpClient;
    }

    public String nativePay(Integer total, String description, String outTradeNo) throws Exception{
        HttpPost httpPost = new HttpPost("https://api.mch.weixin.qq.com/v3/pay/transactions/native");
        // 请求body参数

        Amount amount = Amount.builder().currency("CNY").total(total).build();

        NativePayParams nativePayParams = NativePayParams.builder().appid(wxPayProperties.getAppId())
                .description(description)
                .mchid(wxPayProperties.getMchId())
                .notify_url("https://36d5634033.vicp.fun/native/notify")
                .out_trade_no(outTradeNo)
                .amount(amount)
                .build();


        String reqdata = JSON.toJSONString(nativePayParams);
        StringEntity entity = new StringEntity(reqdata,"utf-8");
        entity.setContentType("application/json");
        httpPost.setEntity(entity);
        httpPost.setHeader("Accept", "application/json");

        //完成签名并执行请求
        CloseableHttpResponse response = httpClient.execute(httpPost);

        String url = "";
        try {
            int statusCode = response.getStatusLine().getStatusCode();
            if (statusCode == 200) { //处理成功
                System.out.println("success,return body = " + EntityUtils.toString(response.getEntity()));
                url = JSON.parseObject( EntityUtils.toString(response.getEntity()), Map.class).get("code_url").toString();
            } else if (statusCode == 204) { //处理成功,无返回Body
                System.out.println("success");
            } else {
                System.out.println("failed,resp code = " + statusCode+ ",return body = " + EntityUtils.toString(response.getEntity()));
                throw new IOException("request failed");
            }
        } finally {
            response.close();
        }
        return url;
    }
}- 提供配置类,启动WxPayProperties类对象,创建WxPayTemplate对象
package com.heima.wxpay.config;

import com.wechat.pay.contrib.apache.httpclient.WechatPayHttpClientBuilder;
import com.wechat.pay.contrib.apache.httpclient.auth.AutoUpdateCertificatesVerifier;
import com.wechat.pay.contrib.apache.httpclient.auth.PrivateKeySigner;
import com.wechat.pay.contrib.apache.httpclient.auth.WechatPay2Credentials;
import com.wechat.pay.contrib.apache.httpclient.auth.WechatPay2Validator;
import com.wechat.pay.contrib.apache.httpclient.util.PemUtil;
import org.apache.http.impl.client.CloseableHttpClient;
import org.springframework.beans.factory.annotation.Autowired;
import org.springframework.boot.context.properties.EnableConfigurationProperties;
import org.springframework.context.annotation.Bean;
import org.springframework.context.annotation.Configuration;

import java.io.ByteArrayInputStream;
import java.security.PrivateKey;

@Configuration
@EnableConfigurationProperties(WxPayProperties.class)
public class WxPayAutoConfig {


    @Bean
    public CloseableHttpClient httpClient(WxPayProperties wxPayProperties) throws Exception{
        // 加载商户私钥(privateKey:私钥字符串)
        PrivateKey merchantPrivateKey = PemUtil
                .loadPrivateKey(new ByteArrayInputStream(wxPayProperties.getPrivateKey().getBytes("utf-8")));

        // 加载平台证书(mchId:商户号,mchSerialNo:商户证书序列号,apiV3Key:V3密钥)
        AutoUpdateCertificatesVerifier verifier = new AutoUpdateCertificatesVerifier(
                new WechatPay2Credentials(wxPayProperties.getMchId(), new PrivateKeySigner(wxPayProperties.getMchSerialNo(), merchantPrivateKey)),wxPayProperties.getApiV3Key().getBytes("utf-8"));

        // 初始化httpClient
        return WechatPayHttpClientBuilder.create()
                .withMerchant(wxPayProperties.getMchId(), wxPayProperties.getMchSerialNo(), merchantPrivateKey)
                .withValidator(new WechatPay2Validator(verifier)).build();
    }

    @Bean
    public WxPayTemplate wxPayTemplate(WxPayProperties wxPayProperties,CloseableHttpClient httpClient){

        return new WxPayTemplate(wxPayProperties,httpClient);
    }

}- 提供META-INF/spring.factory配置类,配置自动化配置
# Auto Configure
org.springframework.boot.autoconfigure.EnableAutoConfiguration=\
com.heima.wxpay.config.WxPayAutoConfig- 创建新测试工程,测试starter使用
导入starter依赖:
<dependency>
    <groupId>com.heima</groupId>
    <artifactId>wx_pay_starter</artifactId>
    <version>1.0-SNAPSHOT</version>
</dependency>
直接springBoot测试
package com.itheima.wxpay;


import com.heima.wxpay.config.WxPayTemplate;
import org.junit.jupiter.api.Test;
import org.springframework.beans.factory.annotation.Autowired;
import org.springframework.boot.test.context.SpringBootTest;

@SpringBootTest
public class StarterTest {

    @Autowired
    private WxPayTemplate wxPayTemplate;

    @Test
    public void testNativePay() throws Exception{

        String url = wxPayTemplate.nativePay(1, "javaEE企业级开发", "ADFADSFS4353534");
        System.out.println(url);
    }
}非常感谢您阅读到这里,创作不易!如果这篇文章对您有帮助,希望能留下您的点赞👍 关注💖 收藏 💕评论💬感谢支持!!!
听说 三连能够给人 带来好运!更有可能年入百w,进入大厂,上岸