title: Python 基础总结
date: 2023-07-19 10:51:55
tags:
- Python
categories: - Python
cover: https://cover.png
feature: false
1. print() 函数
1.1 基础使用
# 输出数字
print(23)
print(11.323)

# 输出字符串
print('你好')
print("你好")

# 输出表达式
print(3 * 3)
print(5 % 2)

# 输出到文件中
fp = open('D://text.txt', 'a+')  # a+ 表示文件不存在则创建, 存在则在内容后面追加
print('test', file=fp)
print('++', file=fp)
fp.close()

# 不换行输出
print('hello', 'world')
23
11.323
你好
你好
9
1
hello world
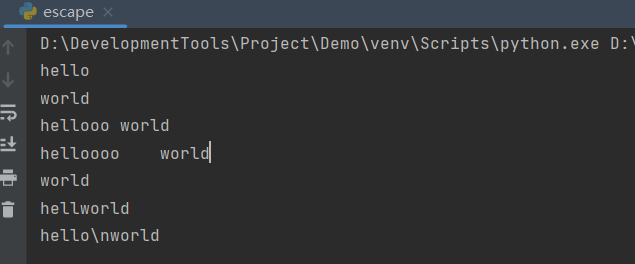
1.2 转义字符与原字符
print('hello\nworld')  # 打印换行
# \t 打印空格 1 位, 因为一个制表位为 4 个字符, 而 \t 只会补满制表符, hell 占一个制表符, ooo 占一个制表符的 3 位, \t 补满剩下的 1 位
print('hellooo\tworld')
print('helloooo\tworld')  # \t 打印空格 4 位, helloooo 占满 2 个制表符, \t 新开一个制表符, 4 位
print('hello\rworld')  # world 对 hello 进行覆盖
print('hello\bworld')  # 退格 1 位, o 被退位

# 原字符, 不希望转义字符起作用, 在前面加上 r/R
print(r'hello\nworld')
1.3 二进制及编码
print(chr(0b100111001011000))
print(chr(0b110101001))
乘
Ʃ
1.4 标识符与保留字
import keyword

print(keyword.kwlist)
[‘False’, ‘None’, ‘True’, ‘and’, ‘as’, ‘assert’, ‘async’, ‘await’, ‘break’, ‘class’, ‘continue’, ‘def’, ‘del’, ‘elif’, ‘else’, ‘except’, ‘finally’, ‘for’, ‘from’, ‘global’, ‘if’, ‘import’, ‘in’, ‘is’, ‘lambda’, ‘nonlocal’, ‘not’, ‘or’, ‘pass’, ‘raise’, ‘return’, ‘try’, ‘while’, ‘with’, ‘yield’]
1.5 变量
一个变量由三部分组成,标识(id)、类型(type)、值
name = '张三'
print(name)
print('标识', id(name))
print('类型', type(name))
print('值', name)

name = '李四'
print(name)
张三
标识 1765751614576
类型 <class ‘str’>
值 张三
李四
1.6 数据类型
1.6.1 整数类型 int
可以表示正数、负数、零。默认进制是十进制,0b 表示二进制、0o 表示八进制、0x 表示十六进制
n1 = 10
n2 = -10
n3 = 0
print(n1, type(n1))
print(n2, type(n2))
print(n3, type(n3))

print('十进制', 118)
print('二进制', 0b10101111)  # 以 ob 开头
print('八进制', 0o176)  # 以 0o 开头
print('十六进制', 0x1EAF)  # 以 0x 开头
10 <class ‘int’>
-10 <class ‘int’>
0 <class ‘int’>
十进制 118
二进制 175
八进制 126
十六进制 7855
1.6.2 浮点数类型 float
由整数和小数部分组成,存储时可能出现小数部分不精确的情况
a = 3.1415
print(a, type(a))

n1 = 1.1
n2 = 2.2
print(n1 + n2)
3.1415 <class ‘float’>
3.3000000000000003
可以引入 Decimal 模块来进行精确运算
from decimal import Decimal

print(Decimal('1.1') + Decimal('2.2'))
3.3
1.6.3 布尔类型 bool
True 和 False,首字母为大写
f1 = True
f2 = False
print(f1, type(f1))
print(f2, type(f2))

# 转成整数计算
print(f1 + 1)  # True 表示 1
print(f2 + 1)  # False 表示 0
True <class ‘bool’>
False <class ‘bool’>
2
1
1.6.4 字符串类型 str
字符串又被称为不可变的字符序列,可以用单引号 ' '、双引号 " "、三引号 ''' ''' 或 """ """ 来表示,单引号和双引号定义的字符串必须在一行,多引号定义的字符串可以分布在连续的多行
str1 = '你好'
str2 = "你好"
print(str1, type(str1))
print(str2, type(str2))

str3 = '''hello
world'''
print(str3, type(str3))
str4 = """hello
world"""
print(str4, type(str4))
你好 <class ‘str’>
你好 <class ‘str’>
hello
world <class ‘str’>
hello
world <class ‘str’>
1.6.5 数据类型转换
str():将其他类型转成字符串int():将其他类型转成整数类型float():将其他类型转成浮点数类型
name = '张三'
age = 18
print(type(name), type(age))
# print('我叫' + name + '今年' + age + '岁')  # error
print('我叫' + name + '今年' + str(age) + '岁')

# str() 函数, 将其他类型转成 str
s1 = 128
s2 = 98.7
s3 = True
print(type(str(s1)), type(str(s2)), type(str(s3)))

# int() 函数, 将其他类型转成 int
s4 = '23'
s5 = '23.2'
print(int(s2), type(int(s2)))  # float 转成 int 类型, 只保留整数部分
print(int(s3), type(int(s3)))  # bool 转成 int 类型, True 为 1, False 为 0
print(int(s4), type(int(s4)))  # str 转成 int 类型, 字符串要为整数数字串
# print(int(s5), type(int(s5)))  # error

# float() 函数, 将其他类型转成 float
print(float(s1), type(float(s1)))
print(float(s3), type(float(s3)))
print(float(s4), type(float(s4)))
print(float(s5), type(float(s5)))
<class ‘str’> <class ‘int’>
我叫张三今年18岁
<class ‘str’> <class ‘str’> <class ‘str’>
98 <class ‘int’>
1 <class ‘int’>
23 <class ‘int’>
128.0 <class ‘float’>
1.0 <class ‘float’>
23.0 <class ‘float’>
23.2 <class ‘float’>
1.7 注释
#:单行注释''' '''或""" """:多行注释# coding:utf-8:中文编码注释说明,指定源码的文件格式
2. input() 函数
2.1 基础使用
word = input('输入一个词: ')
print(word)
输入一个词: 你好
你好
需要注意的是,输入的值为 str 类型,要计算的话需要转成数字或浮点数类型进行计算
a = input('请输入一个加数: ')
b = input('请输入一个加数: ')
print(type(a), type(b))
print(a + b)

print(int(a) + int(b))
请输入一个加数: 10
请输入一个加数: 20
<class ‘str’> <class ‘str’>
1020
30
或者直接在输入时进行转换
a = int(input('请输入一个加数: '))
print(type(a))
请输入一个加数: 10
<class ‘int’>
2.2 运算符
2.2.1 算数运算符
+:加法-:减法*:乘法/:除法//:整除%:取余**:幂运算
a = 10
b = 3
print(a + b)
print(a - b)
print(a * b)
print(a / b)
print(a // b)
print(a % b)
print(a ** b)
13
7
30
3.3333333333333335
3
1
1000
当存在负数时,整除和取余运算需要额外思考一下
# 一正一负整除, 向下取整
print(9 // -4)
print(-9 // 4)
# 一正一负取余, 余数 = 被除数 - 除数 * 商
print(9 % -4)
print(-9 % 4)
-3
-3
-3
3
2.2.2 赋值运算符
1、赋值顺序从右到左
a = 3 + 4
print(a)
7
2、支持链式赋值,变量的引用都指向同一个地址
a = b = c = 20
print(a, id(a))
print(b, id(b))
print(c, id(c))
20 140728618902920
20 140728618902920
20 140728618902920
3、支持参数赋值,进行除法运算时,会转成 float 类型,因为除法可能存在小数
a = 30
a += 10
print(a)
a *= 3
print(a, type(a))
a /= 2
print(a, type(a))
40
120 <class ‘int’>
60.0 <class ‘float’>
4、支持系列解包赋值
a, b, c = 10, 20.3, 'ss'
print(a, type(a))
print(b, type(b))
print(c, type(c))
10 <class ‘int’>
20.3 <class ‘float’>
ss <class ‘str’>
2.2.3 比较运算符
对表达式大小、真假进行比较,结果是 bool 类型。== 比较的是值,is 或 is not 比较的是标识
a, b = 10, 20
print(a > b)
print(a <= b)

# 一个变量由 标识、类型、值 三部分组成, == 比较的是值, is 比较的是标识, is not 即标识不相等
print(a == b)
print(a != b)

c = 10
print(a == c, id(a))
print(a is c, id(c))
print(a is not c)

list1 = [11, 22, 33]
list2 = [11, 22, 33]
print(list1 == list2, id(list1))
print(list1 is list2, id(list2))
print(list1 is not list2)
False
True
False
True
True 140728618902600
True 140728618902600
False
True 2933228983616
False 2933230769856
True
2.2.4 布尔运算符
and:且or:或not:非,取反in:是否存在not in:是否不存在
a, b = 1, 2
print(a == 1 and b != 2)
print(a == 1 or b != 2)

f1 = True
f2 = False
print(not f1)

s1 = 'he'
s2 = 'hello'
print(s1 in s2)
print(s1 not in s2)
False
True
False
True
False
2.2.5 位运算符
&:位与,对应位数都是 1,结果位数才为 1,其他则为 0|:位或,对应位数都是 0,结果位数才为 0,其他则为 1<<:左移位运算符,高位溢出舍弃,低位补 0,相当于除 2>>:右移位运算符,低位溢出舍弃,高位补 0,相当于乘 2
# 0000 0100
# 0000 1000
a, b = 4, 8
# 0000 0000
print(a & b)
# 0000 1100
print(a | b)
# 0000 0001
print(a >> 2)
# 0001 0000
print(a << 2)
0
12
1
16
2.2.6 运算符优先级
先算算数运算(先乘除、后加减);然后算位运算;再算比较运算;再算布尔运算;最后赋值
- **
- *、/、//、%
- +、-
- <<、>>
- &
- |
- >、<、>=、<=、==、!=
- and
- or
- =
3 程序的组织结构
3.1 顺序结构
从上到下顺序的执行代码,中间没有任何判断和跳转,直到程序结束
print('1. 把冰箱门打开')
print('2. 把大象放进去')
print('3. 把冰箱门关上')
- 把冰箱门打开
- 把大象放进去
- 把冰箱门关上
3.2 对象的布尔值
Python 一切皆对象,所有对象都有一个布尔值,使用内置函数 bool() 可以获取对象的布尔值
以下对象的布尔值为 False
print(bool(False))  # False
print(bool(0))  # 整数 0
print(bool(0.0))  # 浮点数 0.0
print(bool(None))  # 空
print(bool(''))  # 空串
print(bool([]))  # 空列表
print(bool(list()))  # 空列表
print(bool(()))  # 空元组
print(bool(tuple()))  # 空元组
print(bool({}))  # 空字典
print(bool(dict()))  # 空字典
print(bool(set()))  # 空集合
False
False
False
False
False
False
False
False
False
False
False
False
剩下的其他所有的对象的布尔值都为 True
3.3 选择结构
3.3.1 单选择
money = 1000
s = int(input('请输入取款金额: '))
if money >= s:
    money -= s
    print('余额为', money)
请输入取款金额: 500
余额为 500
请输入取款金额: 1200
3.3.2 双选择
money = 1000
s = int(input('请输入取款金额: '))
if money >= s:
    money -= s
    print('余额为', money)
else:
    print('余额不足')
请输入取款金额: 1200
余额不足
3.3.3 多选择
score = int(input('请输入成绩: '))
if 90 <= score <= 100:
    print('优秀')
elif 80 <= score < 90:
    print('良好')
elif 70 <= score < 80:
    print('一般')
elif 60 <= score < 70:
    print('及格')
elif score < 60:
    print('不及格')
else:
    print('成绩不在范围内')
请输入成绩: 78
一般
请输入成绩: 67
及格
请输入成绩: 102
成绩不在范围内
3.3.4 嵌套选择
money = float(input('请输入购物金额: '))
vip = input('你有会员吗?y/n')
if vip == 'y':
    if money >= 200:
        print('八折')
    elif money < 200:
        print('九折')
    else:
        print('不打折')
else:
    if money >= 200:
        print('九五折')
    else:
        print('不打折')
请输入购物金额: 200
你有会员吗?y/ny
八折
请输入购物金额: 150
你有会员吗?y/ny
九折
3.3.5 条件表达式
当 if 为 true 时,执行左边的,else 则执行右边的
a = int(input('输入第一个整数: '))
b = int(input('输入第二个整数: '))
print(str(a) + '大于等于' + str(b) if a >= b else str(a) + '小于' + str(b))
输入第一个整数: 20
输入第二个整数: 10
20大于等于10
输入第一个整数: 10
输入第二个整数: 20
10小于20
3.3.6 pass 语句
什么都不做,只是一个占位符,用于需要写语句的地方,让编辑器不报错
vip = input('你有会员吗?y/n')
if vip == 'y':
    pass
else:
    pass
3.4 range() 函数
用于生成一个整数序列
range(stop):创建一个 [0, stop] 之间的整数序列,步长为 1range(start, stop):创建一个 [start, stop] 之间的整数序列,步长为 1range(start, stop, step):创建一个 [start, stop] 之间的整数序列,步长为 step
r = range(10)
print(r, type(r))
print(list(r))
print(10 in r)
print(10 not in r)

print(list(range(5, 10)))
print(list(range(5, 10, 2)))
range(0, 10) <class ‘range’>
[0, 1, 2, 3, 4, 5, 6, 7, 8, 9]
False
True
[5, 6, 7, 8, 9]
[5, 7, 9]
优点:不管 range 对象表示的整数序列有多长,所有 range 对象占用的内存空间都是相同的,仅仅存储了 start、stop、step,只有当用到 range 对象的时候,才会去计算序列中的相关元素
3.5 循环结构
3.5.1 while 循环
result = 0
i = 0
while i < 5:
    result += i
    print(result)
    i += 1
print('和为: ', result)
0
1
3
6
10
和为: 10
3.5.2 for-in 循环
for item in 'python':
    print(item)
p
y
t
h
o
n
for i in range(5):
    print(i)
0
1
2
3
4
不需要自定义变量可以写为 _
for _ in range(5):
    print("hello")
hello
hello
hello
hello
hello
3.5.3 流程控制语句
break:用于结束循环结构continue:用于结束当前循环,进入下一次循环
3.5.4 else 语句
# for a in range(3):
a = 0
while a < 3:
    password = input('请输入密码: ')
    if password == '123':
        print('密码正确')
    else:
        print('密码错误')
    a += 1
else:
    print('你的密码已输入错误三次, 请 1 分钟再试')
请输入密码: 888
密码错误
请输入密码: 888
密码错误
请输入密码: 888
密码错误
你的密码已输入错误三次, 请 1 分钟再试
3.5.5 嵌套循环
for i in range(4):
    for j in range(4):
        print('*', end='\t')  # 不换行输出
    print()
* * * *
* * * *
* * * *
* * * *
嵌套循环中的 break 和 continue 只控制本层循环,不影响外层循环
4. 列表
变量可以存储一个元素,而列表是一个大容器,可以存储 N 多个元素,列表相当于其他语言中的数组
特点:
- 元素有序
- 索引映射唯一一个数据
- 可以存储重复数据
- 可以存储任意数据类型
- 根据需要动态分配和回收内存
4.1 创建
[value...]:中括号list(iterator):内置函数
l1 = ['hello', 'world', 98]
print(id(l1))
print(type(l1))
print(l1)

l2 = list(['hello', 'world', 98])
print(l2)
l3 = list('python')
print(l3)
2591304603584
<class ‘list’>
[‘hello’, ‘world’, 98]
[‘hello’, ‘world’, 98]
[‘p’, ‘y’, ‘t’, ‘h’, ‘o’, ‘n’]
4.2 操作
4.2.1 查询
1、获取单个元素
index(value, start, stop):获取列表中指定元素的索引,元素不存在会报错[index]:通过索引,获取列表中的单个元素,负数表示逆向获取
l1 = ['hello', 'world', 98, 'hello']
print(l1.index('hello'))
print(l1.index('python')) # error
print(l1.index('hello', 1))

# 负数为逆向获取
print(l1[-3])
# 正数即正向获取
print(l1[2])
0
3
world
98
2、获取多个元素,切片操作,[start:stop:step],任何一个参数都可以省略,步长为负数同样表示逆向获取
l2 = l1[0:2:1]
print(l1, id(l1), l2, id(l2))
# 任何一个参数都可省略
print(l1[0:2], l1[0:2:])
print(l1[:2:2])
print(l1[0::2])
print(l1[0:])
[‘hello’, ‘world’, 98, ‘hello’] 2507973351296 [‘hello’, ‘world’] 2507974416384
[‘hello’, ‘world’] [‘hello’, ‘world’]
[‘hello’]
[‘hello’, 98]
[‘hello’, ‘world’, 98, ‘hello’]
3、判断及遍历
value in list:判断是否存在value not in list:判断是否不存在for var in list:遍历 list
4.2.2 添加
append(value):向列表末尾添加一个元素extend(list):向列表末尾至少添加一个元素insert(index, value):在列表的任意位置添加一个元素- 切片,在列表的任意位置添加至少一个元素
l1 = []
l1.append(1)
print(id(l1))
l1.append(2)
print(l1, id(l1))

l2 = [3, 4]
l1.append(l2)
l1.extend(l2)
print(l1)

l1.insert(1, 10)
print(l1)

l3 = [True, False]
l1[1:] = l3
print(l1)
2271766206336
[1, 2] 2271766206336
[1, 2, [3, 4], 3, 4]
[1, 10, 2, [3, 4], 3, 4]
[1, True, False]
4.2.3 删除
remove(value):移除一个元素,有重复元素移除第一个,移除元素不存在则报错pop(index):删除一个指定索引位置的元素,索引不存在则报错,不指定则删除末尾元素- 切片,一次至少删除一个元素
clear():清空列表del:删除列表
l1 = [10, 20, 30, 40, 50, 20]
l1.remove(20)
print(l1)
l1.pop()
print(l1)
l2 = l1[1:3:]
print(l1, l2)
l1.clear()
print(l1)
del l1
print(l1)  # error
[10, 30, 40, 50, 20]
[10, 30, 40, 50]
[10, 30, 40, 50] [30, 40]
[]
4.2.4 修改
- 为指定索引的元素赋一个新值
- 为指定的切片赋一个新值
l1 = [10, 20, 30, 40]
l1[2] = 100
print(l1)
l1[3:] = [2, 3]
print(l1)
[10, 20, 100, 40]
[10, 20, 100, 2, 3]
4.2.5 排序
sort():默认从小到大排序,指定reverse=True可以进行降序排序,默认为 Falsesorted():内置函数,用法与上同,原列表不发生改变
l1 = [20, 10, 50, 30]
l1.sort()
print(l1)
l1.sort(reverse=True)
print(l1)

l2 = sorted(l1)
print(l2)
l3 = sorted(l1, reverse=True)
print(l3)
[10, 20, 30, 50]
[50, 30, 20, 10]
[10, 20, 30, 50]
[50, 30, 20, 10]
4.3 列表生成式
l1 = [i*i for i in range(10)]
i * i:表示列表元素的表达式i:自定义变量range(10):可迭代对象
l1 = [i * i for i in range(10)]
print(l1)
[0, 1, 4, 9, 16, 25, 36, 49, 64, 81]
5. 字典
Python 内置的数据结构之一,与列表一样是一个可变序列,以键值对的方式存储数据,但键是不可变的。字典是一个无序的序列,这里的序指的是排列顺序,即输出的顺序与输入的顺序一致
特点:
- key 不能重复,值可以重复
- 字典中的元素是无序的
- key 必须是不可变对象
- 可以根据需要动态的伸缩
- 会浪费较大的内存,是一种使用空间换时间的数据结构
5.1 创建
{key:value...}:花括号dict():内置函数
d1 = {'张三': 100, '李四': 200}
print(d1)
d2 = dict(name='张三', age=28)
print(d2)
{‘张三’: 100, ‘李四’: 200}
{‘name’: ‘张三’, ‘age’: 28}
5.2 操作
5.2.1 获取
[key]:获取对应键的值,键不存在则报错get(key):获取对应键的值,键不存在则返回 None,并且可以通过参数设置默认返回的 value
d1 = {'张三': 100, '李四': 200}
print(d1['张三'])
print(d1.get('张三'))

print(d1[2])  # error
print(d1.get(2))
print(d1.get(2, 99))
100
100
None
99
判断与遍历
key in dict:判断是否存在key not in dict:判断是否不存在for key in dict:遍历字典的 key
5.2.2 增删改
1、新增:dict[key] = value
2、修改:dict[key] = newValue
3、删除
- 删除单个 key:
del dict[key] - 清空字典:
clear() - 删除字典:
del dict
d1 = {'张三': 100, '李四': 200}
d1['王五'] = 300
print(d1)

d1['王五'] = 333
print(d1)

del d1['王五']
print(d1)

d1.clear()
print(d1)

del d1
print(d1)  # error
{‘张三’: 100, ‘李四’: 200, ‘王五’: 300}
{‘张三’: 100, ‘李四’: 200, ‘王五’: 333}
{‘张三’: 100, ‘李四’: 200}
{}
5.2.3 获取字典视图
keys():获取字典的所有 keyvalues():获取字典的所有 valueitems():获取字典的所有 key:value 对
d1 = {'张三': 100, '李四': 200}
print(d1.keys(), type(d1.keys()))
print(list(d1.keys()))
print(d1.values(), type(d1.values()))
print(list(d1.values()))
print(d1.items(), type(d1.items()))
print(list(d1.items()))
dict_keys([‘张三’, ‘李四’]) <class ‘dict_keys’>
[‘张三’, ‘李四’]
dict_values([100, 200]) <class ‘dict_values’>
[100, 200]
dict_items([(‘张三’, 100), (‘李四’, 200)]) <class ‘dict_items’>
[(‘张三’, 100), (‘李四’, 200)]
5.3 字典生成式
d1 = {item: price for item, price in zip(items, price)}
item: price:字典的键值对元素item, price:自定义变量zip(items, price):内置函数,用于将可迭代的对象作为参数,将对象中对应的元素打包成一个元组,然后返回这些元组组成的列表
items = ['fruit', 'book']
price = [100, 200]
l1 = zip(items, price)
print(l1, list(l1))

d1 = {item: price for item, price in zip(items, price)}
print(d1)
<zip object at 0x000002AA57190C40> [(‘fruit’, 100), (‘book’, 200)]
{‘fruit’: 100, ‘book’: 200}
6. 元组
Python 的内置数据结构之一,是一个不可变序列
6.1 可变序列与不可变序列
可变序列:列表、字典。可以对序列执行增、删、改操作,对象地址不发生改变
不变序列可变序:字符串、元组。没有增、删、改的操作
6.2 创建
(value1, value2):小括号,小括号可省略(value,):只有一个元素时,以,结尾,小括号可省略tuple():内置函数
t1 = ('python', 99)
print(t1, type(t1))
t2 = ('python',)
print(t2, type(t2))

t3 = 'python',
print(t3, type(t3))

t4 = tuple(('python', 'world', 98))
print(t4, type(t4))
(‘python’, 99) <class ‘tuple’>
(‘python’,) <class ‘tuple’>
(‘python’,) <class ‘tuple’>
(‘python’, ‘world’, 98) <class ‘tuple’>
6.3 为什么将元组设计为不可变序列
在多任务环境下,同时操作对象时不需要加锁,因此,在程序中尽量使用不可变序列
需要注意的是,元组存储的是对象的引用,如果元组中对象本身是不可变对象,则不能再引用其他对象;如果对象是可变对象,则可变对象的引用不可改变,但数据可以改变
6.4 遍历
for item in t4:
    print(item)
python
world
98
7. 集合
Python 语言提供的内置数据结构,与列表、字典一样都属于可变类型的序列,集合是没有 value 的字典
7.1 创建
{value...}:花括号set():内置函数
s1 = {10, 20, 30, 40}
print(s1, type(s1))
s2 = {10, 10}
print(s2, type(s2))  # 重复元素只会存在一个

s3 = set(range(5))
print(s3, type(s3))

s4 = set((1, 2, 3))
print(s4, type(s4))

s5 = set('python')
print(s5, type(s5))
{40, 10, 20, 30} <class ‘set’>
{10} <class ‘set’>
{0, 1, 2, 3, 4} <class ‘set’>
{1, 2, 3} <class ‘set’>
{‘h’, ‘o’, ‘n’, ‘p’, ‘y’, ‘t’} <class ‘set’>
7.2 操作
1、判断:in 或 not in
s1 = {10, 20, 30, 40}
print(10 in s1)
print(10 not in s1)
True
False
2、新增
add():一次添加一个元素update():一次至少添加一个元素
s1.add(50)
print(s1)
s1.update({80, 90}, [2, 3], ('num', 28), {'age': 18})
print(s1)
{40, 10, 50, 20, 30}
{2, 3, 40, ‘num’, 10, ‘age’, 80, 50, 20, 90, 28, 30}
3、删除
remove(value):一次删除一个指定元素,不存在则报错discard(value):一次删除一个指定元素,不存在不报错pop():一次删除一个随机元素clear():清空集合
s1.remove('age')
print(s1)
# s1.remove(7)  # error
s1.discard(7)
print(s1)
s1.pop()
print(s1)
s1.clear()
print(s1)
{2, 3, ‘num’, 40, 10, 80, 50, 20, 90, 28, 30}
{2, 3, ‘num’, 40, 10, 80, 50, 20, 90, 28, 30}
{3, ‘num’, 40, 10, 80, 50, 20, 90, 28, 30}
set()
7.3 集合间的关系
- 是否相等,可以使用运算符
==或!=进行判断 - 一个集合是否是另一个集合的子集,可以调用
issubset()方法进行判断 - 一个集合是否是另一个集合的超集,可以调用
issuperset()方法进行判断 - 两个集合是否没有交集,可以调用
isdisjoint()方法进行判断
d1 = {10, 20}
d2 = {10, 20}
print(d1 == d2)

d3 = {10, 20, 30, 40}
print(d1 != d3)

print(d1.issubset(d3))
print(d3.issuperset(d1))

d4 = {30, 40}
print(d1.isdisjoint(d3))
print(d1.isdisjoint(d4))
True
True
True
True
False
True
7.4 数据操作
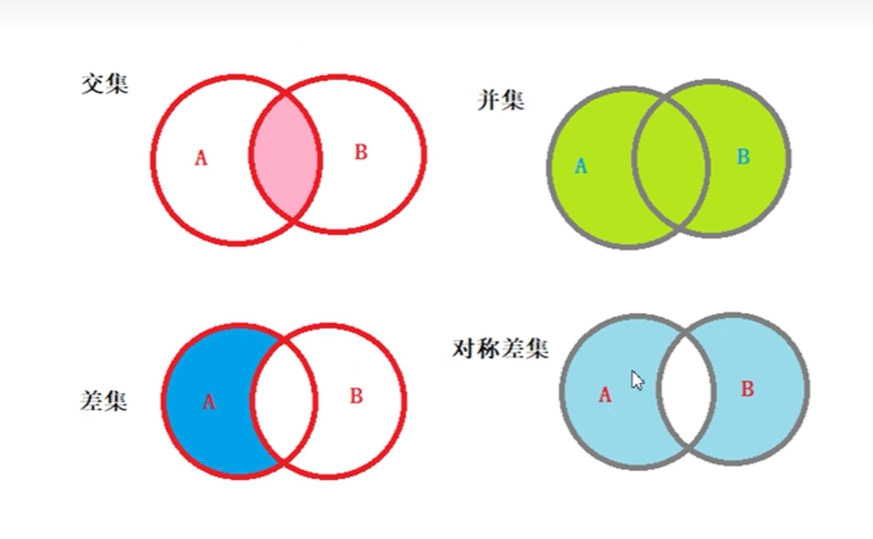
- 交集:
intersection() - 并集:
union() - 差集:
difference() - 对称差集:
symmetric_difference()
d1 = {10, 20}
d2 = {20, 30, 40}

# 交集
print(d1.intersection(d2))
# 并集
print(d1.union(d2))
# 差集
print(d1.difference(d2))
print(d2.difference(d1))
# 对称差集
print(d1.symmetric_difference(d2))
{20}
{20, 40, 10, 30}
{10}
{40, 30}
{40, 10, 30}
7.4 集合生成式
s1 = {i * i for i in range(10)},和列表生成式类似,只是括号不同
i * i:表示列表元素的表达式i:自定义变量range(10):可迭代对象
s1 = {i * i for i in range(10)}
print(s1)
{0, 1, 64, 4, 36, 9, 16, 49, 81, 25}
列表、字典、元组、集合总结

8. 字符串
在 Python 中字符串是基本数据类型,是一个不可变的字符序列
8.1 驻留机制
仅保存一份相同且不可变字符串或整数的方法,不同的值被存放在驻留池中,Python 的驻留机制对相同的字符串或整数只保留一份拷贝,后续创建相同字符串或整数时,不会开辟新空间,而是把该字符串的地址或整数赋给新创建的变量
驻留机制的几种情况,注意这里要使用 Python 的命令行进行测试结果才正确,使用 PyCharm 结果可能会出现偏差,因为 Pycharm 对字符串进行了优化处理
- 字符串的长度为 0 或 1 时
- 符合标识符的字符串
- 字符串只在编译时进行驻留,而非运行时
- [-5, 256] 之间的整数数字
- sys 的
intern()方法强制两个字符串指向同一个对象
>>> s1 = '%'
>>> s2 = '%'
>>> s1 is s2
True
>>> s3 = 'abc%'
>>> s4 = 'abc%'
>>> s3 is s4
False
>>> s3 == s4
True
>>> s5 = 'abcx'
>>> s6 = 'abcx'
>>> s5 is s6
True
>>> s7 = 'abc'
>>> s8 = 'ab' + 'c'
>>> s9 = ''.join(['ab', 'c'])
>>> s7 is s8
True
>>> s7 is s9
False
>>> s10 = -5
>>> s11 = -5
>>> s10 is s11
True
>>> s12 = -6
>>> s13 = -6
>>> s12 is s13
False
>>> type(s13)
<class 'int'>
>>> s3 is s4
False
>>> import sys
>>> s3 = sys.intern(s4)
>>> s3 is s4
True
优缺点:
- 当需要值相同的字符串时,可以直接从驻留池里拿来使用,避免频繁的创建和销毁,提升效率和节约内存,因此拼接字符串和修改字符串是比较影响性能的
- 在需要进行字符串拼接时建议使用 str 类型的
join()方法,而非+,因为join()方法是先计算出所有字符的长度,然后再拷贝,只 new 一次对象,效率比+要高
8.2 操作
8.2.1 查询
index(sub):查找子串 subStr 第一次出现的位置,不存在则报错rindex(sub):查找子串 subStr 最后一次出现的位置,不存在则报错find(sub):查找子串 subStr 第一次出现的位置,不存在则返回 -1rfind(sub):查找子串 subStr 最后一次出现的位置,不存在则返回 -1
s1 = 'hello,hello'
print(s1.index('lo'))
print(s1.rindex('lo'))
print(s1.find('lo'))
print(s1.rfind('lo'))

print(s1.find('xx'))
print(s1.index('xx'))  # error
3
9
3
9
-1
8.2.2 大小写转换
转换后会产生一个新的字符串对象
upper():将字符串中的所有字符都转成大写字母lower():将字符串中的所有字符都转成小写字母swapcase():将字符串中的所有大写字母转成小写字母,小写字母转成大写字母capitalize():把第一个字符转成大写,其余字符转成小写title():把每个单词的第一个字符转成大写,剩余字符转成小写
s1 = 'hello,WORLD'
print(s1.upper())
print(s1.lower())
print(s1.swapcase())
print(s1.capitalize())
print(s1.title())
HELLO,WORLD
hello,world
HELLO,world
Hello,world
Hello,World
8.2.3 内容对齐
center(width, fill):居中对齐,填充参数默认为空格,宽度小于等于原长度则返回原字符串ljust(width, fil):左对齐,填充参数默认为空格,宽度小于等于原长度则返回原字符串rjust(width, fil):右对齐,填充参数默认为空格,宽度小于等于原长度则返回原字符串zfill(width):右对齐,填充参数为 0,宽度小于原长度则返回原字符串
s1 = 'hello'
print(s1.center(10, '*'))
print(s1.ljust(10, '*'))
print(s1.rjust(10, '*'))
print(s1.zfill(10))
hello*
hello*****
*****hello
00000hello
8.2.4 分割
返回值都是一个列表
split(sep, max):从左边开始分割,默认分割字符为空格,在分割次数达到 max 之后,剩下的子串会单独作为一部分rsplit(sep, max):从右边开始分割,其他与上同
s1 = 'he+llo wor+ld pyth+on'
print(s1.split())
print(s1.split('+'))
print(s1.split('+', 2))

print(s1.rsplit())
print(s1.rsplit('+'))
print(s1.rsplit('+', 2))
[‘he+llo’, ‘wor+ld’, ‘pyth+on’]
[‘he’, ‘llo wor’, ‘ld pyth’, ‘on’]
[‘he’, ‘llo wor’, ‘ld pyth+on’]
[‘he+llo’, ‘wor+ld’, ‘pyth+on’]
[‘he’, ‘llo wor’, ‘ld pyth’, ‘on’]
[‘he+llo wor’, ‘ld pyth’, ‘on’]
8.2.5 判断字符串
isidentifier():判断指定的字符串是否是合法的标识符isspace():判断指定的字符串是否全部由空白字符组成(回车、换行、空格、水平制表符)isalpha():判断指定的字符串是否全部由字母组成isdecimal():判断指定的字符串是否全部由十进制的数字组成isnumeric():判断指定的字符串是否全部由数字组成isalnum():判断指定的字符串是否全部由字母和数字组成
print('标识符')
s1 = 'python'
s2 = 'python%'
print(s1.isidentifier())
print(s2.isidentifier())

print('空白符')
s3 = '  '
print(s3.isspace())
print(s1.isspace())

print('字母')
print(s1.isalpha())
print(s2.isalpha())

print('十进制数字')
s4 = '123四'
s5 = '123'
print(s4.isdecimal())
print(s5.isdecimal())

print('数字')
print(s4.isnumeric())

print('字母和数字')
s6 = 'ab123四%'
s7 = 'ab123四'
print(s6.isalnum())
print(s7.isalnum())
标识符
True
False
空白符
True
False
字母
True
False
十进制数字
False
True
数字
True
字母和数字
False
True
8.2.6 替换与合并
replace(sub, replace, max):将某些子串替换为其他字符串,max 表示最大替换次数join():将列表或元组合并成一个字符串
s1 = 'hello,world'
s2 = s1.replace('l', 'x')
print(s2)
s3 = s1.replace('l', 'x', 2)
print(s3)
print(s1)

s4 = ''.join(['hello', 'world'])
s5 = ''.join(('hello', 'world'))
print(s4)
print(s5)
hexxo,worxd
hexxo,world
hello,world
helloworld
helloworld
8.2.7 比较
使用运算符 >、<、>=、<=、==、!=
比较规则:依次比较每个字符,遇到不匹配的直接返回
比较原理:两个字符进行比较时,比较的是其 original value(原始值),调用内置函数 ord() 可以得到指定字符的 original value,与内置函数 ord() 对应的是内置函数 chr(),调用内置函数 chr() 指定 original value 可以得到对应的字符
s1 = 'apple'
s2 = 'app'

print(s1 > s2)
print(ord('a'))
print(chr(97))
True
97
a
8.2.8 切片
s1 = 'hello,world'

s2 = s1[4:]
print(s2)

s3 = s1[:5]
print(s3)

s4 = s1[2:12:2]
print(s4)

# 从后往前切片
s5 = s1[::-1]
print(s5)

s6 = s1[-6::1]
print(s6)
o,world
hello
lowrd
dlrow,olleh
,world
8.3 格式化
1、% 作为占位符
%s:字符串%i或%d:整数,可以实现宽度%f:浮点数,可以实现精度
name = '张三'
age = 18
print('我叫%s, 今年%d岁' % (name, age))

print('%10i' % 99)
print('%.3f' % 3.1415926)
我叫张三, 今年18岁
99
3.142
2、{} 作为占位符,使用索引来表示占位,配合 format() 方法来使用
print('我叫{0}, 今年{1}岁, {0}'.format(name, age))
print('{0}'.format(3.1415926))
print('{0:.3}'.format(3.1415926))  # 3 位数
print('{0:.3f}'.format(3.1415926))  # 3 位小数
print('{:.3f}'.format(3.1415926))
print('{:10.3f}'.format(3.1415926))
我叫张三, 今年18岁, 张三
3.1415926
3.14
3.142
3.142
3.142
3、前面加上 f 来表示格式化,占位符使用 {var}
print(f'我叫{name}, 今年{age}岁')
我叫张三, 今年18岁
8.4 编码与解码
- 编码:将字符串转换为二进制数据(bytes)
- 解码:将 bytes 类型数据转换成字符串类型
计算机 A(str 在内存中以 Unicode 表示) --> encode(str) --> byte 字节传输 --> decode --> 计算机 B
s1 = '你好'
b1 = s1.encode('GBK')
print(b1)  # 一个中文占两个字节
b2 = s1.encode('UTF-8')
print(b2)  # 一个中文占三个字节

# 解码格式要和编码格式相同
print(b1.decode(encoding='GBK'))
print(b2.decode(encoding='UTF-8'))
b’\xc4\xe3\xba\xc3’
b’\xe4\xbd\xa0\xe5\xa5\xbd’
你好
你好
9. 函数
函数就是执行特定任务和完成特定功能的一段代码
优点:
- 复用代码
- 隐藏实现细节
- 提高可维护性
- 提高可读性便于调试
9.1 定义与调用
def f1(a, b):
    return a + b


result1 = f1(3, 4)
print(result1)
result1 = f1(b=4, a=3)
print(result1)
7
7
9.2 参数
9.2.1 参数传递
1、实参
实际参数的值,一般是函数的调用处,如上面的 result1 = f1(3, 4) 与 result1 = f1(b=4, a=3)
- 位置传参,根据参数的顺序一一对应,如
result1 = f1(3, 4) - 关键字传参,根据参数名称传递,如
result = f1(b=4, a=3)
2、形参
形式参数,一般是函数的定义处,如上面的 def f1(a, b)
9.2.2 默认值
函数定义时可以给参数设置默认值,调用函数时未传则使用默认值,传了则使用传递的值
def fun1(a, b=10):
    print(a, b)


fun1(10)
fun1(10, 30)
10 10
10 30
9.2.3 可变参数
1、位置传参
使用 * 定义可变的位置形参,结果为一个元组
def fun2(*args):
    print(args, type(args))


fun2(2)
fun2(2, 3, 4, 5)
2、关键字传参
使用 ** 定义可变的关键词形参,结果为一个字典
(2,) <class ‘tuple’>
(2, 3, 4, 5) <class ‘tuple’>
def fun3(**kwargs):
    print(kwargs, type(kwargs))


fun3(a=10)
fun3(a=20, b=30, c=40)
{‘a’: 10} <class ‘dict’>
{‘a’: 20, ‘b’: 30, ‘c’: 40} <class ‘dict’>
注意:相同类型的可变参数只能存在一个,同时存在可变的位置形参和可变的关键词形参时,位置形参要在前面
def fun4(*args, **kwargs):
    pass
9.3 返回值
- 没有返回值,可以省略 return
- 返回值为 1 个时,直接返回原值
- 返回多个值时,返回结果为元组
def f1(num):
    odd = []
    even = []
    for i in num:
        if i % 2:
            odd.append(i)
        else:
            even.append(i)
    return odd, even


result1 = f1([1, 3, 2, 3, 4, 5])
print(result1, type(result1))


def f2(num):
    return num


result2 = f2(123)
print(result2, type(result2))
result3 = f2('123')
print(result3, type(result3))
([1, 3, 3, 5], [2, 4]) <class ‘tuple’>
123 <class ‘int’>
123 <class ‘str’>
9.4 变量的作用域
即程序代码能访问该变量的区域
- 局部变量:在函数内定义并使用的变量,只在函数内部有效,局部变量使用 global 声明,这个变量就会成为全局变量
- 全局变量:函数体外定义的变量,可作用于函数内外
a = 10


def fun1():
    b = 10
    global c
    c = 20
    print(a, b, c)


fun1()
print(a)
print(b)  # error
print(c)
10 10 20
10
20
9.5 递归函数
即在一个函数内部调用该函数本身,需要递归调用和递归终止条件。每递归调用一次函数,都会在栈内存分配一个栈帧,每执行完一次函数,都会释放对应的空间
- 缺点:占用内存多,效率低下
- 优点:思路和代码简单
def fun1(num):
    if 1 == num:
        return 1
    else:
        return num * fun1(num - 1)


print(fun1(5))
120
10. 异常
10.1 异常处理
try...except:如果 try 块中抛出异常,则执行 except 块try...except...else:如果 try 块中抛出异常,则执行 except 块,否则执行 else 块try...except...else...finally:finally 块无论是否发生异常都会执行,常用来释放 try 块中申请的资源
try:
    i = 1 / 0
    print(i)
except Exception as e:
    print('出错了')
    print(e)

try:
    i = 1 / 1
    print(i)
except Exception as e:
    print('出错了')
    print(e)
else:
    print('正常运行')

try:
    i = 1 / 0
    print(i)
except Exception as e:
    print('出错了')
    print(e)
else:
    print('正常运行')
finally:
    print('最后执行')

try:
    i = 1 / 1
    print(i)
except Exception as e:
    print('出错了')
    print(e)
else:
    print('正常运行')
finally:
    print('最后执行')
出错了
division by zero
1.0
正常运行
出错了
division by zero
最后执行
1.0
正常运行
最后执行
10.2 常见异常类型
| 序号 | 异常类型 | 描述 |
|---|---|---|
| 1 | ZeroDivisionError | 除(或取模)零(所有数据类型) |
| 2 | IndexError | 序列中没有此索引(index) |
| 3 | KeyError | 映射中没有这个键 |
| 4 | NameError | 未声明/初始化对象(没有属性) |
| 5 | SyntaxError | Python 语法错误 |
| 6 | ValueError | 传入无效的参数 |
print(1 / 0)

l1 = [11, 22, 33]
print(l1[4])

d1 = {'name': '张三', 'age': 22}
print(d1['sex'])

print(num)

int a = 20

a = int('hello')
10.3 traceback 模块
使用 traceback 模块打印异常信息
import traceback

try:
    print('1.-----------')
    num = 10 / 0
except ZeroDivisionError as e:
    traceback.print_exc()
11. 类与对象
类,是多个类似事物组成的群体的统称,能够帮助我们快速理解和判断事物的性质
- 数据类型
- 不同的数据类型属于不同的类
- 使用内置函数查看数据类型,
type(100)
- 对象
- 不管是 100,还是 99、520 等,都是 int 类之下包含的相似的不同个例,这个个例专业术语称为实例或对象
Python 中一切皆对象
11.1 面向过程与面向对象
- 面向过程:事物比较简单,可以用线性的思维去解决
- 面向对象:事物比较复杂,使用简单的线性思维无法解决
共同点:都是解决实际问题的一种思维方式
二者相辅相成,并不是对立的,解决复杂问题,通过面向对象方式便于我们从宏观上把握事物之间复杂的关系,方便我们分析整个系统;具体到微观操作,仍然使用面向过程方式来处理
11.2 类的定义与组成
使用 class 修饰
class Student:
    pass


print(id(Student))
print(type(Student))
print(Student)
2443536301376
<class ‘type’>
<class ‘main.Student’>
类的组成
- 类属性
- 实例方法:普通方法
- 静态方法:
@staticmethod修饰 - 类方法:
@classmethod修饰
class Student:
    address = '吉林'  # 类属性

    def __init__(self, name, age):  # 构造函数
        self.name = name
        self.age = age

    def eat(self):  # 实例方法
        print('吃东西')

    @staticmethod
    def method():  # 静态方法
        print('静态方法')

    @classmethod
    def cm(cls):  # 类方法
        print('类方法')
11.3 对象的创建与调用
对象的创建又称为类的实例化,有了实例,就可以调用类中的内容
stu1 = Student('张三', 18)
print(id(stu1))
print(type(stu1))
print(stu1)
1693665418768
<class ‘main.Student’>
<main.Student object at 0x0000018A56535E10>
stu1.eat()
Student.eat(stu1)

stu1.method()
Student.method()

stu1.cm()
Student.cm()

print(stu1.name, stu1.age)
print(stu1.address)
print(Student.address)
吃东西
吃东西
静态方法
静态方法
类方法
类方法
张三 18
吉林
吉林
11.4 动态绑定属性和方法
stu1 = Student('张三', 18)
stu1.gender = '女'
print(stu1.name, stu1.age, stu1.gender)


def show():
    print('show')


stu1.show = show
stu1.show()
张三 18 女
show
11.5 面向对象的三大特征
- 封装:提高程序的安全性
- 将数据(属性)和行为(方法)包装到类对象中。在方法内部对属性进行操作,在类对象的外部调用方法。这样,无需关心方法内部的具体实现细节,从而隔离了复杂度
- 在 Python 中没有专门的修饰符用于属性的私有,如果该属性不希望在类对象外部被访问,前面使用两个
_
- 继承:提高代码的复用性
- 多态:提高程序的可扩展性和可维护性
11.5.1 封装
上面提到如果不希望属性在类对象外部被访问,前面使用两个 _,但实际上还是可以通过 _类名___属性 来进行访问
class Student:
    def __init__(self, name, age):
        self.name = name
        self.__age = age

    def show(self):
        print(self.age)


stu1 = Student('张三', 20)
print(stu1.name)
print(stu1.__age)  # error
print(dir(stu1))
print(stu1._Student__age)
张三
[‘_Student__age’, ‘class’, ‘delattr’, ‘dict’, ‘dir’, ‘doc’, ‘eq’, ‘format’, ‘ge’, ‘getattribute’, ‘getstate’, ‘gt’, ‘hash’, ‘init’, ‘init_subclass’, ‘le’, ‘lt’, ‘module’, ‘ne’, ‘new’, ‘reduce’, ‘reduce_ex’, ‘repr’, ‘setattr’, ‘sizeof’, ‘str’, ‘subclasshook’, ‘weakref’, ‘name’, ‘show’]
20
11.5.2 继承
- 如果一个类没有继承任何类,则默认继承 object
- Python 支持多继承
- 定义子类时,必须在其构造函数中调用父类的构造函数
class Person:
    def __init__(self, name, age):
        self.name = name
        self.age = age

    def info(self):
        print(self.name, self.age)


class Student(Person):
    def __init__(self, name, age, stuNo):
        super().__init__(name, age)
        self.stuNo = stuNo


stu = Student('张三', 19, 10001)
stu.info()
print(stu.stuNo)
张三 19
10001
方法重写
class Student(Person):
    def __init__(self, name, age, stuNo):
        super().__init__(name, age)
        self.stuNo = stuNo

    def info(self):
        super().info()
        print(self.stuNo)


stu = Student('张三', 19, 10001)
stu.info()
张三 19
10001
多继承
class A:
    pass


class B:
    pass


class C(A, B):
    pass
object 类
object 类是所有类的父类,因此所有类都有 object 类的属性和方法
dir():内置函数,可以查看指定对象的所有属性__str__():用于返回一个对于对象的描述,对应于内置函数str()经常用于print()方法,我们查看对象的信息,经常会对__str__()方法进行重写
class Student:
    def __init__(self, name, age):
        self.name = name
        self.age = age

    def __str__(self):
        return '我的名字是{0}, 今年{1} 岁'.format(self.name, self.age)


stu = Student('张三', 19)
print(dir(stu))

print(stu)
[‘class’, ‘delattr’, ‘dict’, ‘dir’, ‘doc’, ‘eq’, ‘format’, ‘ge’, ‘getattribute’, ‘getstate’, ‘gt’, ‘hash’, ‘init’, ‘init_subclass’, ‘le’, ‘lt’, ‘module’, ‘ne’, ‘new’, ‘reduce’, ‘reduce_ex’, ‘repr’, ‘setattr’, ‘sizeof’, ‘str’, ‘subclasshook’, ‘weakref’, ‘age’, ‘name’]
我的名字是张三, 今年19 岁
11.5.3 多态(静态语言和动态语言)
简单来说,多态就是具有多种形态。它指的是:即便不知道一个变量所引用的对象到底是什么类型,仍然可以通过这个变量调用方法,在运行过程中根据变量所引用对象的类型,动态决定调用哪个对象中的方法
- 静态语言(如 Java),实现多态需要三个必要条件
- 继承
- 方法重写
- 父类引用指向子类对象
- 动态语言(如 Python),动态语言的多态崇尚“鸭子类型”
- 当看到一只鸟走起来像鸭子,游泳起来像鸭子,那么这只鸟就可以被称之为鸭子
- 在鸭子类型中,不需要关心对象是什么类型,到底是不是鸭子,只关心对象的行为
class Animal:
    def eat(self):
        print('动物')


class Dog(Animal):
    def eat(self):
        print('狗')


class Cat(Animal):
    def eat(self):
        print('猫')


class Person:
    def eat(self):
        print('人')


def fun(obj):
    obj.eat()


fun(Cat())
fun(Dog())
fun(Person())
猫
狗
人
11.6 特殊属性
__dict__:获得类对象或实例对象所绑定的所有属性和方法的字典__class__:获取对象所属的类__bases__:获取父类类型的元组__mro__:获取类的层次结构__subclasses__:获取子类类型的列表
class A:
    pass


class B:
    pass


class C(A, B):
    def __init__(self, name):
        self.name = name


c = C('张三')
print(c.__dict__)
print(C.__dict__)
print(c.__class__)
print(C.__bases__)
print(C.__mro__)
print(A.__subclasses__())
{‘name’: ‘张三’}
{‘module’: ‘main’, ‘init’: <function C.init at 0x0000023C55F68CC0>, ‘doc’: None}
<class ‘main.C’>
(<class ‘main.A’>, <class ‘main.B’>)
(<class ‘main.C’>, <class ‘main.A’>, <class ‘main.B’>, <class ‘object’>)
[<class ‘main.C’>]
11.7 特殊方法
__len__():通过重写__len__()方法,让内置函数len()的参数可以是自定义类型__add__():通过重写__add__()方法,可以让自定义对象具有 “+”功能__new__():用于创建对象__init__():对创建的对象进行初始化
class Student:
    def __init__(self, name):
        self.name = name

    def __len__(self):
        return len(self.name)

    def __add__(self, other):
        return self.name + other.name


stu1 = Student('张三')
stu2 = Student('李四')
print(len(stu1))
print(len(stu2))

print(stu1.__add__(stu2))
2
2
张三李四
创建对象过程
先执行 new() 方法创建对象,然后将创建的对象返回,该对象即为 self,也就是实例对象,然后再执行 init() 方法
class Student:
    def __init__(self, name, age):
        print('init 创建的对象自身id', id(self))
        self.name = name
        self.age = age

    def __new__(cls, *args, **kwargs):
        print('new Student类', cls, id(cls))
        obj = super().__new__(cls)
        print('创建的对象id', id(obj))
        return obj


stu1 = Student('张安', 19)
print('Student类id', id(Student))
print('stu1对象id', id(stu1))
new Student类 <class ‘main.Student’> 1978364975584
创建的对象id 1978363977808
init 创建的对象自身id 1978363977808
Student类id 1978364975584
stu1对象id 1978363977808
11.8 类的赋值与拷贝
1、变量的赋值操作
只是形成两个变量,实际上还是指向同一个对象
class Cpu:
    pass


cpu1 = Cpu()
cpu2 = cpu1
print(cpu1)
print(cpu2)
<main.Cpu object at 0x000002E31C210B50>
<main.Cpu object at 0x000002E31C210B50>
2、浅拷贝
Python 拷贝一般都是浅拷贝,拷贝时,对象包含的子对象内容不拷贝,因此,源对象与拷贝对象会引用同一个子对象
class Cpu:
    pass


class Disk:
    pass


class Computer:
    def __init__(self, cpu, disk):
        self.cpu = cpu
        self.disk = disk


disk = Disk()
computer1 = Computer(cpu1, disk)

import copy

computer2 = copy.copy(computer1)
print(computer1, computer1.cpu, computer1.disk)
print(computer2, computer2.cpu, computer2.disk)
<main.Computer object at 0x000002016406A290> <main.Cpu object at 0x000002016406A210> <main.Disk object at 0x000002016406A250>
<main.Computer object at 0x000002016406A350> <main.Cpu object at 0x000002016406A210> <main.Disk object at 0x000002016406A250>
3、深拷贝
使用 copy 模块的 deepcopy() 函数,递归拷贝对象中包含的子对象,源对象和拷贝对象所有的子对象也不相同
computer3 = copy.deepcopy(computer1)
print(computer1, computer1.cpu, computer1.disk)
print(computer3, computer3.cpu, computer3.disk)
<main.Computer object at 0x000002D3219EA310> <main.Cpu object at 0x000002D3219EA290> <main.Disk object at 0x000002D3219EA2D0>
<main.Computer object at 0x000002D3219EA350> <main.Cpu object at 0x000002D3219EA410> <main.Disk object at 0x000002D3219EA490>
12. 模块
模块,英文为 Module,在 Python 中一个扩展名为 .py 的文件就是一个模块
优点:
- 方便其他程序和脚本的导入并使用
- 避免函数名和变量名冲突
- 提高代码的可维护性
- 提高代码的可复用性
12.1 模块的引入
1、全部引入
basic.py 文件
def fun():
    print('basic fun')


class Student:
    def __init__(self, name, age):
        self.name = name
        self.age = age

    def info(self):
        print(self.name, self.age)
在另一个文件中引入
import basic

basic.fun()
stu1 = basic.Student('张三', 18)
stu1.info()

# import basic as bas
#
# bas.fun()
# stu1 = bas.Student('张三', 18)
# stu1.info()
basic fun
张三 18
2、部分引入
from basic import fun

fun()
stu1 = basic.Student('张三', 18)  # error
stu1.info()
basic fun
12.2 以主程序形式运行
在每个模块的定义中都包括一个记录模块名称的变量 __name__,程序可以检查该变量,以确定他们在哪个模块中执行,如果一个模块不是被导入到其他程序中执行,那么它可能在解释器的顶级模块中执行,顶级模块的 __name__ 变量的值为 __main__
add.py 文件
def add(num1, num2):
    return num1 + num2


print(add(10, 20))
另一个文件中引入
import add

print(add.add(100, 200))
30
300
此时会输出 30、300,而这里的 30 是 add.py 文件输出的,此时我们运行的是另一个文件,add.py 文件只是作为引入其 add() 函数,不应该执行其他代码,因此加上判断,修改如下
def add(num1, num2):
    return num1 + num2


if __name__ == '__main__':
    print(add(10, 20))
此时输出只为 300
12.3 包
Python 中的包是一个分层次的目录结构,它将一组功能相近的模块组织在一个目录
作用:
- 代码规范
- 避免模块名称冲突
包和目录的区别:
- 包含
__init__.py文件的目录称为包 - 目录里通常不包含
__init__.py文件
如包结构如下
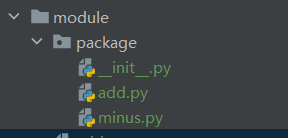
其他文件引入
import package.add as add

print(add.a)

# from package import add
#
# print(add.a)
#
# from package.add import a
#
# print(a)
10
12.4 Python 中常用的内置模块
| 模块名 | 描述 |
|---|---|
| sys | 与 Python 解释器及其环境操作相关的标准库 |
| time | 提供与时间相关的各种函数的标准库 |
| os | 提供了访问操作系统服务功能的标准库 |
| calendar | 提供与日期相关的各种函数的标准库 |
| urllib | 用于读取来自网上(服务器)的数据标准库 |
json | 用于使用 JSON 序列化和反序列化对象 |
| re | 用于在字符串中执行正则表达式匹配和替换 |
| math | 提供标准算术运算函数的标准库 |
| decimal | 用于进行精确控制运算精度、有效数位和四舍五入操作的十进制运算 |
| logging | 提供了灵活的记录事件、错误、警告和调试信息等日志信息的功能 |
import sys

print(sys.getsizeof('张三'))
print(sys.getsizeof(20))
print(sys.getsizeof(False))
print(sys.getsizeof(2011.233332))
print(sys.getsizeof([11, 22, 33, 44, 77]))

import time

print(time.time())
print(time.localtime())
print(time.localtime(time.time()))

import urllib.request

print(urllib.request.urlopen('http://www.baidu.com').read())

import math

print(math.pi)
78
28
28
24
104
1690177727.869666
time.struct_time(tm_year=2023, tm_mon=7, tm_mday=24, tm_hour=13, tm_min=48, tm_sec=47, tm_wday=0, tm_yday=205, tm_isdst=0)
time.struct_time(tm_year=2023, tm_mon=7, tm_mday=24, tm_hour=13, tm_min=48, tm_sec=47, tm_wday=0, tm_yday=205, tm_isdst=0)
3.141592653589793
12.5 第三方模块的安装及使用
1、安装
pip install schedule,schedule 为一个任务调度模块
2、使用
import schedule
import time


def job():
    print('hello')


schedule.every(3).seconds.do(job)

while True:
    schedule.run_pending()
    time.sleep(1)
hello
hello
hello
…
13. 文件
13.1 编码格式
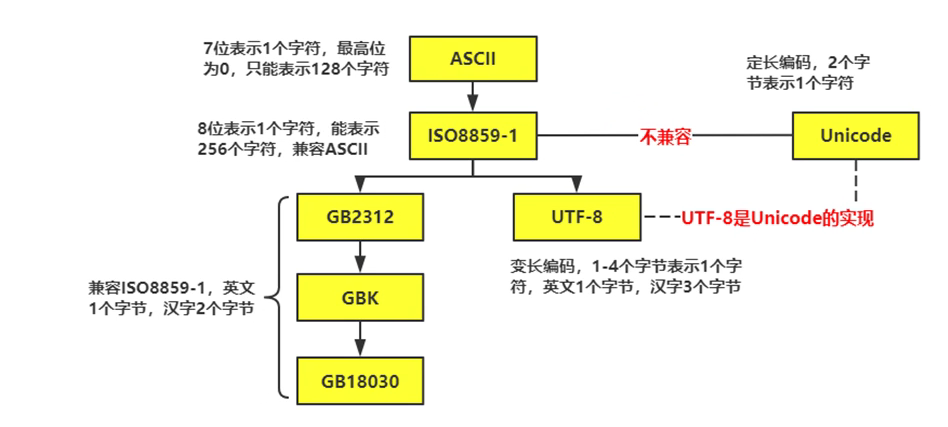
Python 解释器使用的是 Unicode(内存),.py 文件在磁盘上使用 UTF-8 存储(外存)
# coding:utf-8:指定文件格式
13.2 文件读写
文件的读写俗称 “IO 操作”,首先 .py 文件在解释器上运行,当涉及到读写文件等操作系统的资源时,解释器会调用 OS,即操作系统,然后 OS 再去操作磁盘
内置函数 open() 创建文件对象,file = open(filename, mode, buffering, encoding)
file:被创建的文件对象open():创建文件对象的函数filename:要创建或打开的文件名称mode:打开模式,默认为只读buffering:值为 0,则表示不会有寄存,值为 1,访问文件时会寄存行;值大于 1,表明这就是寄存区的缓冲大小;如果取负值,寄存区的缓冲大小则为系统默认encoding:文本文件中字符的编码格式,默认为 GBK
a.txt 文件,编码为 UTF-8
你好
Python
对应读取文件也要设置编码格式为 UTF-8
# file = open('a.txt', 'r', 1, 'UTF-8')
file = open('a.txt', encoding='UTF-8')
print(file.readlines())
file.close()
[‘你好\n’, ‘Python’]
13.2.1 常用的文件打开模式
按文件中数据的组织形式,文件分为以下两大类
- 文本文件:存储的是普通“字符”文本,默认为 Unicode 字符集,可以使用记事本程序打开
- 二进制文件:把数据内容用“字节”进行存储,无法用记事本打开,必须使用专用的软件打开,如 MP3 音频文件、JPG 图片、doc 文档等
| 打开模式 | 描述 |
|---|---|
| r | 以只读模式打开文件,文件的指针将会放在文件的开头 |
| w | 以只写模式打开文件,如果文件不存在则创建,如果文件存在,则覆盖原有内容,文件指针在文件的开头 |
| a | 以追加模式打开文件,如果文件不存在则创建,文件指针在文件开头;如果文件存在,则在文件末尾追加内容,文件指针在原文件末尾 |
| b | 以二进制方式打开文件,不能单独使用,需要与其他模式一起使用,如 rb、wb |
| + | 以读写方式打开文件,不能单独使用,需要与其他模式一起使用,如 a+ |
追加内容
file = open('a.txt', 'a', encoding='UTF-8')
file.write('你好')
file.close()
此时 a.txt 文件内容为
你好
Python你好
13.2.2 文件对象常用方法
| 方法名称与对应参数名称 | 说明 |
|---|---|
read([size]) | 从文件中读取 size 个字节或字符的内容返回,若省略 [size],则读取到文件末尾,即一次性读取文件所有内容 |
readline() | 从文本文件中读取一行内容 |
readlines() | 把文本文件中每一行都作为独立的字符串对象,并将这些对象放入列表返回 |
wirte(str) | 将字符串 str 内容写入文件 |
writelines(s_list) | 将字符串列表 s_list 写入文本文件,不添加换行符 |
seek(offset, whence) | 把文件指针移动到新的位置,offset 表示相对于 whence 的位置,为正表示从结束方向移动,为负表示从开始方向移动;whence 为 0 表示从文件头开始计算(默认值),为 1 表示从当前位置开始计算,为 2 表示从文件尾开始计算 |
tell() | 返回文件指针的当前位置 |
flush() | 把缓冲区的内容写入文件,但不关闭文件 |
close() | 把缓冲区的内容写入文件,同时关闭文件,释放文件对象相关资源 |
以读写模式打开文件,这里的 r 决定了文件指针的初始位置
file = open('a.txt', 'r+', encoding='UTF-8')
print(file.read(1))
file.seek(0)
print(file.readline())
file.seek(0)
print(file.readlines())

file.write('world')
file.seek(0)
print(file.readlines())
file.close()
你
你好

['你好\n', 'Python你好']
['你好\n', 'Python你好world']
13.3 os、os.path 模块的常用函数
os 模块是 Python 内置的与操作系统功能和文件系统相关的模块,该模块中的语句的执行结果通常与操作系统有关,在不同的操作系统上运行,得到的结果可能不一样
import os

os.system('notepad.exe')  # 打开记事本
os.system('calc.exe')  # 打开计算器
os 模块与 os.path 模块用于对目录或文件进行操作
| os 模块函数 | 说明 |
|---|---|
getcwd() | 返回当前的工作目录 |
listdir(path) | 返回指定路径下的文件和目录信息 |
mkdir(path, mode) | 创建目录 |
makedirs(path1/path2..., mode) | 创建多级目录 |
rmdir(path) | 删除目录 |
removedirs(path1/path2) | 删除多级目录 |
chdir(path) | 将 path 设为当前工作目录 |
walk() | 递归获取目录路径,名称及其子文件 |
| os.path 模块函数 | 说明 |
|---|---|
abspath(path) | 用于获取文件或目录的绝对路径 |
exists(path) | 用于判断文件或目录是否存在,如果存在返回 True,否则返回 False |
join(path, name) | 将目录与目录或文件名拼接起来 |
splitext() | 分离文件名和扩展名 |
basename(path) | 从一个目录中提取文件名 |
dirname(path) | 从一个路径中提取文件路径,不包括文件名 |
isdir(path) | 用于判断是否为路径 |
import os
import os.path as path

# os.system('notepad.exe')  # 打开记事本
# os.system('calc.exe')  # 打开计算器

print(os.getcwd())

l1 = os.listdir('../file')
print(l1)

print(path.abspath('system.py'))
print(path.exists('D:\\DevelopTools\\Project\\fan-leaning-python\\fan\\file\\system.py'))
print(path.splitext('system.py'))
print(path.basename('D:\\DevelopTools\\Project\\fan-leaning-python\\fan\\file\\system.py'))
print(path.dirname('.D:\\DevelopTools\\Project\\fan-leaning-python\\fan\\file\\system.py'))
print(path.isdir('D:\\DevelopTools\\Project\\fan-leaning-python\\fan\\file\\system.py'))
print(path.isdir('D:\\DevelopTools\\Project\\fan-leaning-python\\fan\\file'))
D:\DevelopTools\Project\fan-leaning-python\fan\file
[‘a.txt’, ‘open.py’, ‘system.py’, ‘write.py’]
D:\DevelopTools\Project\fan-leaning-python\fan\file\system.py
True
(‘system’, ‘.py’)
system.py
.D:\DevelopTools\Project\fan-leaning-python\fan\file
False
True
import os

files = os.walk(os.getcwd())
for dirpath, dirname, filename in files:
    print(dirpath)
    print(dirname)
    print(filename)
D:\DevelopTools\Project\fan-leaning-python\fan\file
[‘walk’]
[‘a.txt’, ‘open.py’, ‘system.py’, ‘walk.py’, ‘write.py’]
D:\DevelopTools\Project\fan-leaning-python\fan\file\walk
[]
[‘walk.py’]