目录
前言:
改造思路:
实现:
最后:
总结:
前言:
之前通过重写unittest的初始化方法加入设备参数进行并发,实现了基于unittest的appium多设备并发,但是考虑到unittest的框架实在过于简陋,也不方便后期的Jenkins的持续集成,所以想换一个框架来使用。
那么通过调研,pyhon+pytest+allure 这套框架很不错,pytest是一个单元测试框架,他可以集成很多插件,包括出错重试,参数化,等。在此特别是基于他的allure插件,能够和Jenkins完美兼容,生成美观强大的测试报告。

改造思路:
pytest框架和unittest框架明显不同,通过命令行启动,读取响应目录下的test开头的文件,进行执行用例。
而unittest却是通过将用例加载到TestSuite中,运行随测试集来执行用例
所以这边多进程就要换一种思路进行了。
基于pytest的结构和运行方式,那么思路如下:
运行方式:
1. pytest目录下会先加载conftest.py运行。
2. 该目录下加载test开头的py文件
3. 加载文件中Test开头的类
4. 加载Test类下test开头的方法
5. 通过命令行pytest.main([1, 2 ,3])带入1 2 3参数进行运行
解决思路:
1. 通过命令行把不同设备的参数传递给conftest.py
2. conftest中,使用传递过来的设备参数,连接设备到appium,并生成driver对象
3. 在各自的测试类和测试方法中,调用driver对象,进行测试操作
4. 生成allure测试报告
实现:
1. 通过命令行传递参数:
run中的设备池:
def devices_Pool():
    devices_list = []
    for i in range(0, len(getDevices())):
        _initApp = {}
        _initCaps = {}
        _initApp["devices"] = getDevices()[i]
        _initCaps["deviceName"] = getDevices()[i]
        _initCaps["platformVersion"] = getPhoneInfo(devices=_initCaps["deviceName"])["release"]
        _initCaps["platformName"] = "Android"
        _initApp["port"] = str(random.randint(4700, 4900))
        _initApp["bport"] = str(random.randint(4700, 4900))
        _initApp["systemPort"] = str(random.randint(4700, 4900))
        _initCaps["automationName"] = "UiAutomator2"
        _initCaps["appPackage"] = 'cn.vsx.vc'
        _initCaps["appActivity"] = '.activity.RegistActivity'
        _initApp["Caps"] = _initCaps
        devices_list.append(_initApp)
    print(len(getDevices()))
    print(len(devices_list))
    return devices_list
run中,多进程调用启动命令行,并传递参数:
def runnerPool(device_list):
    getdevice = getDevices()
    with ProcessPoolExecutor(len(getdevice)) as pool:
        pool.map(runPytest, device_list)


def runPytest(device):
    print(f"cmdopt is {device}")
    report = f"report-{device['Caps']['deviceName']}".split(":", 1)[0]
    try:
        os.system(f"del /s /q E:\\appium-pytest\\{report}")
        time.sleep(1)
        os.system(f"rd /s /q E:\\appium-pytest\\{report}")
        time.sleep(1)
        print(f"{report} report has deleted")
    except:
        print("no directory existed")
    finally:
        print(f"pool run device is {device['devices']}")
        pytest.main(["../TestCases/", f"--cmdopt={device}", "--alluredir", f"../{report}/xml"])
        time.sleep(1)
        os.system(f"allure generate ../{report}/xml -o ../{report}/html")
conftest文件中,获取命令行传递过来的参数:
def pytest_addoption(parser):
    parser.addoption("--cmdopt", action="store", default="device", help="None")

@pytest.fixture(scope="session")
def cmdopt(request):
    return request.config.getoption("--cmdopt")
conftest中通过传递的参数,生成连接对象:
@pytest.fixture(scope="session")
def connectDevice(cmdopt):
    device = eval(cmdopt)
    device_caps = {}
    device_caps["platformVersion"] = getPhoneInfo(device["Caps"]["deviceName"])["release"]
    device_caps["platformName"] = "Android"
    device_caps["automationName"] = "UiAutomator2"
    device_caps["deviceName"] = device["Caps"]['deviceName']
    device_caps["udid"] = device["Caps"]['deviceName']
    device_caps["appPackage"] = "cn.vsx.vc"
    device_caps["appActivity"] = ".activity.RegistActivity"
    device_caps["noReset"] = True
    device_caps["noSign"] = True
    device_caps["unicodeKeyboard"] = True
    device_caps["resetKeyboard"] = True
    device_caps["systemPort"] = int(device["systemPort"])
    remote = "http://127.0.0.1:" + str(device["port"]) + "/wd/hub"
    print(f"wo shi pytest {device_caps}")
    driver = webdriver.Remote(remote, device_caps)
    return driver
测试用例中,使用对象来进行操作:
class Test_groupCall():
    @allure.feature("group_call")
    @allure.story("login")
    def test001_login(self, connectDevice):
        '''登入选择单位'''
        WebDriverWait(connectDevice, 10).until(
            lambda x: x.find_element_by_xpath(
                "//android.widget.TextView[contains(@text, '选择单位')]").is_displayed())  # 验证等待10秒超时
        x = connectDevice.get_window_size()['width']  # 获取当前屏幕宽
        y = connectDevice.get_window_size()['height']  # 获取当前屏幕高
        a, b = 170 / 768, 790 / 1184  # 选择单位222系数
        connectDevice.find_element_by_xpath("//android.widget.TextView[contains(@text, '选择单位')]").click()
最后:
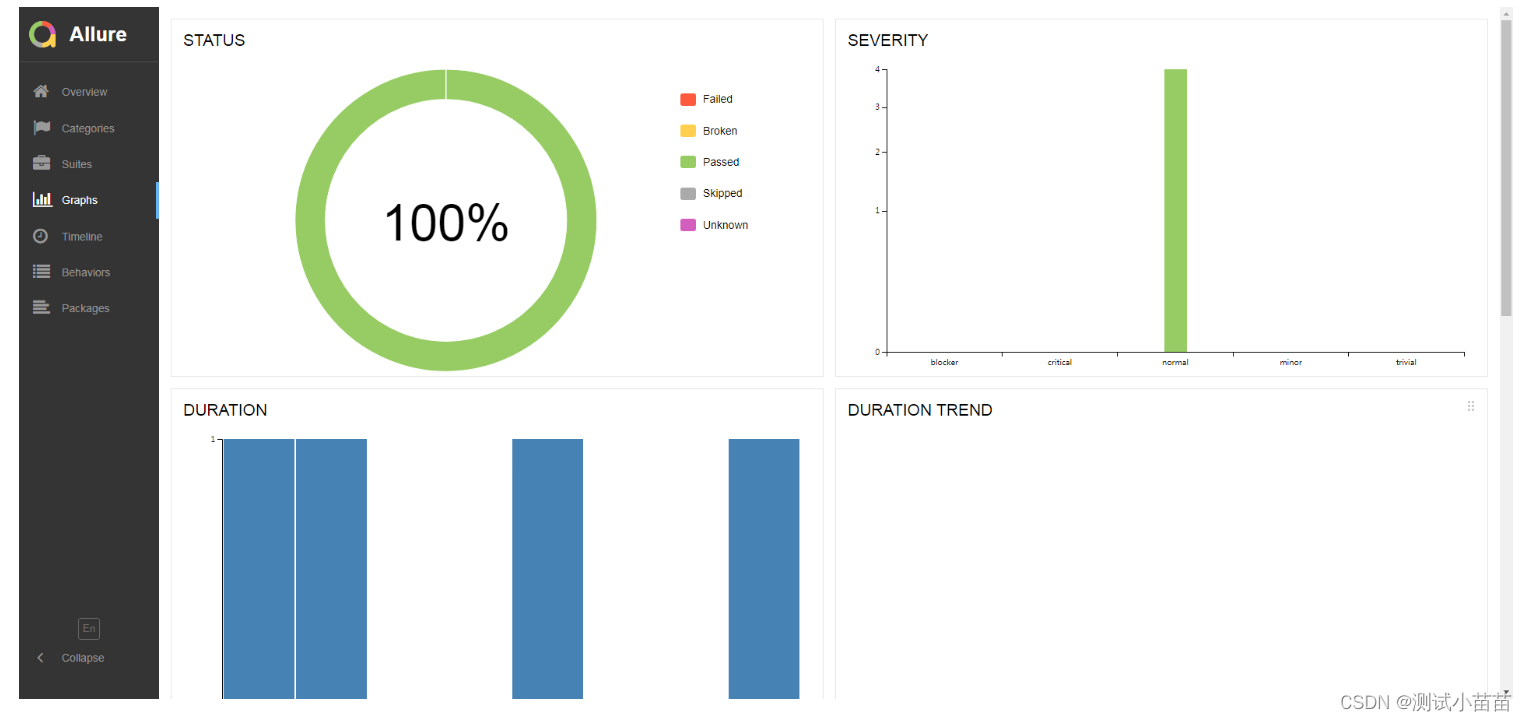
多设备连接时,一定要注意给每个desired_caps中加入每个设备自己的systemPort,否则会连接不上多设备,至此改造成功,最后生成的报告也让人满意:
总结:
感谢每一个认真阅读我文章的人!!!
我个人整理了我这几年软件测试生涯整理的一些技术资料,包含:电子书,简历模块,各种工作模板,面试宝典,自学项目等。欢迎大家评论区留言或私我免费领取。