项目结构

技术选型
flask 做后端, 提供数据和渲染html
暂时没有提供mysql, 后续会更新操作mysql和样式美化的版本
起一个flask服务
flask是python的一个web框架, 下面演示如何提供http接口, 并返回json数据
main.py
# flask创建http接口
from flask import Flask, request, jsonify,render_template
# 支持flask跨域
from flask_cors import CORS
# 创建flask服务
app = Flask(__name__)
CORS(app, resources=r'/*')  # 注册CORS, "/*" 允许访问域名所有api

# 首页
@app.route('/',methods=['get'])
def index():
    # 自动在templates里找对应名称的文件
    return jsonify({"msg":"hello"})

if __name__ == "__main__":
    # 运行web服务
    app.run(host='0.0.0.0', port=10086)
此时打开终端, 运行

python main.py打开浏览器, 输入 http://localhost:10086/

渲染模板
flask可以渲染html文件(自动往项目根目录的templates里找), 并往里面填数据

main.py
# flask创建http接口
from flask import Flask, request, jsonify,render_template
# 支持flask跨域
from flask_cors import CORS
# 创建flask服务
app = Flask(__name__)
CORS(app, resources=r'/*')  # 注册CORS, "/*" 允许访问域名所有api

# 首页
@app.route('/',methods=['get'])
def index():
    # 自动在templates里找对应名称的文件
    return render_template('index.html',msg="hello world")

if __name__ == "__main__":
    # 运行web服务
    app.run(host='0.0.0.0', port=10086)
index.html
<!DOCTYPE html>
<html lang="en">
<head>
    <meta charset="UTF-8">
    <meta http-equiv="X-UA-Compatible" content="IE=edge">
    <meta name="viewport" content="width=device-width, initial-scale=1.0">
    <title>Document</title>
</head>
<body>
    {{msg}}
</body>
</html>
浏览器

用对象数组来存放图书数据
main.py
通过模板渲染传递books到html里
# flask创建http接口
from flask import Flask, request, jsonify,render_template
# 支持flask跨域
from flask_cors import CORS
# 创建flask服务
app = Flask(__name__)
CORS(app, resources=r'/*')  # 注册CORS, "/*" 允许访问域名所有api

# 暂时代替数据库
books = [
    {
        "id":'1',
        "name":"hello world",
        "author":"迭名",
        "desc": "程序员入门第一本书",
        "price": 11.99
    },
    {
        "id":'2',
        "name":"0基础学it",
        "author":"xx程序员",
        "desc": "某培训机构精心出品教程",
        "price": 99.98
    },
]

# 首页
@app.route('/',methods=['get'])
def index():
    # 自动在templates里找对应名称的文件
    return render_template('index.html',books=books)

if __name__ == "__main__":
    # 运行web服务
    app.run(host='0.0.0.0', port=10086)
index.html
html接收flask后端传来的数据, 渲染到table里
<!DOCTYPE html>
<html lang="en">

<head>
    <meta charset="UTF-8">
    <meta http-equiv="X-UA-Compatible" content="IE=edge">
    <meta name="viewport" content="width=device-width, initial-scale=1.0">
    <title>Document</title>
</head>
<!-- 加样式,居中 -->
<style>
    * {
        margin: 0 auto;
    }
</style>

<body>
    <br>
    <table border="1">
        <thead>
            <tr>
                <th>书名</th>
                <th>作者</th>
                <th>描述</th>
                <th>价格</th>
                <th>操作</th>
            </tr>
        </thead>
        <tbody>
            {% for book in books %} {# 遍历 books 变量 #}
            <tr id={{book.id}}>
                <th>{{book.name}}</th>
                <th>{{book.author}}</th>
                <th>{{book.desc}}</th>
                <th>{{book.price}}</th>
                <th>
                    <button id={{book.id}}>删除</button>
                    <a href='http://localhost:10086/uptbook?id={{book.id}}'>修改</a>
                </th>
            </tr>
            {% endfor %} {# 使用 endfor 标签结束 for 语句 #}
        </tbody>
    </table>
    <br>
</body>

</html>
查看效果

添加图书
使用a标签请求flask后端, flask后端返回html模板, 实现跳转添加页面(add.html)
这里add.html是在book下, 这是因为如果还有别的服务(比如用户的crud), 可以通过不同文件夹区分模块

添加两个接口, 我们的id就用book对象在books数组里的下标(索引/序号), 添加就直接append添加到books数组的末尾
# 跳转添加页面
@app.route('/addbook',methods=['get'])
def addbook_html():
    # 自动在templates里找对应名称的文件
    return render_template('book/add.html')

# 添加
@app.route('/addbook',methods=['post'])
def addbook():
    # 获取json数据
    book = request.get_json()
    book['id']= str(len(book)-1)
    books.append(book)
    return jsonify({"books":books})
main.py
# flask创建http接口
from flask import Flask, request, jsonify,render_template
# 支持flask跨域
from flask_cors import CORS
# 创建flask服务
app = Flask(__name__)
CORS(app, resources=r'/*')  # 注册CORS, "/*" 允许访问域名所有api

# 暂时代替数据库
books = [
    {
        "id":'1',
        "name":"hello world",
        "author":"迭名",
        "desc": "程序员入门第一本书",
        "price": 11.99
    },
    {
        "id":'2',
        "name":"0基础学it",
        "author":"xx程序员",
        "desc": "某培训机构精心出品教程",
        "price": 99.98
    },
]

# 首页
@app.route('/',methods=['get'])
def index():
    # 自动在templates里找对应名称的文件
    return render_template('index.html',books=books)

# 跳转添加页面
@app.route('/addbook',methods=['get'])
def addbook_html():
    # 自动在templates里找对应名称的文件
    return render_template('book/add.html')

# 添加
@app.route('/addbook',methods=['post'])
def addbook():
    # 获取json数据
    book = request.get_json()
    # 用数组下标表示id
    book['id']= str(len(book)-1)
    # 添加到books末尾
    books.append(book)
    return jsonify({"books":books})

if __name__ == "__main__":
    # 运行web服务
    app.run(host='0.0.0.0', port=10086)
index.html
我们使用axios(js的一个库)来发送http请求
<!-- 引入axios发送请求给后端 -->
<script src="https://unpkg.com/axios/dist/axios.min.js"></script>
发送请求前, 通过input框的value获取数据, 然后axios发送post请求, 并传递一个json对象给后端
<!DOCTYPE html>
<html lang="en">

<head>
    <meta charset="UTF-8">
    <meta http-equiv="X-UA-Compatible" content="IE=edge">
    <meta name="viewport" content="width=device-width, initial-scale=1.0">
    <title>Document</title>
</head>

<body>
    <form id="form">
        <lable>书名</lable>
        <input type="text" name="book-name" id="book-name">
        <label>作者</label>
        <input type="text" name="book-author" id="book-author">
        <label>描述</label>
        <input type="text" name="book-desc" id="book-desc">
        <label>价格</label>
        <input type="text" name="book-price" id="book-price">
        <button type="submit">提交</button>
    </form>
    <!-- 引入axios发送请求给后端 -->
    <script src="https://unpkg.com/axios/dist/axios.min.js"></script>
    <script>
        const addform = document.querySelector("#form")
        const bookName = document.querySelector("#book-name")
        const bookDesc = document.querySelector("#book-desc")
        const bookAuthor = document.querySelector("#book-author")
        const bookPrice = document.querySelector("#book-price")
        addform.addEventListener("submit", function (e) {
            e.preventDefault();
            // console.log(bookName.value);
            // 发送请求给后端
            axios.post('http://localhost:10086/addbook',
                // 传递json数据给后端
                {
                    name: bookName.value,
                    author: bookAuthor.value,
                    desc: bookDesc.value,
                    price: bookPrice.value
                })
                // axios请求完成后
                .then((res) => {
                    // 后端处理完请求,axios拿到的结果
                    console.log(res);
                    alert('添加成功')
                    // 跳转首页
                    window.location.href = 'http://localhost:10086/'
                })
        })
    </script>
</body>

</html>
查看效果


删除图书
我们通过axios发送delete请求给后端, 同时传递id, 后端遍历books, 找到对应id的元素下标, 然后删除
main.py
# flask创建http接口
from flask import Flask, request, jsonify,render_template
# 支持flask跨域
from flask_cors import CORS
# 创建flask服务
app = Flask(__name__)
CORS(app, resources=r'/*')  # 注册CORS, "/*" 允许访问域名所有api

# 暂时代替数据库
books = [
    {
        "id":'1',
        "name":"hello world",
        "author":"迭名",
        "desc": "程序员入门第一本书",
        "price": 11.99
    },
    {
        "id":'2',
        "name":"0基础学it",
        "author":"xx程序员",
        "desc": "某培训机构精心出品教程",
        "price": 99.98
    },
]

# 首页
@app.route('/',methods=['get'])
def index():
    # 自动在templates里找对应名称的文件
    return render_template('index.html',books=books)

# 跳转添加页面
@app.route('/addbook',methods=['get'])
def addbook_html():
    # 自动在templates里找对应名称的文件
    return render_template('book/add.html')

# 添加
@app.route('/addbook',methods=['post'])
def addbook():
    # 获取json数据
    book = request.get_json()
    # 用数组下标表示id
    book['id']= str(len(book)-1)
    # 添加到books末尾
    books.append(book)
    return jsonify({"books":books})

# 删除
@app.route('/delete',methods=['delete'])
def delbook():
    id = request.args.get('id')
    # 下标
    index = -1
    # 遍历,找到id相同的元素
    for i in range(len(books)):
        if books[i]['id'] == id:
            # 记录元素下标
            index = i
    # id不是-1表示有找到要删除的元素
    if i != -1:
        # 删除
        books.remove(books[index])
        return jsonify({'books': books})
    else:
        return jsonify({'books': books})

if __name__ == "__main__":
    # 运行web服务
    app.run(host='0.0.0.0', port=10086)
index.html
我们在渲染table的时候, 将每行(tr标签)的id设为book的id, 删除时, 可以通过tr的id获取要删除的book的id, 实现删除特定的book
<!DOCTYPE html>
<html lang="en">

<head>
    <meta charset="UTF-8">
    <meta http-equiv="X-UA-Compatible" content="IE=edge">
    <meta name="viewport" content="width=device-width, initial-scale=1.0">
    <title>Document</title>
</head>
<!-- 加样式,居中 -->
<style>
    * {
        margin: 0 auto;
        text-align: center;
    }
</style>

<body>
    <br>
    <table border="1">
        <thead>
            <tr>
                <th>书名</th>
                <th>作者</th>
                <th>描述</th>
                <th>价格</th>
                <th>操作</th>
            </tr>
        </thead>
        <tbody>
            {% for book in books %} {# 遍历 books 变量 #}
            <tr id={{book.id}}>
                <th>{{book.name}}</th>
                <th>{{book.author}}</th>
                <th>{{book.desc}}</th>
                <th>{{book.price}}</th>
                <th>
                    <button id={{book.id}}>删除</button>
                    <a href='http://localhost:10086/uptbook?id={{book.id}}'>修改</a>
                </th>
            </tr>
            {% endfor %} {# 使用 endfor 标签结束 for 语句 #}
        </tbody>
    </table>
    <br>
    <a href="http://localhost:10086/addbook">添加图书</a>
    <!-- axios,可以发送请求给后端 -->
    <script src="https://unpkg.com/axios/dist/axios.min.js"></script>
    <script>
        // 按钮
        const btns = document.querySelectorAll('th > button')
        // 遍历
        btns.forEach((b) => {
            console.log(b.id);
            // 给按钮添加click事件
            b.addEventListener('click', function (e) {
                // todo 弹出确认框,是否删除
                // 删除
                axios.delete(("http://localhost:10086/delete?id=" + b.id))
                    .then((res) => {
                        if (res.status == 200 && res.data) {
                            // 刷新页面
                            location.reload();
                            alert('删除成功')
                        } else {
                            alert('删除失败')
                        }
                    })
            })
        })
    </script>
</body>

</html>
查看效果


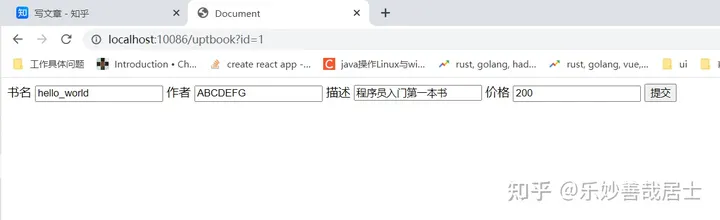
修改图书信息

前端点击修改后跳转修改页面
<a href='http://localhost:10086/uptbook?id={{book.id}}'>修改</a>main.py
# flask创建http接口
from flask import Flask, request, jsonify,render_template
# 支持flask跨域
from flask_cors import CORS
# 创建flask服务
app = Flask(__name__)
CORS(app, resources=r'/*')  # 注册CORS, "/*" 允许访问域名所有api

# 暂时代替数据库
books = [
    {
        "id":'1',
        "name":"hello world",
        "author":"迭名",
        "desc": "程序员入门第一本书",
        "price": 11.99
    },
    {
        "id":'2',
        "name":"0基础学it",
        "author":"xx程序员",
        "desc": "某培训机构精心出品教程",
        "price": 99.98
    },
]

# 首页
@app.route('/',methods=['get'])
def index():
    # 自动在templates里找对应名称的文件
    return render_template('index.html',books=books)

# 跳转添加页面
@app.route('/addbook',methods=['get'])
def addbook_html():
    # 自动在templates里找对应名称的文件
    return render_template('book/add.html')

# 添加
@app.route('/addbook',methods=['post'])
def addbook():
    # 获取json数据
    book = request.get_json()
    # 用数组下标表示id
    book['id']= str(len(book)-1)
    # 添加到books末尾
    books.append(book)
    return jsonify({"books":books})

# 删除
@app.route('/delete',methods=['delete'])
def delbook():
    id = request.args.get('id')
    # 下标
    index = -1
    # 遍历,找到id相同的元素
    for i in range(len(books)):
        if books[i]['id'] == id:
            # 记录元素下标
            index = i
    # id不是-1表示有找到要删除的元素
    if i != -1:
        # 删除
        books.remove(books[index])
        return jsonify({'books': books})
    else:
        return jsonify({'books': books})

# 跳转修改页面
@app.route('/uptbook',methods=['get'])
def uptbook_html():
    id = request.args.get('id')
    book = {}
    for b in books:
        if b['id'] == id:
            book = b
    return render_template('book/update.html',book=book)

# 修改
@app.route('/uptbook',methods=['patch'])
def uptbook():
    id = request.args.get('id')
    book = request.get_json()
    index = -1
    for i in range(len(books)):
        if books[i]['id'] == id:
            index = i
    if index == -1:
        return jsonify({"books":books})
    else:
        if(book['name']!=None):
            books[index]['name'] = book['name']
        if(book['author']!=None):
            books[index]['author'] = book['author']
        if(book['desc']!=None):
            books[index]['desc'] = book['desc']
        if(book['price']!=None):
            books[index]['price'] = book['price']
        return jsonify({"books":books})

if __name__ == "__main__":
    # 运行web服务
    app.run(host='0.0.0.0', port=10086)
update.html
和添加图书页面基本相同
<!DOCTYPE html>
<html lang="en">

<head>
    <meta charset="UTF-8">
    <meta http-equiv="X-UA-Compatible" content="IE=edge">
    <meta name="viewport" content="width=device-width, initial-scale=1.0">
    <title>Document</title>
</head>

<body>
    <!-- 自定义属性,值为book.id -->
    <form id="form" data-id={{book.id}}>
        <lable>书名</lable>
        <input type="text" name="book-name" value={{book.name}} id="book-name">
        <label for="">作者</label>
        <input type="text" name="book-author" value={{book.author}} id="book-author">
        <label for="">描述</label>
        <input type="text" name="book-desc" value={{book.desc}} id="book-desc">
        <label for="">价格</label>
        <input type="text" name="book-price" value={{book.price}} id="book-price">
        <button type="submit">提交</button>
    </form>
    <script src="https://unpkg.com/axios/dist/axios.min.js"></script>
    <script>
        const uptform = document.querySelector("#form")
        const bookName = document.querySelector("#book-name")
        const bookDesc = document.querySelector("#book-desc")
        const bookAuthor = document.querySelector("#book-author")
        const bookPrice = document.querySelector("#book-price")
        // 自定义属性
        const id = uptform.dataset.id
        uptform.addEventListener("submit", function (e) {
            e.preventDefault();
            // console.log(bookName.value);
            // 发送请求给后端
            axios.patch(("http://localhost:10086/uptbook?id=" + id), {
                name: bookName.value,
                author: bookAuthor.value,
                desc: bookDesc.value,
                price: bookPrice.value
            }).then((res) => {
                console.log(res);
                alert('修改成功')
                // 跳转回首页
                window.location.href = 'http://localhost:10086/'
            })
        })
    </script>
</body>

</html>
查看效果


完结, 恭喜