目录
- 1. 单例模式
- 1.1 饿汉模式实现单例
- 1.2 懒汉模式实现单例
- 1.2.1 加锁实现懒汉模式线程安全
- 1.2.2 volatile实现懒汉模式线程安全
- 1.3 饿汉模式和懒汉模式小结(面试题)
- 2. 阻塞队列
- 2.1 单线程下阻塞队列
- 2.2 多线程下阻塞队列——生产者消费者模型
- 2.3 模拟写一个阻塞队列+生产者消费者
- 3. 定时器
- 3.1 定时器小例子
- 3.2 实现定时器——优先级阻塞队列
- 4. 线程池
- 4.1 拒绝策略(4种)
- 4.2 实现线程池
1. 单例模式
单例模式是一种经典的设计模式(软件开发中的固定套路)。
设计模式有很多种,目前主要考察:①单例模式 ②工厂模式。
单例——>单个实例(instance)对象,在一个程序中,某个类,只创建出一个实例(一个对象),不能创建多个对象。
Java中的单例模式,借助java语法,保证某个类只能创建出一个实例,而不能new多次。
java中实现单例模式有很多种写法,主要总结以下2种:
①饿汉模式(急迫)
②懒汉模式(从容)
通常认为,懒汉模式更好,效率更高。(非必要不去做)
计算机种的例子: 打开一个硬盘上的文件,读取文件内容,并显示出来
饿汉:把文件所有内容都读到内存中,并显示。(文件非常大会卡)
懒汉:只把文件读一小部分,把当前屏幕填充上,如果用户翻页了,再读其他文件内容,如果不翻页,就省下了。
1.1 饿汉模式实现单例
核心思想:早早就把实例创建好了
//单例模式
class Singleton {
    //通过静态成员变量的模式
    private static Singleton singleton = new Singleton();
    //饿汉模式,不足:类的实例的加载太早了,后面可能没有用到这个类的实例
    //获取到实例的方法
    public static Singleton getSingleton() {
        return singleton;
    }
    //构造方法私有化,禁止外部new实例
    private Singleton() {
    }
}
public class ThreadDemo3 {
    public static void main(String[] args) {
        Singleton s1 = Singleton.getSingleton();
        Singleton s2 = Singleton.getSingleton();
        //此时s1和s2是同一个对象
        System.out.println(s1 == s2);
//        Singleton s3 = new Singleton();
    }
}
分析: 在get方法中,只是单纯的读操作,没有修改,多个线程读同一个变量不会引起线程不安全的问题。
饿汉模式,认为式线程安全的,只是在读数据。
1.2 懒汉模式实现单例
核心思想:非必要,不创建,真正在使用的时候才去创建实例
class SingletonLazy {
    //懒汉模式
    private static SingletonLazy singletonLazy = null;
    //真正在使用的时候才去创建实例
    public static SingletonLazy getSingletonLazy() {
        if (singletonLazy == null) {
            singletonLazy = new SingletonLazy();
        }
        return singletonLazy;
    }

    private SingletonLazy() {
    }
}
public class ThreadDemo4 {
    public static void main(String[] args) {
        SingletonLazy s1 = SingletonLazy.getSingletonLazy();
        SingletonLazy s2 = SingletonLazy.getSingletonLazy();
        System.out.println(s1 == s2);
    }
}
分析:多线程下,可能无法保证懒汉模式创建对象的唯一性。
1.2.1 加锁实现懒汉模式线程安全
下面代码if和new不是原子的,因此需要加锁保证线程安全。
        if (singletonLazy == null) {
            singletonLazy = new SingletonLazy();
        }
        return singletonLazy;
则给if判定和new操作加锁:
        synchronized (SingletonLazy.class) {
            if (singletonLazy == null) {
                singletonLazy = new SingletonLazy();
            }
        }
        return singletonLazy;
但是加锁其实是一个比较低效的操作,因为加锁可能涉及到阻塞等待。
上面代码,在任何时候调用getSingletonLazy()都会触发锁的竞争。
其实,此处的线程不安全,只出现在首次创建对象的时候,一旦对象new好了,后续调用getSingletonLazy(),就只是单纯的读操作,就没有线程安全的问题,这个时候就没必要再加锁了。
因此,非必要,不加锁。
    public static SingletonLazy getSingletonLazy() {
        if (singletonLazy == null) { //是否要加锁
            synchronized (SingletonLazy.class) {
                if (singletonLazy == null) { //是否要创建对象
                    singletonLazy = new SingletonLazy();
                }
            }
        }
        return singletonLazy;
    }
判断是否要加锁,如果对象已经有了,就不必枷锁了,此时本身就是线程安全的。
注意:此处虽然2个if判断条件相同,但是如果调用的时间间隔长了,结果也可能不同,加锁可能导致阻塞,啥时候接触阻塞,沧海桑田!!!
1.2.2 volatile实现懒汉模式线程安全
singletonLazy = new SingletonLazy();
这个操作,可能会触发指令重排序:①创建内存(买房子)②调用构造方法(装修)③把内存地址赋给引用(拿到钥匙),其中②和③可以调换顺序。
如果t1执行了①和③,此时系统调度给t2,再去判断条件,发现条件不成立,非空,直接返回实例的引用,接下来t2继续调用,就会引发线程不安全。解决方法:
volatile private static SingletonLazy singletonLazy = null;
1.3 饿汉模式和懒汉模式小结(面试题)
- 饿汉模式:天然就是安全的,只有读操作
- 懒汉模式:不安全的,有读也有写
- ①加锁,把if和new变成原子操作
- ②双重if,减少不必要的加锁操作
- ③使用volatile禁止指令重排序,保证后续线程肯定拿到的是完整的对象
class SingletonLazy {
    //懒汉模式
    volatile private static SingletonLazy singletonLazy = null;

    public static SingletonLazy getSingletonLazy() {
        if (singletonLazy == null) {
            synchronized (SingletonLazy.class) {
                if (singletonLazy == null) {
                    singletonLazy = new SingletonLazy();
                }
            }
        }
        return singletonLazy;0
    }

    private SingletonLazy() {
    }
}
public class ThreadDemo4 {
    public static void main(String[] args) {
        SingletonLazy s1 = SingletonLazy.getSingletonLazy();
        SingletonLazy s2 = SingletonLazy.getSingletonLazy();
        System.out.println(s1 == s2);
    }
}
2. 阻塞队列
阻塞队列是带有阻塞特性的队列,是线程安全的。
- 如果队列空,尝试出队列,就会阻塞等待,等待到队列不空为止;
- 如果队列满,尝试入队列,就会阻塞等待,等待到队列不满为止。
2.1 单线程下阻塞队列
import java.util.concurrent.*;
//阻塞队列
public class ThreadDemo5 {
    public static void main(String[] args) throws InterruptedException {
        //BlockingQueue是一个接口不能直接new,我们new他的实现类
        BlockingQueue<String> queue = new LinkedBlockingQueue<>();
        //阻塞队列的核心方法主要有2个,入队列和出队列
        queue.put("hello1");
        queue.put("hello2");
        queue.put("hello3");
        queue.put("hello4");
        queue.put("hello5");
        String ret = queue.take();
        System.out.println(ret);
        ret = queue.take();
        System.out.println(ret);
        ret = queue.take();
        System.out.println(ret);
        ret = queue.take();
        System.out.println(ret);
        ret = queue.take();
        System.out.println(ret);
        ret = queue.take();
        System.out.println(ret);
        ret = queue.take();
        System.out.println(ret);

    }
}
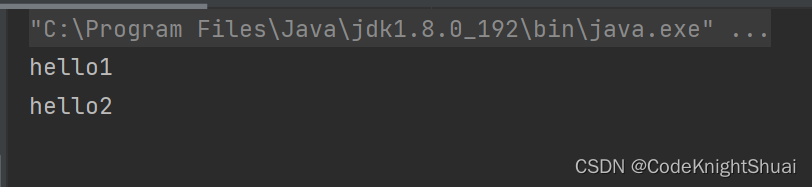
运行结果:
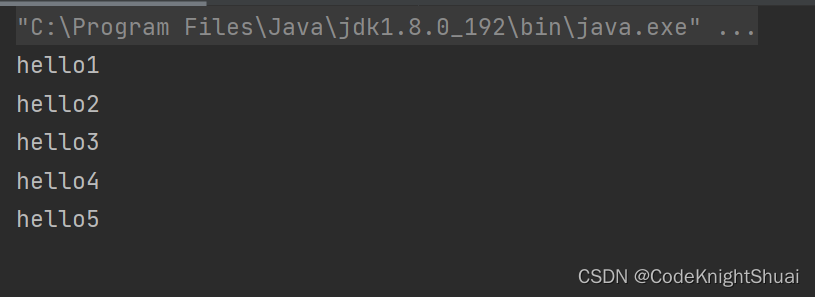
分析:JAVA标准库提供了阻塞队列的使用,在上述代码中,put了5次,take6次,前5次take都很顺利,第6次take就阻塞了。
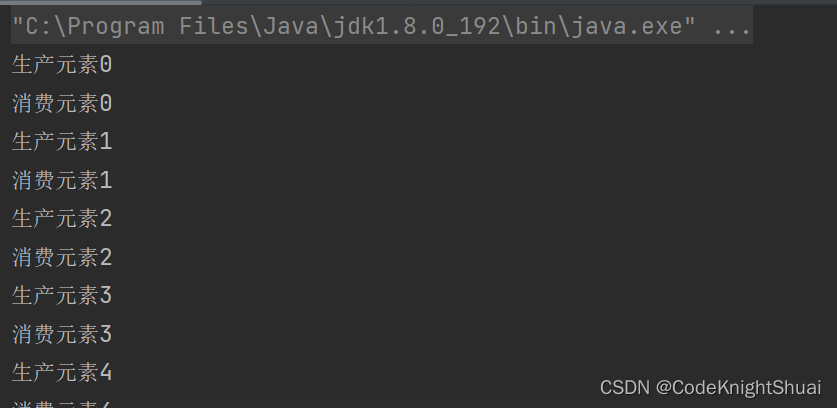
2.2 多线程下阻塞队列——生产者消费者模型
生产者、消费者这样的角色是针对某个资源来说的。
生产者:生产某个资源;
消费者:消耗某个资源;
生产者和消费者之间交互数据需要用到一个交易场所(阻塞队列)。
生产者消费则最主要解决2方面问题:
1.可以让上下游模块之间,进行更好的“解耦合”
2.削峰填谷
基于阻塞队列,写个生产者消费者模型。
import java.util.concurrent.BlockingQueue;
import java.util.concurrent.LinkedBlockingQueue;

public class ThreadDemo6 {
    public static void main(String[] args) {
        BlockingQueue<Integer> blockingQueue = new LinkedBlockingQueue<>();

        //消费者
        Thread t1 = new Thread(() -> {
            while (true) {
                try {
                    int value = blockingQueue.take();
                    System.out.println("消费元素" + value);
                } catch (InterruptedException e) {
                    e.printStackTrace();
                }
            }
        });
        t1.start();
        //生产者
        Thread t2 = new Thread(() -> {
            int value = 0;
            while (true) {
                try {
                    System.out.println("生产元素" + value);
                    blockingQueue.put(value);
                    value++;
                    Thread.sleep(1000);
                } catch (InterruptedException e) {
                    e.printStackTrace();
                }
            }
        });

        t2.start();
    }
}
运行结果:
2.3 模拟写一个阻塞队列+生产者消费者
实现阻塞队列,分3步:
①先实现一个普通的队列
②加上线程安全(锁 + 内存可见性)
③加上阻塞功能(wait notify)
//阻塞队列
class MyBlockingQueue {
    volatile int rear; //队尾
    volatile int front; //队头
    volatile int size; //数量
    int[] array = new int[1000]; //数组

    //入队
    synchronized public void in(int x) throws InterruptedException {
        //判断队列是否满
        while (size == array.length) {
            //队列满了
            this.wait();
        }
        array[rear] = x;
        rear++;
        if (rear == array.length) {
            //达到末尾,就需要从头开始
            rear = 0;
        }
        size++;
        this.notify();
    }

    //出队
    synchronized public int out() throws InterruptedException {
        //判断队列是否为空
        while (size == 0) {
            this.wait();
        }
        int val = array[front];
        front++;
        if (front == array.length) {
            front = 0;
        }
        size--;
        this.notify();
        return val;
    }
}
public class Test {
    public static void main(String[] args) {
        MyBlockingQueue myBlockingQueue = new MyBlockingQueue();
        //生产者消费者模型
        Thread t1 = new Thread( () -> {
            //消费者
            while (true) {
                synchronized (myBlockingQueue) {
                    try {
                        System.out.println("消费了" + myBlockingQueue.out());
                    } catch (InterruptedException e) {
                        e.printStackTrace();
                    }
                }
            }
        });

        Thread t2 = new Thread(() -> {
            int val = 0;
            //生产者
            while (true) {
                synchronized (myBlockingQueue) {
                    try {
                        myBlockingQueue.in(val);
                        System.out.println("生产了" + val);
                        Thread.sleep(1000);
                        val++;
                    } catch (InterruptedException e) {
                        e.printStackTrace();
                    }
                }
            }
        });
        t1.start();
        t2.start();
    }
}
3. 定时器
3.1 定时器小例子
public class ThreadDemo {
    public static void main(String[] args) {
        //定时器
        Timer timer = new Timer();
        timer.schedule(new TimerTask() {
            @Override
            public void run() {
                System.out.println("hello2");
            }
        },2000);
        System.out.println("hello1");
    }
}
运行结果:
分析:
- 标准库提供了一个Timer类,Timer类的核心方法尾schedule
- schedule包含2个参数,第1个参数是指定即将执行的任务代码,第二个参数是指定多次时间之后执行(单位是毫秒)。
- 可以发现上述代码在运行之后,进程并没有结束,这也说明Timer内置的线程是前台线程会阻止进程结束。
3.2 实现定时器——优先级阻塞队列
定时器内部管理的不仅仅是一个任务,可以管理很多任务。
虽然任务有很多,但是它们触发的时间是不同的,只需要有一个/一组工作线程,每次找到这些任务中最先到达时间的任务,一个线程先执行最早的任务,做完了之后再执行第二早的。(堆、优先级队列——阻塞优先级队列)
import java.util.concurrent.PriorityBlockingQueue;
//任务对象
class MyTask implements Comparable<MyTask>{
public Runnable runnable;
public long time;
public MyTask(Runnable runnable, long delay) {
this.runnable = runnable;
this.time = delay + System.currentTimeMillis();
}
@Override
public int compareTo(MyTask o) {
//这样意味着每次取出的是最小的元素
return (int)(this.time - o.time);
}
}
class MyTimer {
private PriorityBlockingQueue<MyTask> priorityBlockingQueue = new PriorityBlockingQueue<>();
public void schedule(Runnable runnable, Long delay) {
MyTask myTask = new MyTask(runnable,delay);
priorityBlockingQueue.put(myTask);
synchronized (this) {
this.notify();
}
}
public MyTimer() {
Thread t = new Thread(() -> {
while (true) {
try {
synchronized (this) {
MyTask myTask = priorityBlockingQueue.take();
long curTime = System.currentTimeMillis();
if (myTask.time <= curTime) {
myTask.runnable.run();
}else {
//时间没到的话,就把刚刚取出来的任务塞回去
priorityBlockingQueue.put(myTask);
wait(myTask.time - curTime); //不忙等
}
}
} catch (InterruptedException e) {
e.printStackTrace();
}
}
});
t.start();
}
}
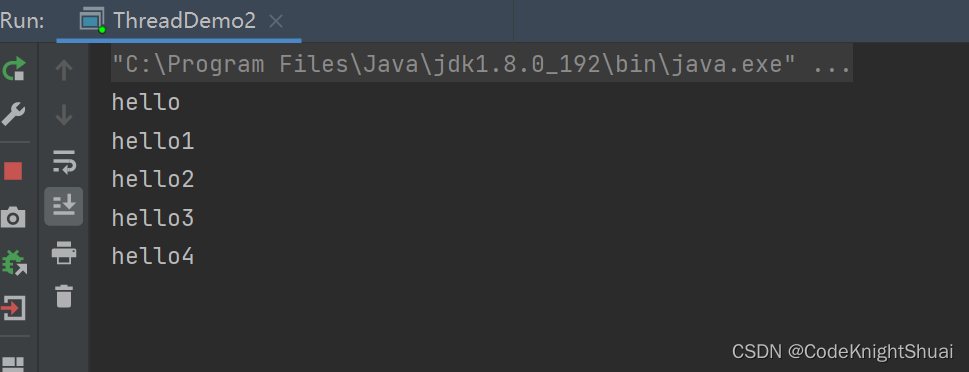
public class ThreadDemo2 {
public static void main(String[] args) {
MyTimer myTimer = new MyTimer();
myTimer.schedule(new Runnable() {
@Override
public void run() {
System.out.println("hello4");
}
},4000L);
myTimer.schedule(new Runnable() {
@Override
public void run() {
System.out.println("hello3");
}
},3000L);
myTimer.schedule(new Runnable() {
@Override
public void run() {
System.out.println("hello2");
}
},2000L);
myTimer.schedule(new Runnable() {
@Override
public void run() {
System.out.println("hello1");
}
},1000L);
System.out.println("hello");
}
}
运行结果:
4. 线程池
池的目的是为了提高效率,标准库提供了现场的线程池。
线程的创建,虽然比进程轻量,但是再频繁创建的情况下,开销也是不可忽略的,为啥从池子里拿线程比从系统创建线程更高效?
从线程池拿线程,是纯粹的用户态操作。 从系统创建线程,涉及到用户态和内核态之间的切换,真正的创建还是在内核态完成的。
结论:纯用户态操作时间是可控的,涉及到内核态操作时间就不太可控了。
import java.util.concurrent.ExecutorService;
import java.util.concurrent.Executors;

public class ThreadDemo3 {
    public static void main(String[] args) {
        //执行服务 线程池,此处并非是直接new ExecutorService对象,而是通过Executors类里面的静态方法完成的对象构造
        //new隐藏在方法内部的,创建对象不再直接new,工厂模式
        ExecutorService pool = Executors.newFixedThreadPool(10);
        //添加任务到线程池中
        pool.submit(new Runnable() {
            @Override
            public void run() {
                System.out.println("hello");
            }
        });
    }
}
4.1 拒绝策略(4种)
标准库提供了4种拒绝策略
- 如果满了,继续添加任务,添加操作直接抛出异常
- 添加的线程自己负责执行这个任务
- 丢弃最老(最先安排)的任务
- 丢弃最新的任务
4.2 实现线程池
import java.util.concurrent.BlockingQueue;
import java.util.concurrent.LinkedBlockingQueue;

class MyThreadPool {
    //阻塞队列用来存放任务
    private BlockingQueue<Runnable> queue = new LinkedBlockingQueue<>();
    public void submit(Runnable runnable) throws InterruptedException {
        //把任务添加到阻塞队列里面
        queue.put(runnable);
    }
    //此处实现一个固定线程数的线程池
    public MyThreadPool(int n) {
        for (int i = 0; i < n; i++) {
            Thread t = new Thread(() -> {
                try {
                    while (true) {
                        Runnable runnable = queue.take();
                        runnable.run();
                    }
                } catch (InterruptedException e) {
                    e.printStackTrace();
                }
            });
            t.start(); //启动线程
        }

    }
}
public class ThreadDemo {
    public static void main(String[] args) throws InterruptedException {
        MyThreadPool pool = new MyThreadPool(10);
        //自己实现线程池
        for (int i = 0; i < 1000; i++) {
            int n = i;
            pool.submit(new Runnable() {
                @Override
                public void run() {
                    System.out.println("hello" + n);
                }
            });
        }
        Thread.sleep(1000);
    }
}
分析:此处可以看到,线程池中任务执行的顺序和添加顺序不一定相同,因为这10个线程是无序调度的。
当前代码,搞了10个线程的线程池,实际开发中,一个线程池的线程数量设计成多少比较合适?
答:线程不是越多越好,线程的执行本质是要在cpu上调度的,具体要通过测试的方式来确定。